Table of Contents
- Who do I contact if I need help?
- What documentation is required for the different types of assets?
- How will I know if a supplier has submitted an asset for approval?
- I mistakenly approved an asset - How do I correct it?
- I received an asset submission email and I can’t see the submitted asset on the ChekRite App or ChekRite Portal - Where can I find it?
- I can’t see any of the assets that are pending or in review, I can only see the assets that have been approved - Where can I find the other assets?
- How do I order new or replacement site authority decals/stickers?
- A supplier is asking me the status of their asset - What can I tell them?
- What do the different project statuses mean for supplier assets?
- How do I get a copy of the Pre-Start Registration Poster if the project's lost it or needs a new one?
- I can't add users - How do I get my colleagues access to the CPB Contractors Digital Plant System?
- How do I get access to the CPB Contractors Digital Plant System?
- I have a new phone / tablet and my old pairing code is no longer valid how do get a new one?
- What if a supplier tells me that they can’t find a suitable Asset Class when they are trying to add a new asset?
- A supplier is trying to add a new asset, but they are saying the asset number already exists.
- Where can a supplier find their ChekRite App login Credentials?
- A suppliers’ pairing code has expired – How do they get another one?
CPB Project Guide
Updated
by Jordan Millar
- Who do I contact if I need help?
- What documentation is required for the different types of assets?
- How will I know if a supplier has submitted an asset for approval?
- I mistakenly approved an asset - How do I correct it?
- I received an asset submission email and I can’t see the submitted asset on the ChekRite App or ChekRite Portal - Where can I find it?
- I can’t see any of the assets that are pending or in review, I can only see the assets that have been approved - Where can I find the other assets?
- How do I order new or replacement site authority decals/stickers?
- A supplier is asking me the status of their asset - What can I tell them?
- What do the different project statuses mean for supplier assets?
- How do I get a copy of the Pre-Start Registration Poster if the project's lost it or needs a new one?
- I can't add users - How do I get my colleagues access to the CPB Contractors Digital Plant System?
- How do I get access to the CPB Contractors Digital Plant System?
- I have a new phone / tablet and my old pairing code is no longer valid how do get a new one?
- What if a supplier tells me that they can’t find a suitable Asset Class when they are trying to add a new asset?
- A supplier is trying to add a new asset, but they are saying the asset number already exists.
- Where can a supplier find their ChekRite App login Credentials?
- A suppliers’ pairing code has expired – How do they get another one?

Welcome to the CPB Contractors Digital Plant System Project Guide. This guide will take through the steps involved in the digital asset onboarding review and approval process. Completing the Approving an Asset for a Project section of this guide will enable you to get assets onboarded to your project effortlessly and safely.
Approving an Asset for a Project
To approve an asset for a project, assets must be onboarded to ensure that they have the capability to perform their intended purpose. The digital asset onboarding process will confirm, prior to acceptance and commencement of work on a project, that an asset is fit for purpose as per applicable legislation, associated standards, and manufacturer requirements.
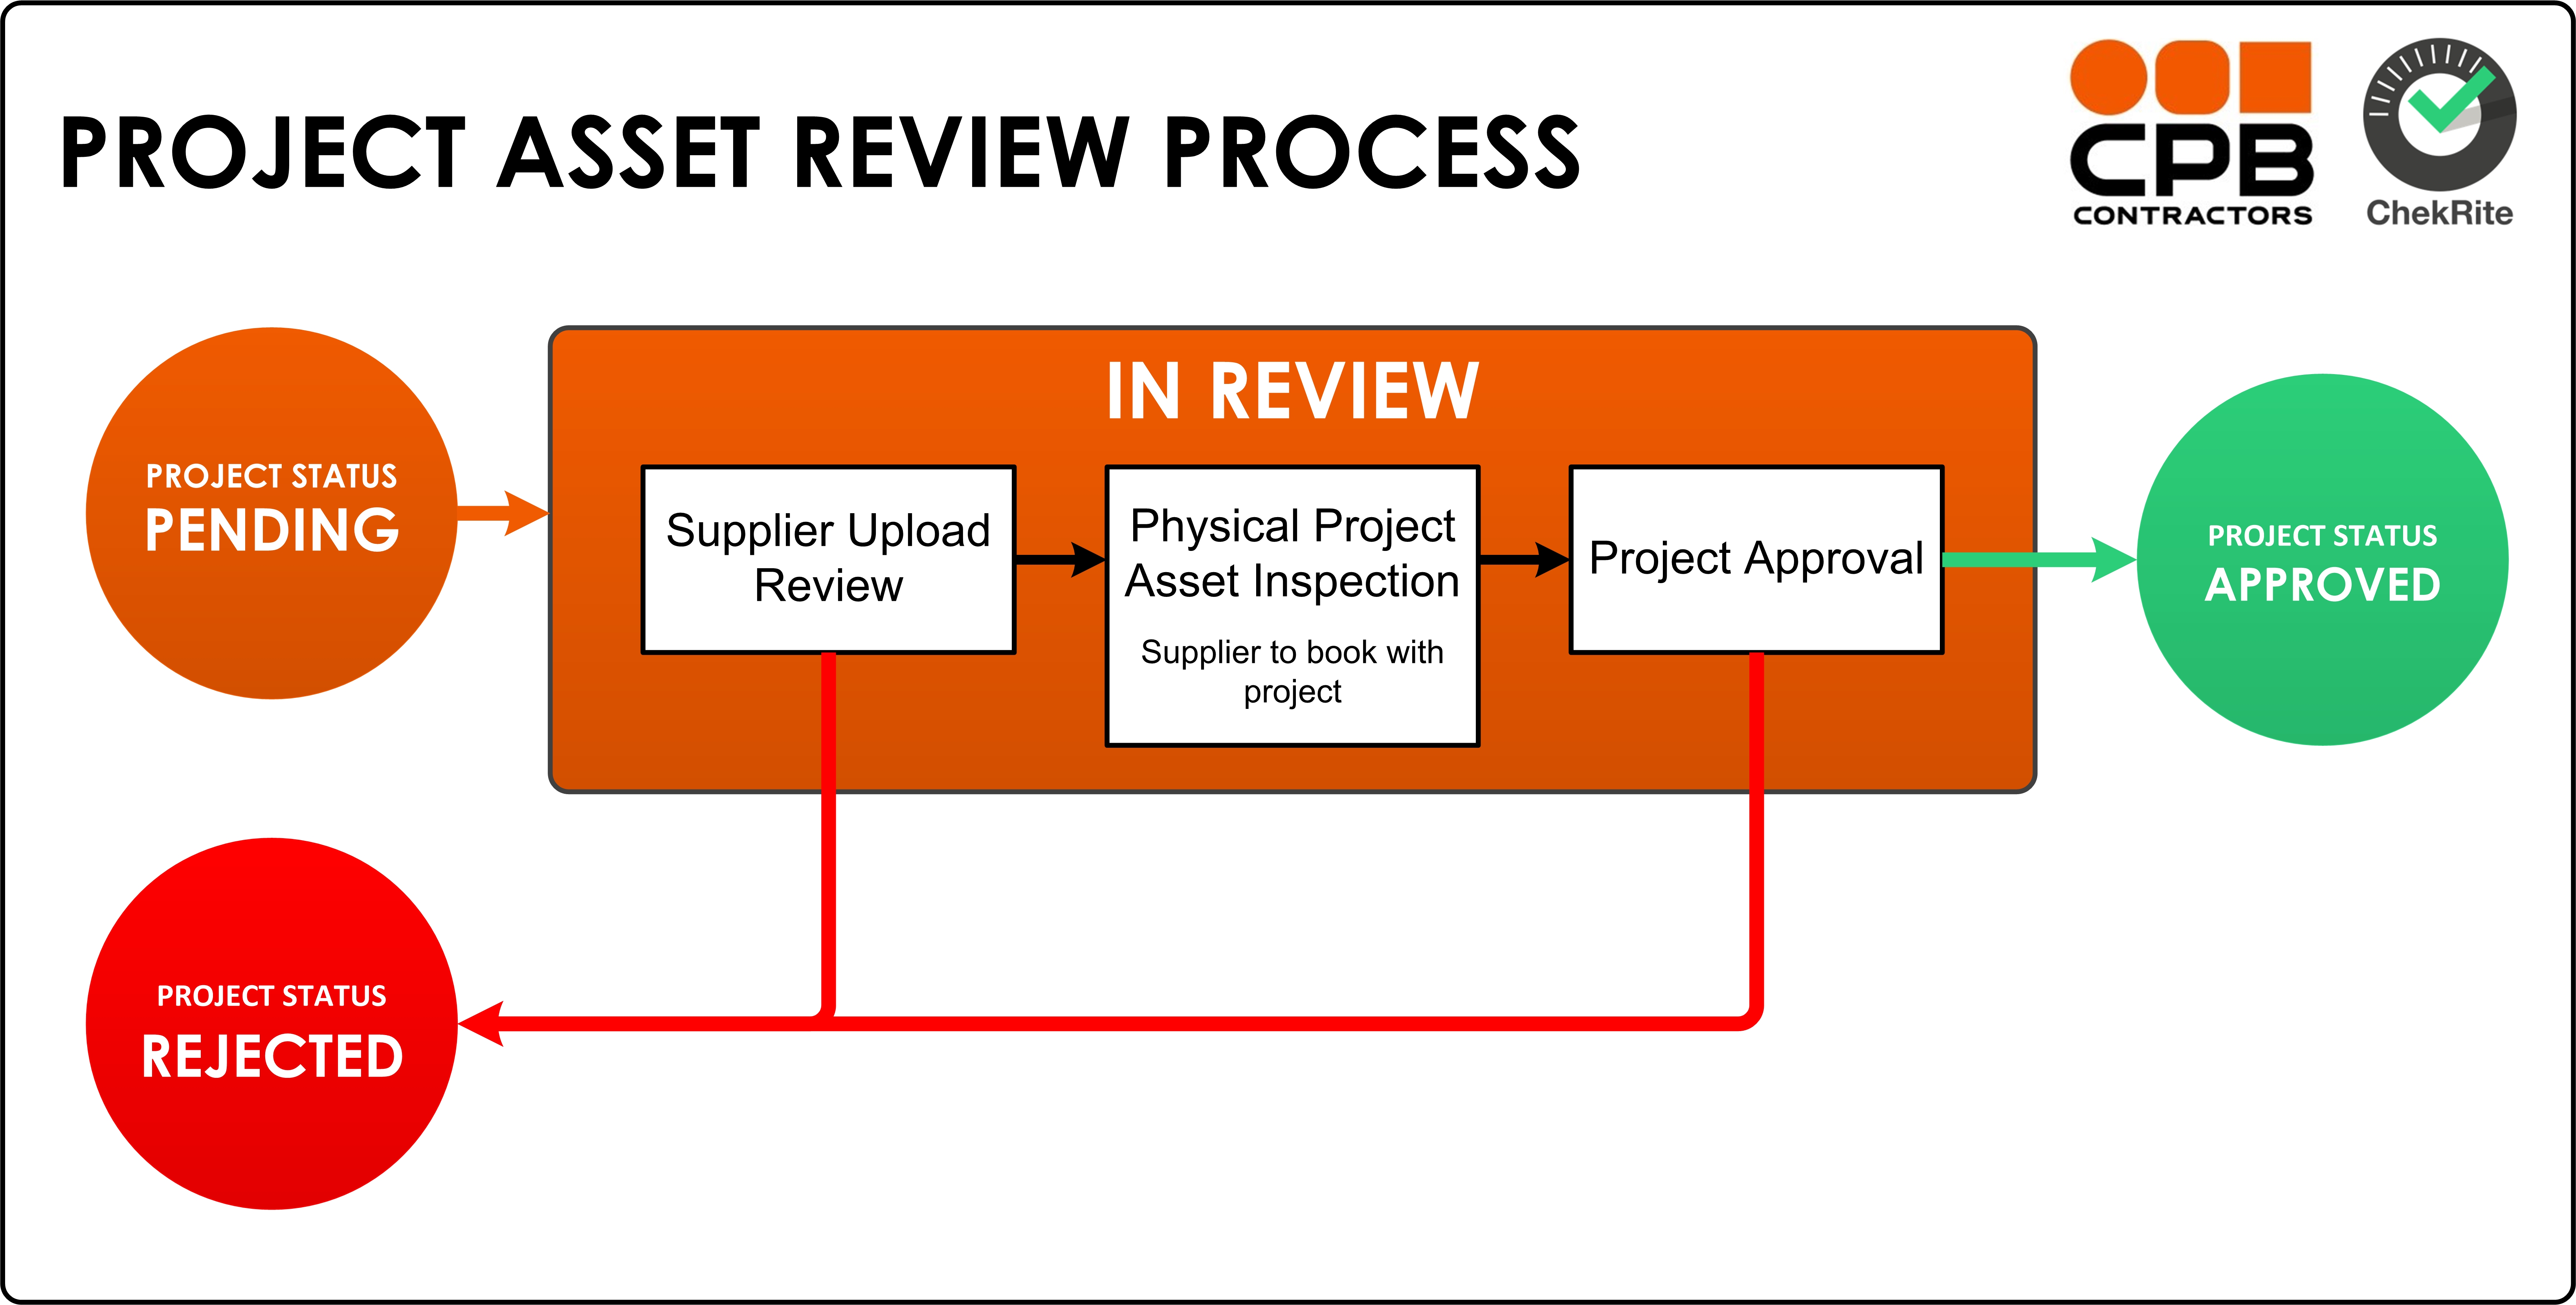
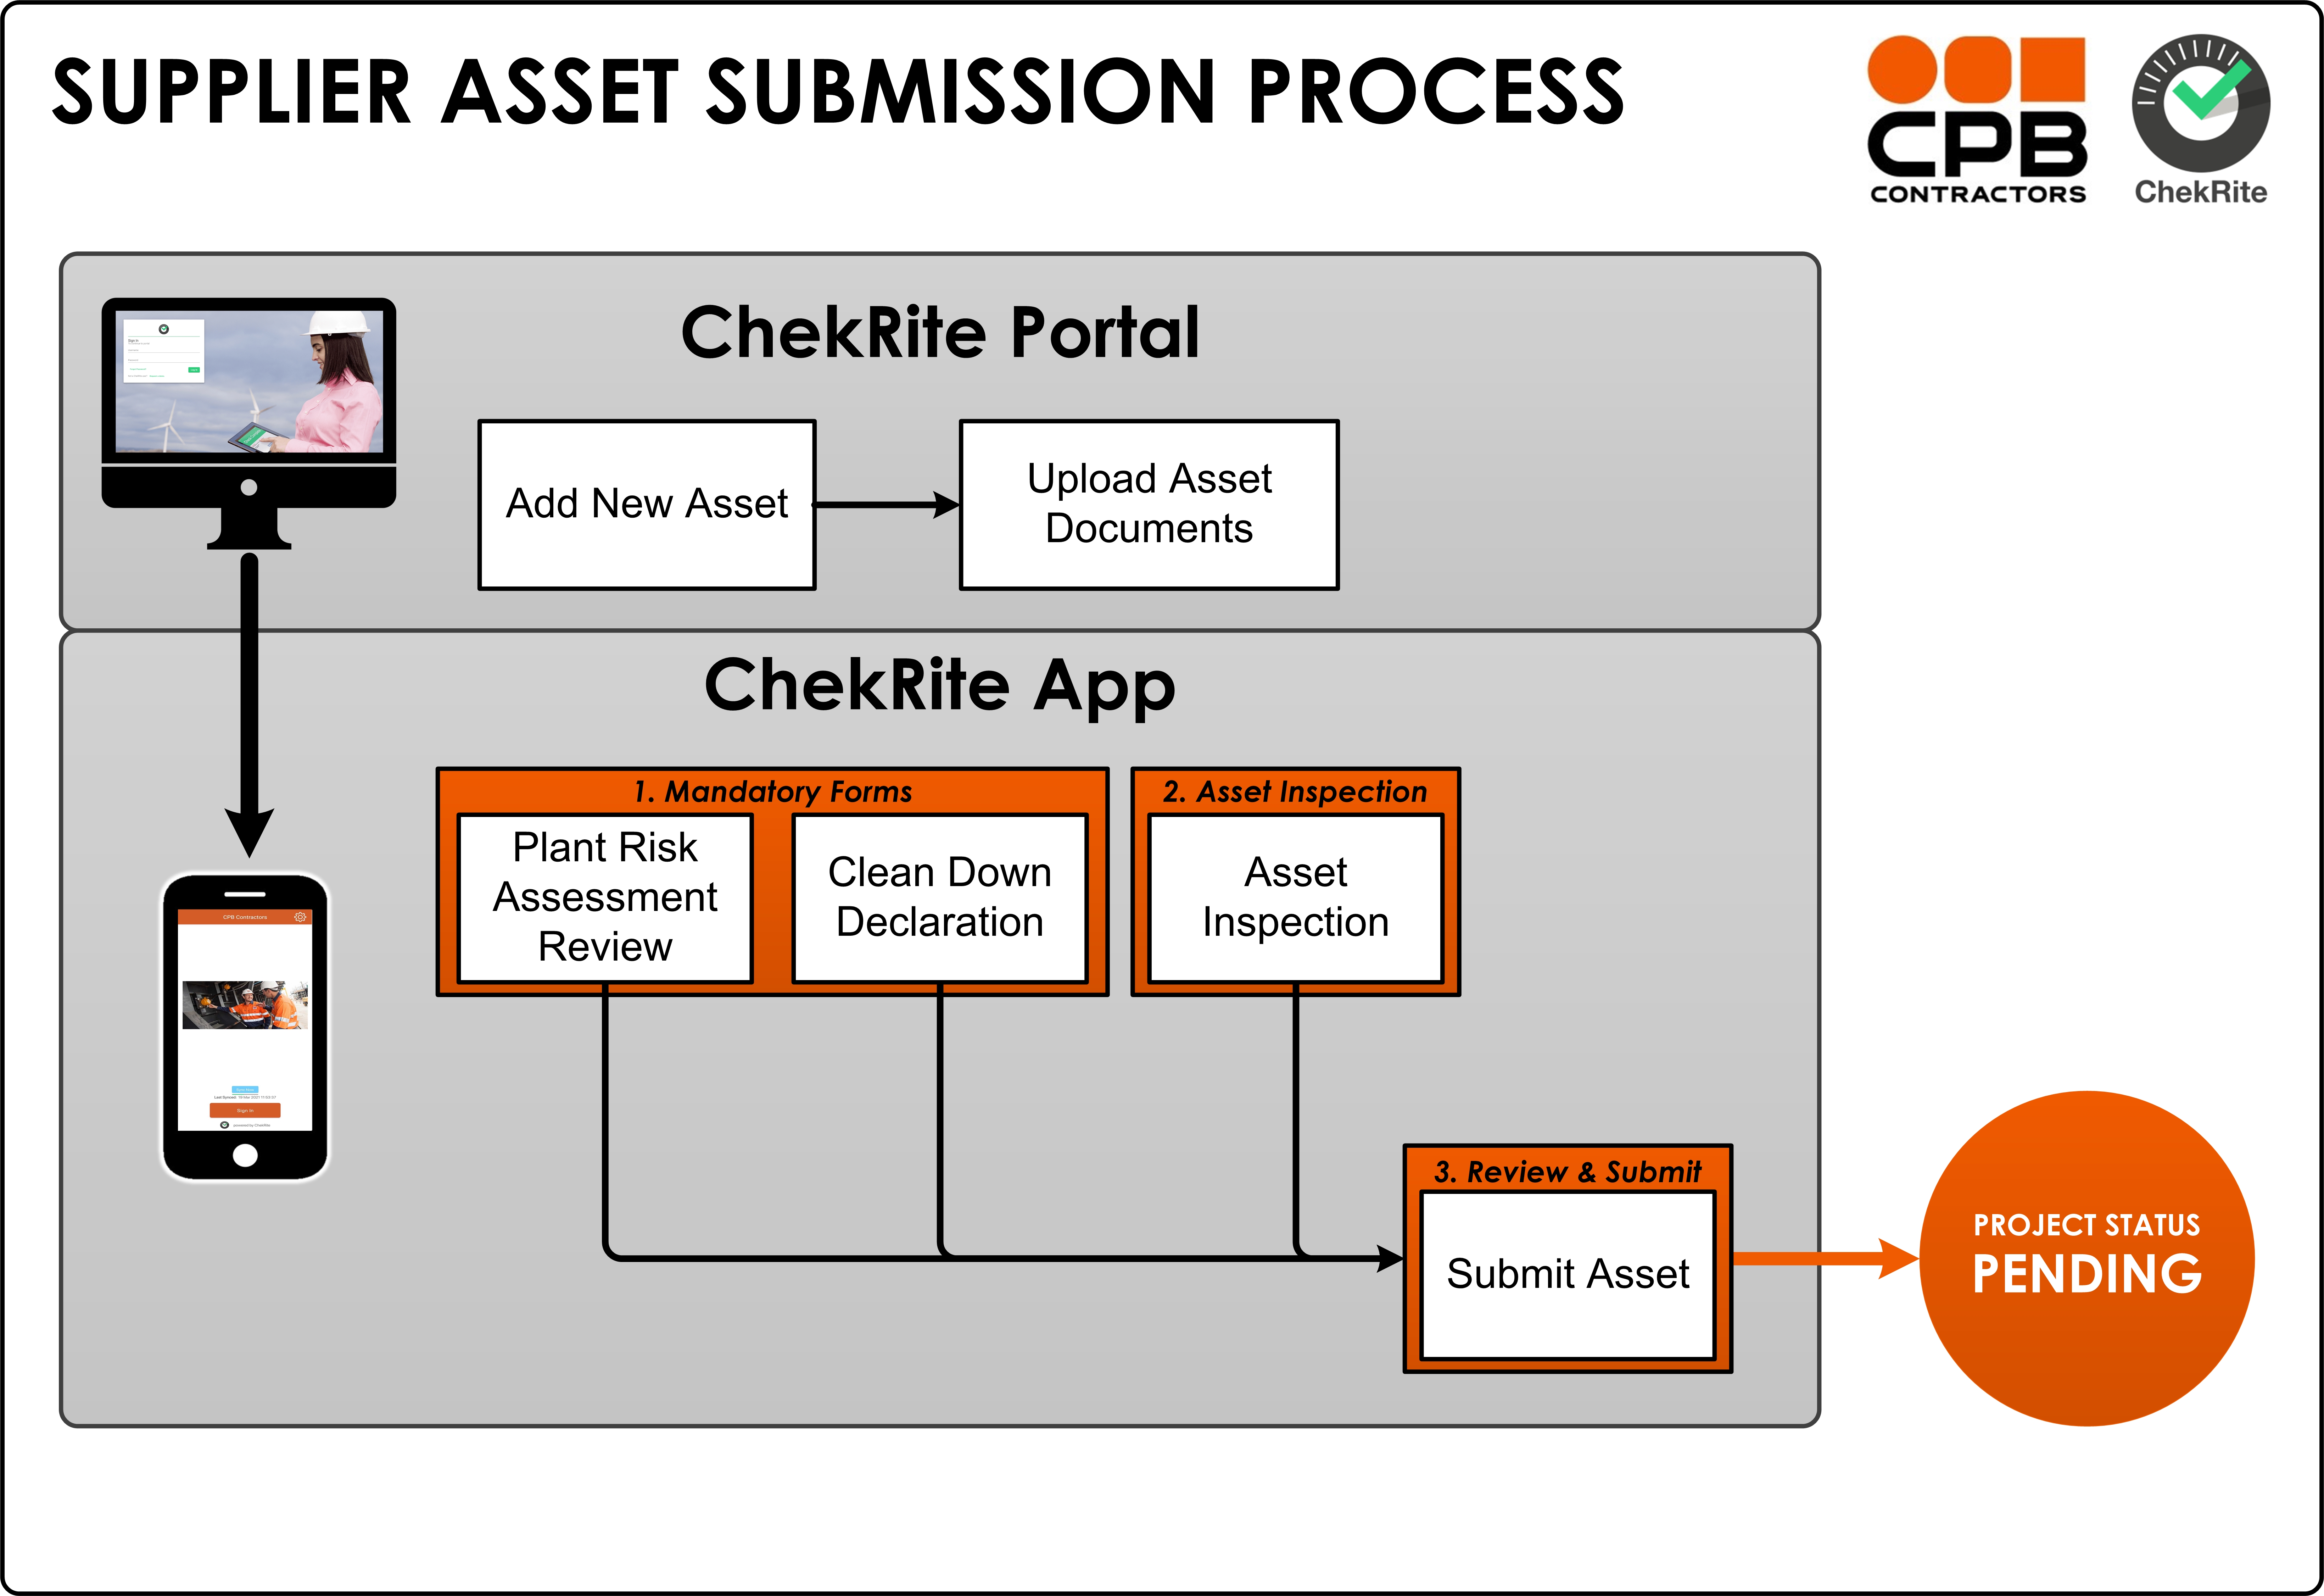
The below image outlines each step in the project review process and is a good visual reference to return to if you get stuck. There is also a reference to the supplier asset submission process which the supplier will have to go through with each asset, to give you a general understanding of this process.
What happens when a Supplier submits an Asset?
When a supplier submits an asset to a project, an email notification is sent to the nominated project plant admin contact. The email notification will contain details regarding the asset and its submission, as well as a link to the full report of the submission checklist.
The asset will now appear with a Pending project status for authorised project approvals users only. The asset will be visible with this status on the ChekRite Portal Asset Approvals page and the ChekRite App.
Asset Approvals
Any asset that has been submitted by a supplier, is currently in review, or has been approved or rejected will appear on the Asset Approvals page of the ChekRite Portal. As a project plant representative authorised to review, inspect, and approve supplier assets for your project, the Asset Approvals page is the primary place you will need to view and access. You will also be able to select assets and review documents and inspections from here as well.
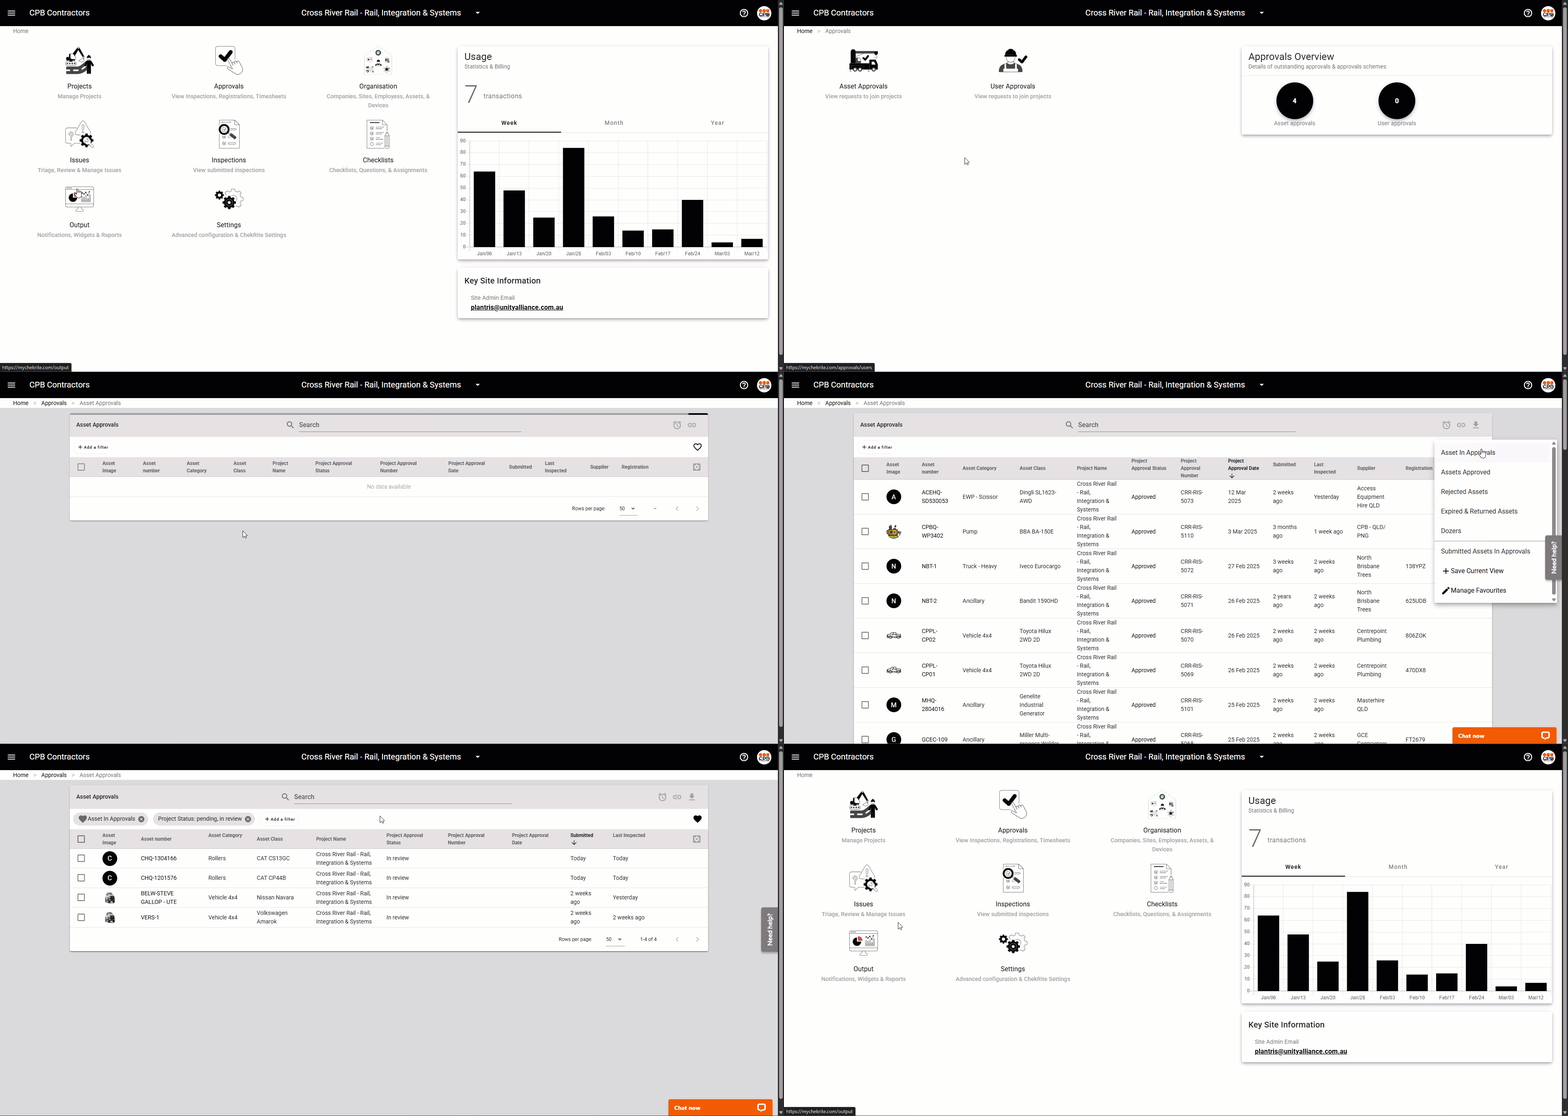
- Sign in to the ChekRite Portal (mychekrite.com)
- Go to Approvals > Asset Approvals.
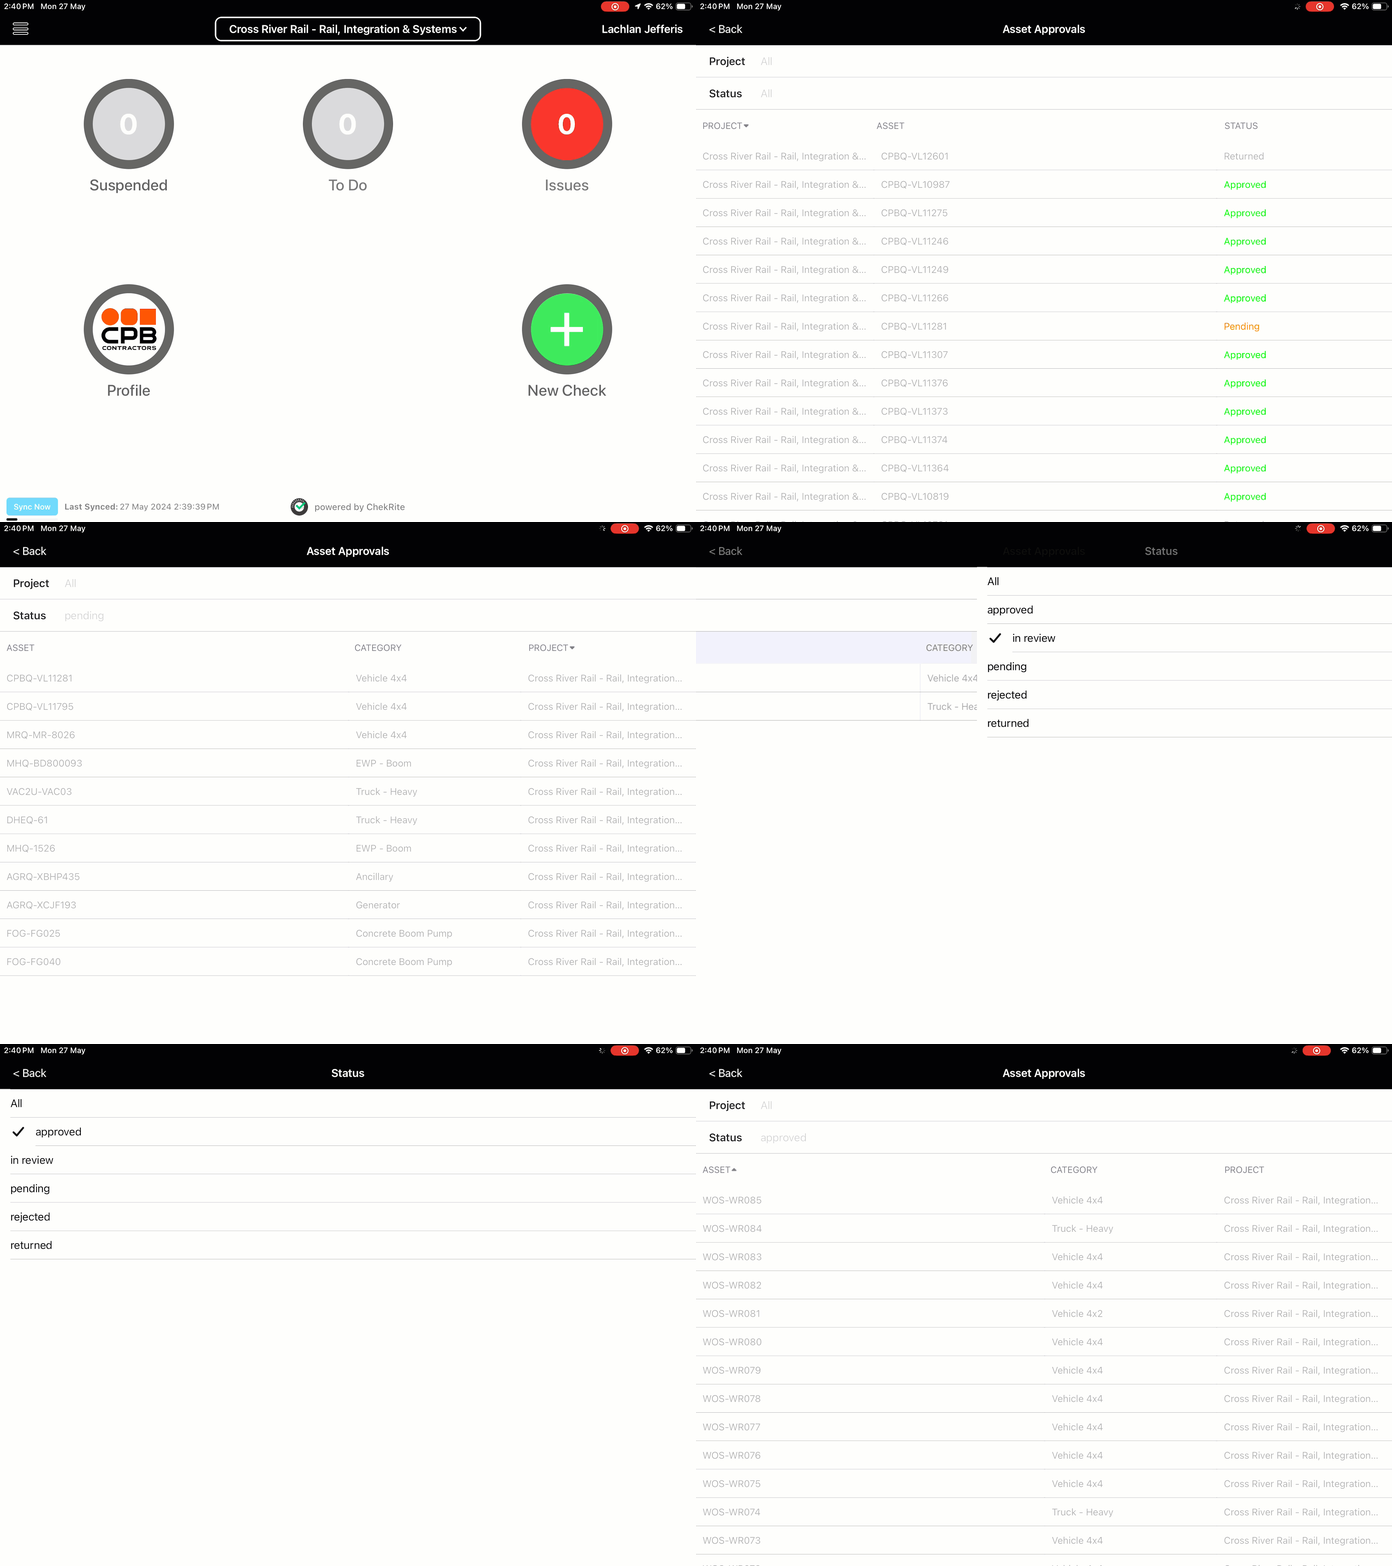
- Apply the Assets In Approvals favourite by clicking on the heart icon in the top right corner. This will only show assets that have a Pending or In Review status:
You may also check Asset Approvals directly from the ChekRite App:
- Sign In to the ChekRite App.
- Open the hamburger menu (click on the icon in the upper left corner).
- Under Reports click on Asset Approval.
- You may sort by Asset (asset number) and Status. You may also apply filters on the Project Status to only show one of Pending, In Review, Approved, Rejected, or Returned, or on individual Projects, to see which assets you have assigned to which projects.
Reviewing Asset Submissions
Each asset that is submitted to a project needs to be reviewed by an authorised project plant representative to confirm that the asset has the capability to perform the intended purpose, and to ensure that what the supplier has declared in their submission is true and accurate.
Asset submissions can be reviewed from the ChekRite Portal or the ChekRite App. From the ChekRite Portal, all assets that are in the approvals process will appear on the Approvals page. Assets that appear there may have either one of the following project statuses - Pending, In Review, Approved, Rejected. Authorised project approval users will be able to review asset documents that have been uploaded and checklists that have been performed by the supplier.
Asset Documents
Documents that have been uploaded against the asset will need to be reviewed so that they can be verified. An example of these documents are registration certificates, Plant Risk Assessments and 12 Months maintenance and service history:
Some asset classes, particularly high-risk assets, will require further documentation to be uploaded. A list of documents required by asset category can be found here:
Documents Required by Asset Category
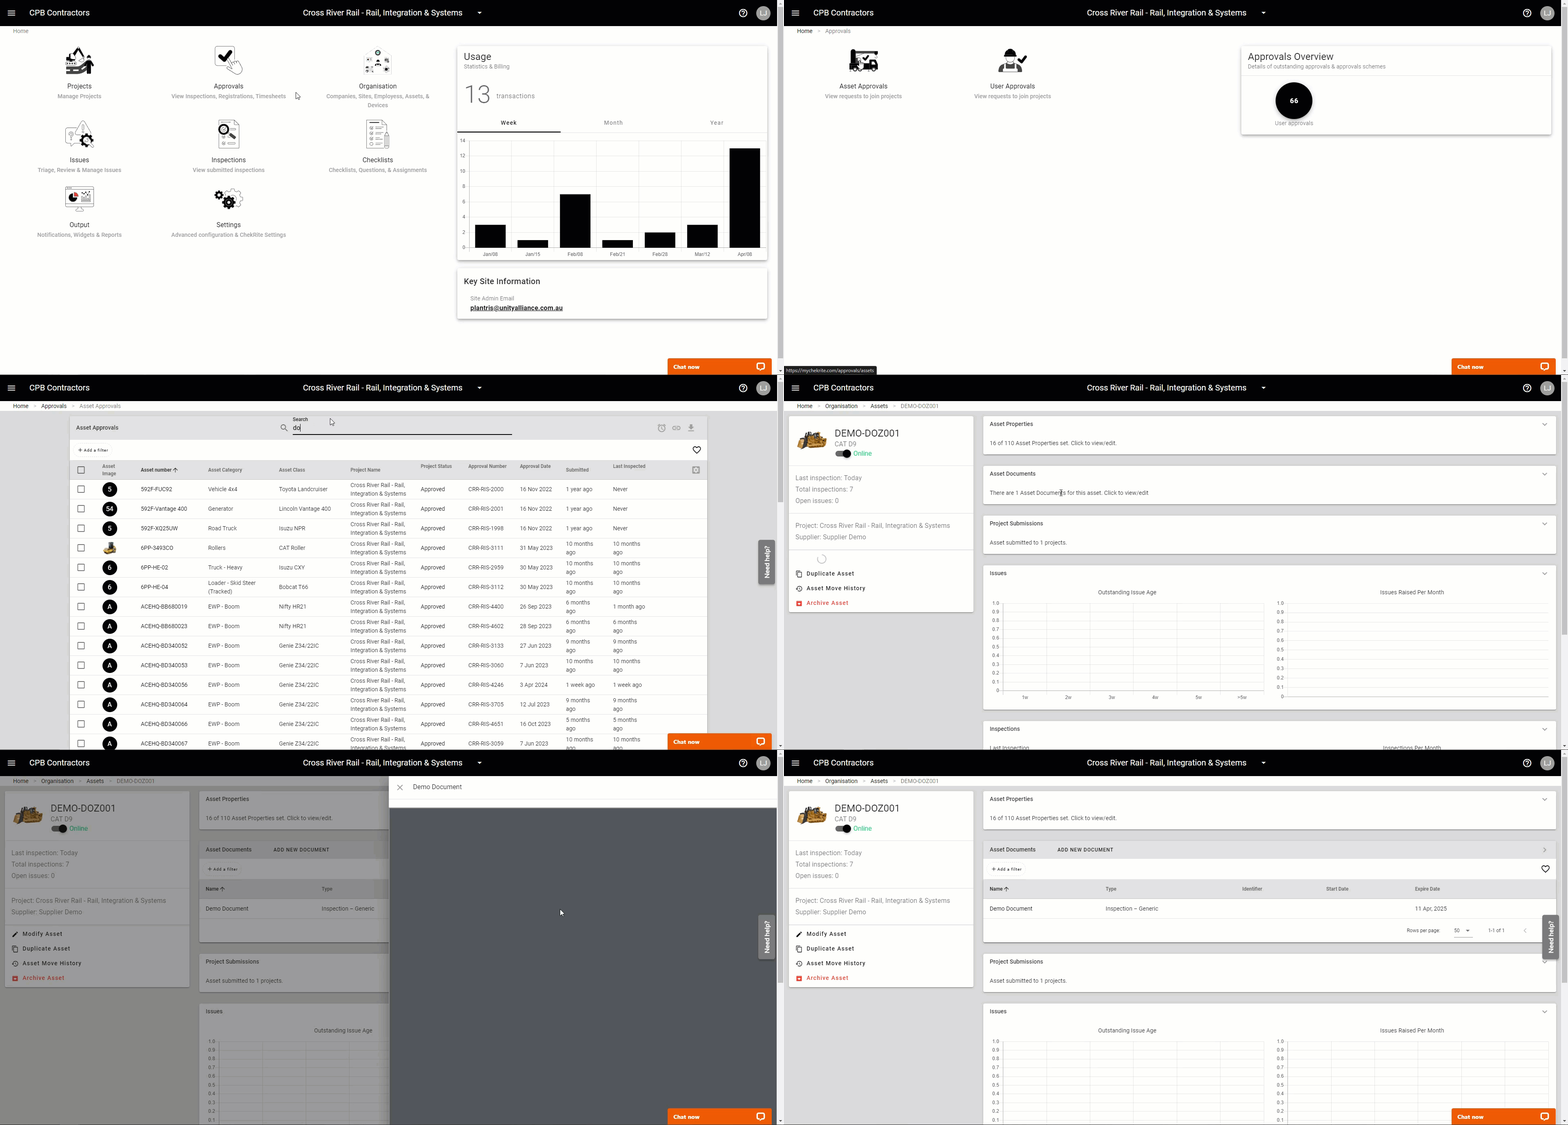
You can review asset documents by selecting the asset from the Approvals page on the ChekRite Portal, OR directly from the ChekRite App on your device.
ChekRite Portal:
- Go to Approvals > Asset Approvals > Find and select the asset.
- Click on the Asset Documents tab.
- Click on the document to review the details and attachments, or hover over and select Attachment to view the attachment directly.
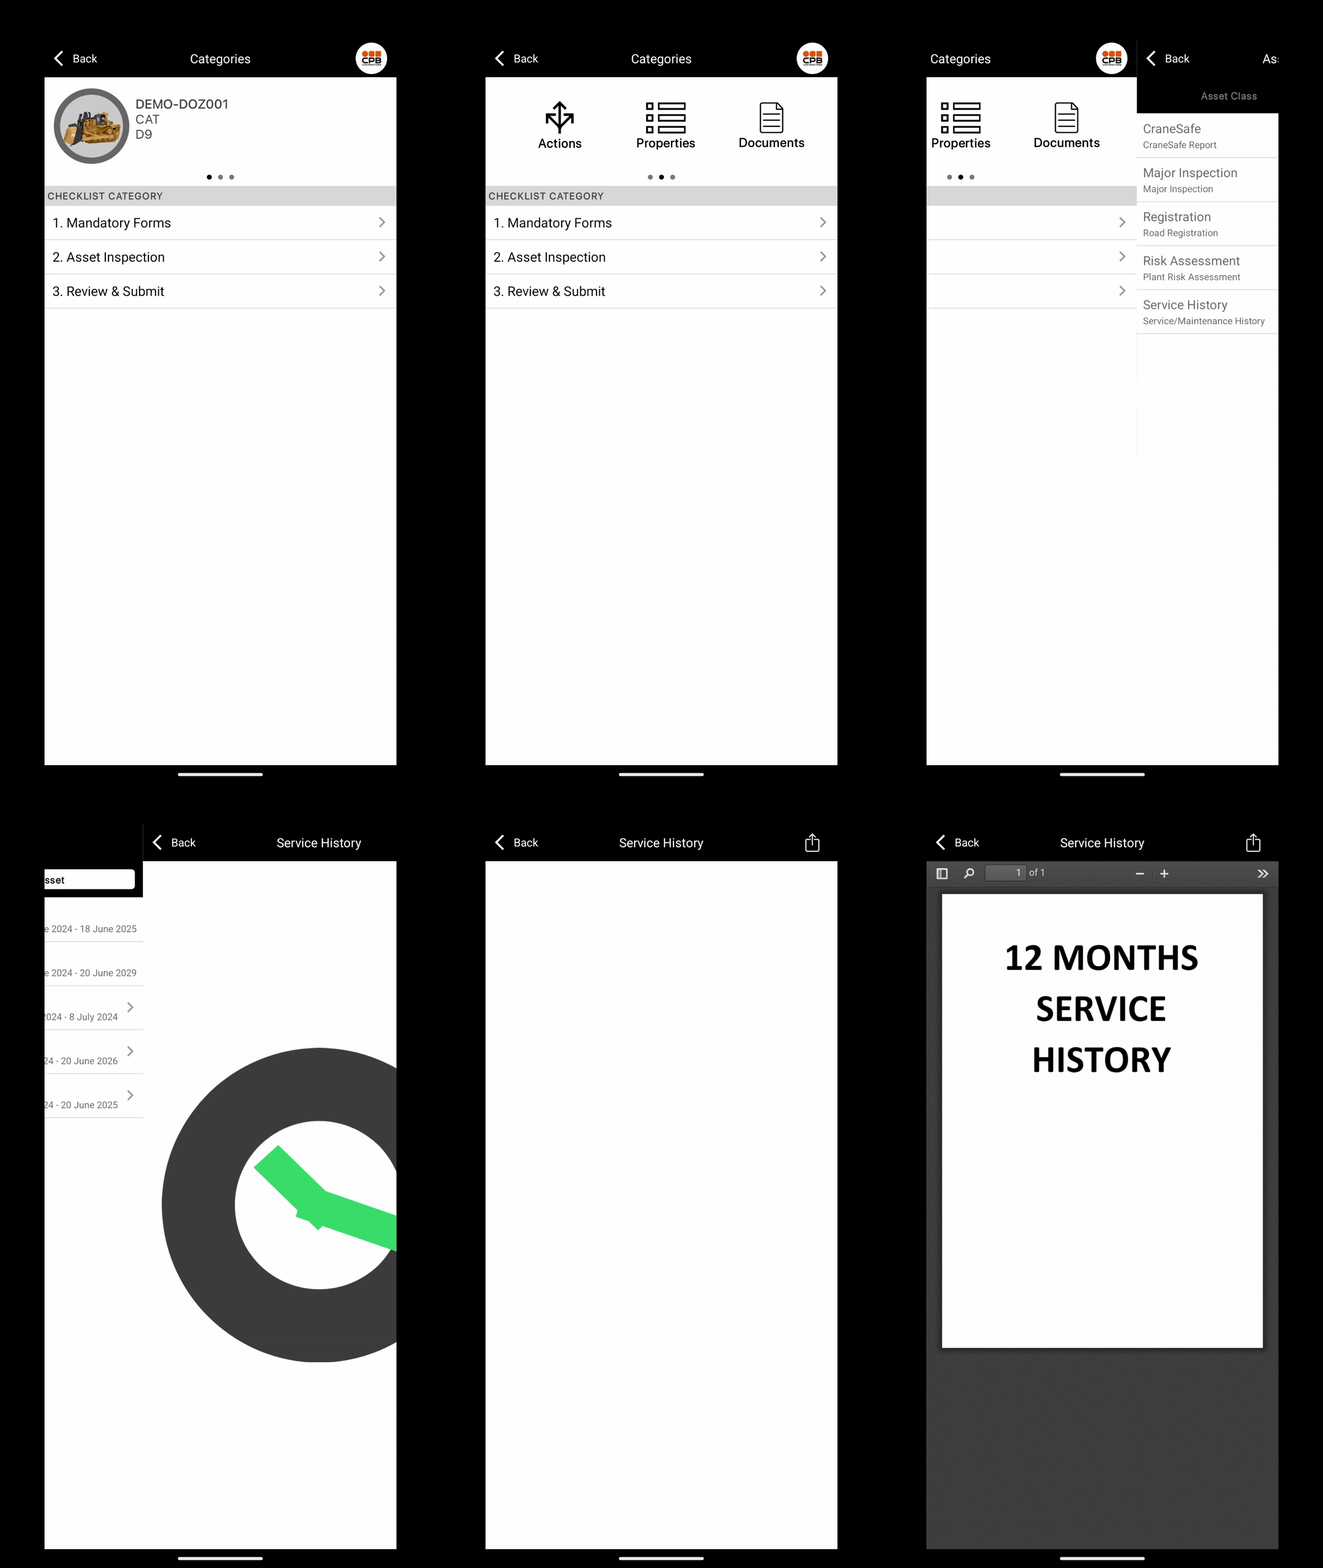
ChekRite App:
- Sign In to the ChekRite App.
- Select New Check and navigate to or search for the asset.You can search for an asset via it's asset number
- Select the Documents icon, if you are on a phone you may need to swipe across where the asset is displayed at the top of the screen.
- Select the Asset tab, and select the document to view.
Asset Document Expiry
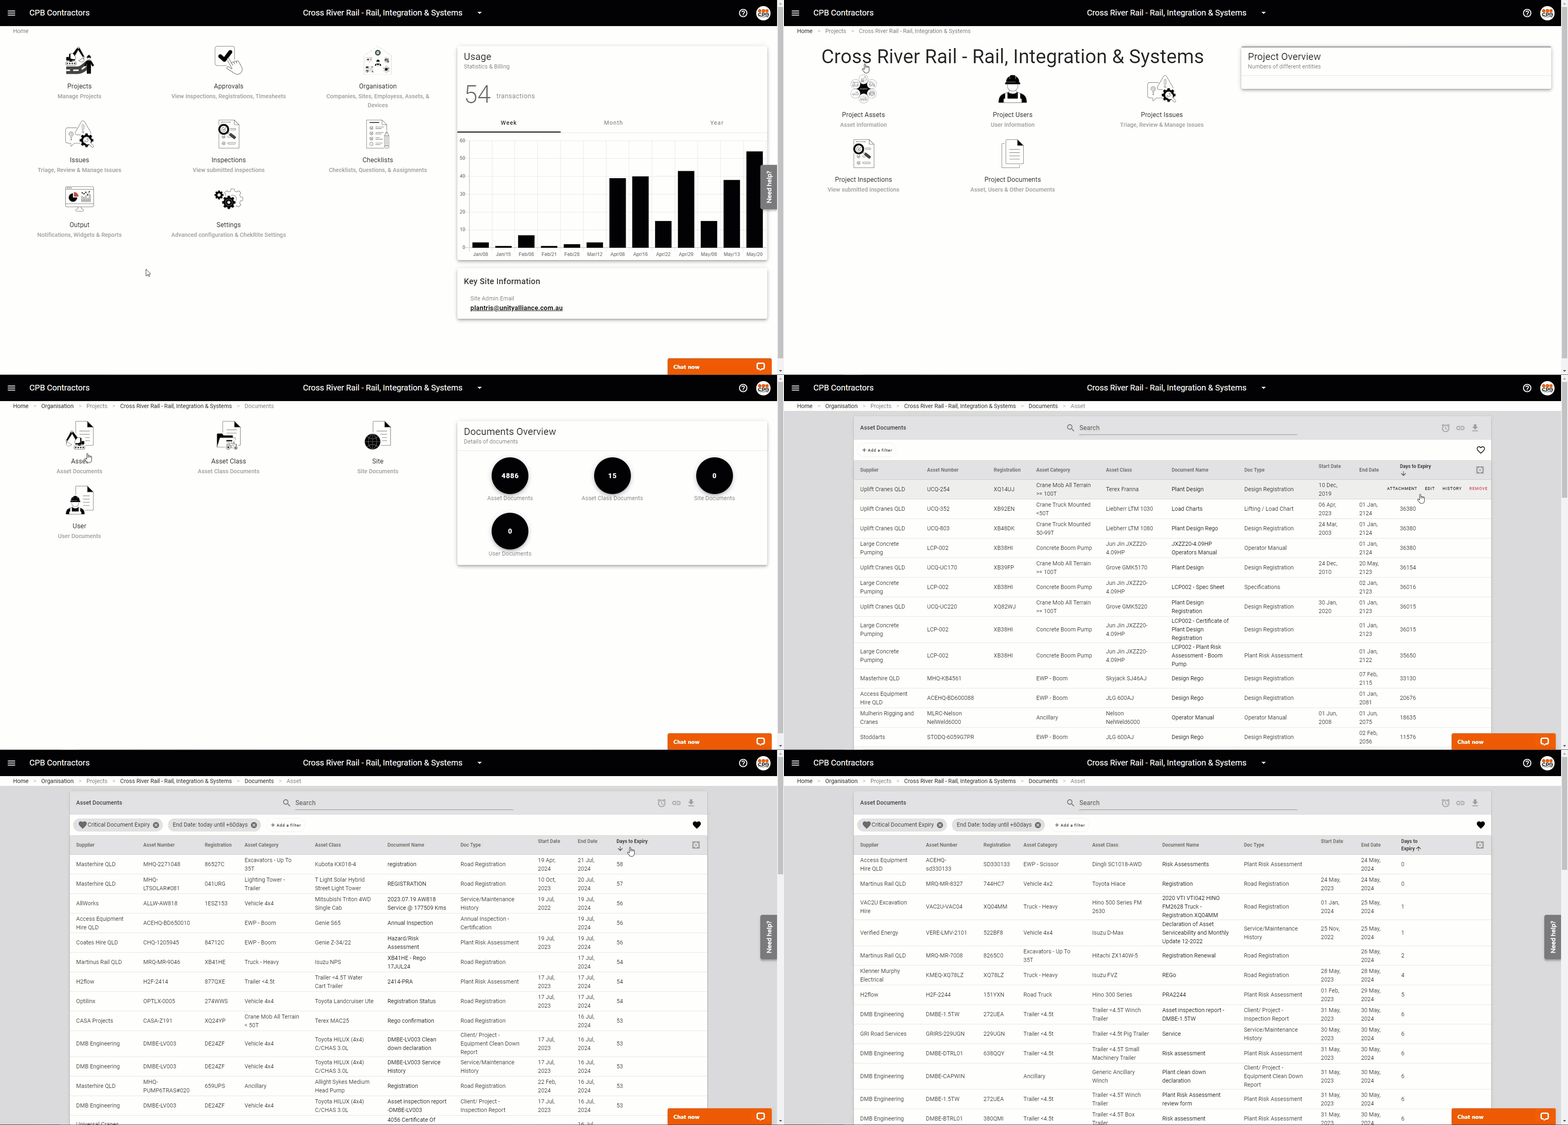
Mandatory asset documents need to be reviewed regularly to ensure that information is current and up to date, and to maintain ongoing approval with a project. Documents need to be updated before they expire. You can see documents that are about to expire for supplier's project approved assets from the Project Asset Documents page of the ChekRite Portal.
The supplier will also be sent an email notifying them when documents are close to expiring. When suppliers are updating documents you should verify the updated document to ensure that it matches the information that was updated.
Failure to update asset documents will revoke the project approval the asset has, and the asset will not be allowed to continue working on the project until the relevant documents are updated and the asset resubmitted.
To review expiring asset documents:
- Sign in to the ChekRite Portal (mychekrite.com)
- Go to Projects > Project Documents > Asset.
- Ensure you have the favourite view called Critical Documents Expiring enabled. Click on the heart symbol to select favourite views.
- You can sort the Days to Expiry column so that documents that are due to expire sooner appear at the top of the list.
- You can then hover over the document and click Attachment to verify the attachment, and History to see the change history of the document.
Asset Checklists
Checklists that have been completed for the asset will need to be reviewed to verify the details of the asset as well as confirm that it meets project requirements. The checklists that need to be reviewed are:
- Plant Risk Assessment Review
- Plant & Equipment Clean Down Declaration
- Asset Inspection
- Submit Asset
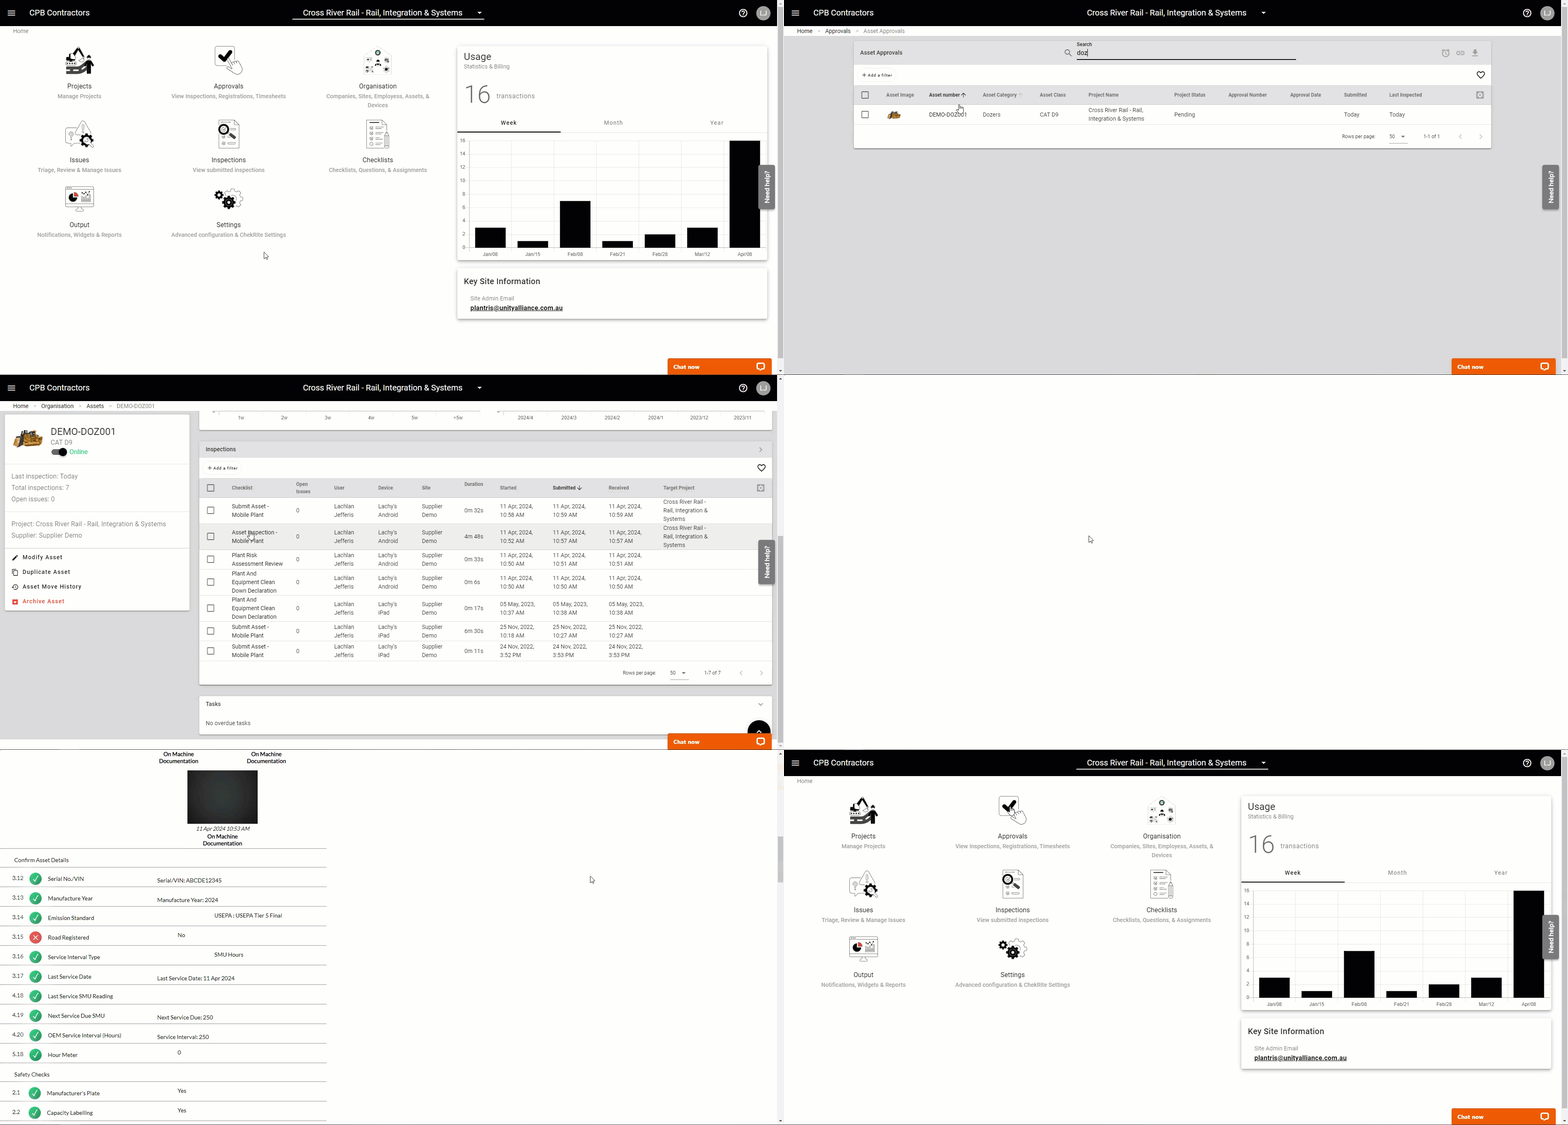
You can review asset checklists by selecting the asset from the Approvals page on the ChekRite Portal, OR directly from the ChekRite App on your device.
ChekRite Portal:
- Sign in to the ChekRite Portal (mychekrite.com)
- Go to Approvals > Asset Approvals > Find and select the asset.
- Click on the Inspections tab.
- Find and select the relevant inspection, you can sort by Submitted date to find the most recent.
- By default, the inspection will show failed questions or questions that have extra info recorded (e.g. photos, serial numbers etc.). To view all questions check the All Questions box.
- To view an online version of the inspection in a separate browser tab click on Online Inspection.
- To download a copy of the report click on Generate PDF from the Online Inspection window.
ChekRite App:
- Sign In to the ChekRite App.
- Select New Check and navigate to or search for the asset.
- Select the Actions icon, if you are on a phone you may need to swipe across where the asset is displayed at the top of the screen.
- Select the History tab, and select the inspection record to view.
Review and Approvals Checklists
The following checklists will need to be completed using the ChekRite App to validate that what the supplier has submitted is true and accurate and that the asset meets project requirements.
Supplier Upload Review
Complete this review on the ChekRite App on your mobile device. This review is completed to qualify an asset for a physical project asset inspection, ensuring that the mandatory documentation has been uploaded and the prerequisite checklists have been completed.
- Log in to the ChekRite App.
- Select New Check and navigate to the asset by searching or scanning.
- Select Checklist Category 1. Supplier Document & Checklist Review.
- Select the Supplier Upload Review checklist.
- Follow the prompts to complete this check.
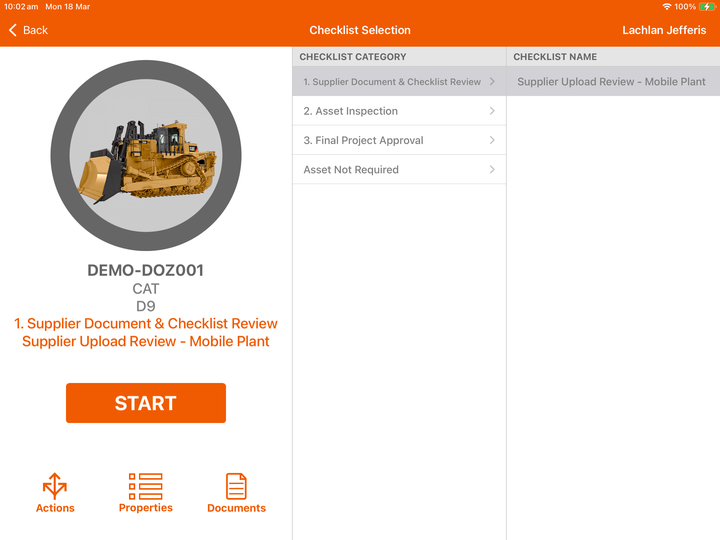
If mandatory documentation is missing or is incorrect, or prerequisite checklists have not been completed or have been completed incorrectly, the asset will not qualify for a physical project asset inspection, and the submission will have to be rejected. Refer to the Rejecting Assets section of this guide for more information.
Asset Inspection
If an asset submission is accepted, the supplier and/or authorised project plant representative will need to schedule a time and location to physically inspect the asset.
An asset inspection specific to the plant / equipment type is required to be completed to verify the item is safe for operation as per what the supplier has submitted and declared.
The project asset inspection is identical to the supplier asset inspection and will be preassigned to the asset based on the class (Make & Model). E.g, a CAT 325 excavator will only see a Mobile Plant Asset Inspection; a Franna MAC25 a Mobile Crane Asset Inspection. The inspection must be physically performed in the presence of the asset by an authorised plant representative using the ChekRite App:
- Log in to the ChekRite app.
- Select New Check and navigate to the asset by searching or scanning.
- Select Checklist Category 2. Asset Inspection.
- Select the Asset Inspection checklist.
- Follow the prompts to complete this checklist.
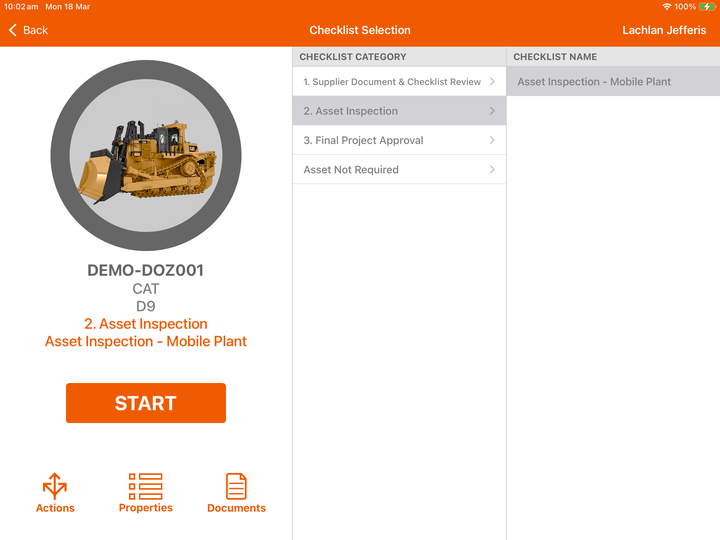
If an asset fails any of the inspection or checklist criteria, the supplier asset inspection is false or inaccurate and does not meet project standards, the asset will have to be rejected. This is done through the Project Approval checklist. Refer to the Rejecting Assets section of this guide for more information.
Project Approval
This is the final step performed to approve an asset for project use and may be completed immediately after completing the project asset inspection. You will need to briefly review and confirm that the Supplier Upload Review and Asset Inspection checklists have been completed to an acceptable standard and verify that the supplier has satisfied all requirements. The final submission check must be performed using the ChekRite App.
- Log in to the ChekRite App.
- Select New Check and navigate to the asset by searching or scanning.
- Select Checklist Category 3. Final Project Approval.
- Select the Project Approval checklist.
- Follow the prompts to complete this check.
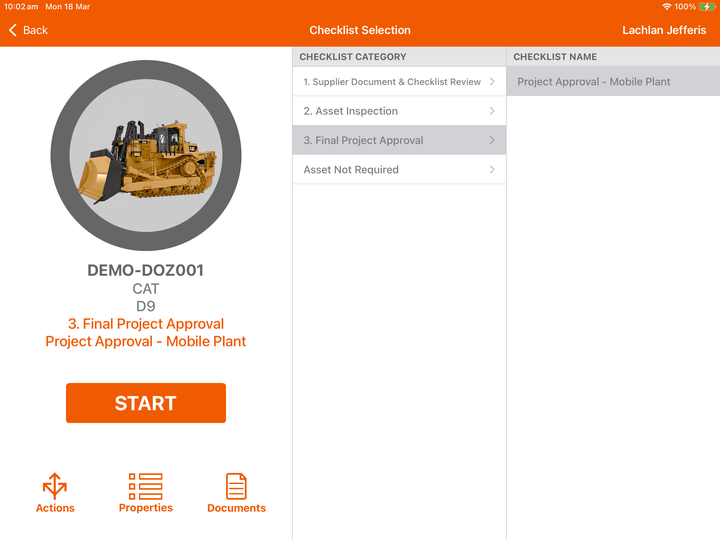
If an asset does not meet project standards, the asset will have to be rejected. Refer to the Rejecting Assets section of this guide for more information.
Rejecting Assets
If items are missing from an asset submission or there are issues identified during the physical inspection, the asset will need to be rejected. When you reject an asset, ensure that you provide as much, clear information to the supplier as possible to allow them to triage issues easier. This is best achieved by providing an audio message or voice note when prompted when an asset is failed in the Supplier Upload Review or Project Approval checklists.
The suppliers nominated administrator will receive an email notifying them that their asset has been rejected, and the project status will change to Rejected. The email will contain an exception report listing any issues that would have been raised in either the Supplier Upload Review or Project Approval checklists.
When the issues have been rectified the supplier will have to resubmit the asset by completing the Submit Asset checklist. You will receive another asset submission notification and the asset will have to be reviewed following the project review process. The project status will return to Pending when it is resubmitted by the supplier.
What Happens Next?
If the asset passes all project standards it can be approved for use on the project and you may assign and fit a site authority decal/sticker to which a project Approval Number will be allocated. When the asset is approved the project status will change to Approved and the suppliers nominated administrator will receive an email notification advising them that the asset has been approved for use on the project.
Project Assets
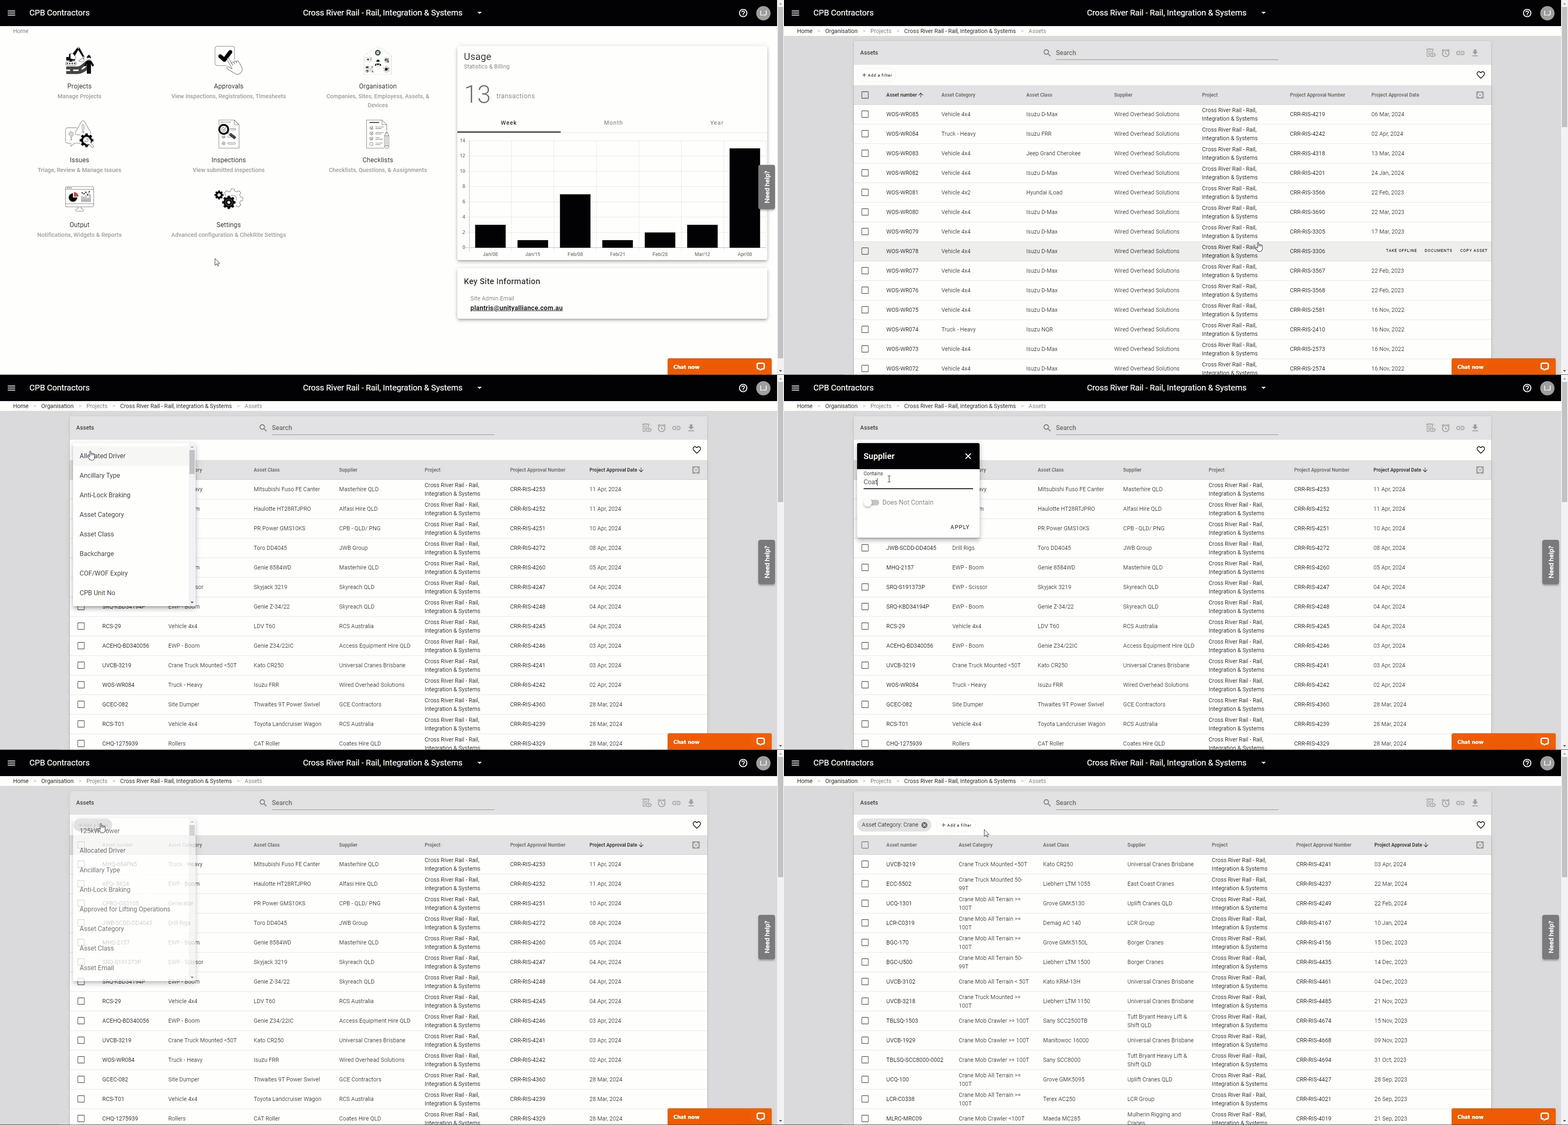
While approved project assets will appear on the Asset Approvals page, a comprehensive list of Project Assets will appear on the Project Assets page. Here is where only assets which have been approved for the project will appear.
- Go to Projects > Project Assets
- You can sort by Project Approval Date to see which assets have been approved most recently.
- You may also search for particular asset via the asset number, or apply and save a custom filter if you only want to see assets for a particular supplier or even if you want to see what cranes have been approved.
Supplementary Checklists
The following checklists are supplementary to the Review and Approvals Checklists and are not required as part of the process of onboarding a supplier’s asset. These checklists may be required if you need to capture new or missing details that were not captured during the supplier submission or project review processes, or may form part of additional inspection and testing requirements for the ongoing management of project approved assets. The checklists must be performed on the ChekRite App and may only be visible to either authorised project approvals users or authorised project users, depending on the checklist.
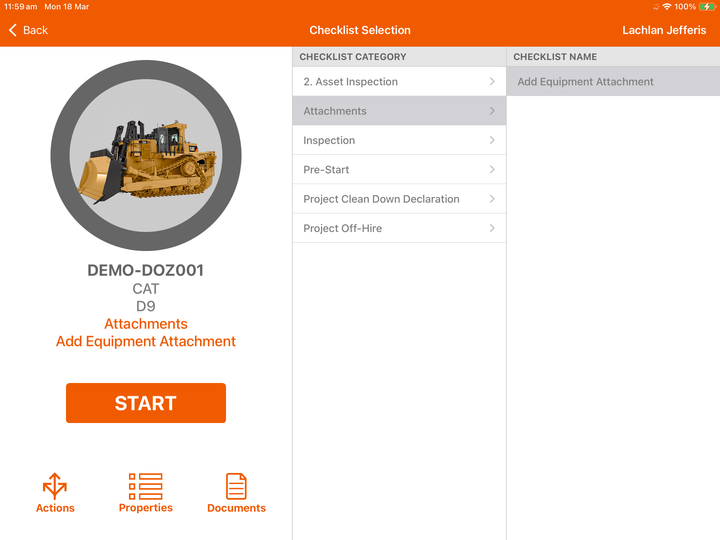
Add Equipment Attachment Checklist
If additional equipment attachments are required to be added to an approved machine, the Add Equipment Attachment checklist will need to be completed when requested by the supplier. The attachment may need to be physically inspected by an authorised project plant representative while facilitating this checklist using the ChekRite App.
- Log in to the ChekRite App.
- Select New Check and navigate to the asset by searching or scanning
- Select Checklist Category Attachments.
- Select the Add Equipment Attachment checklist.
- Follow the prompts to complete this check.
Project Clean Down Declaration
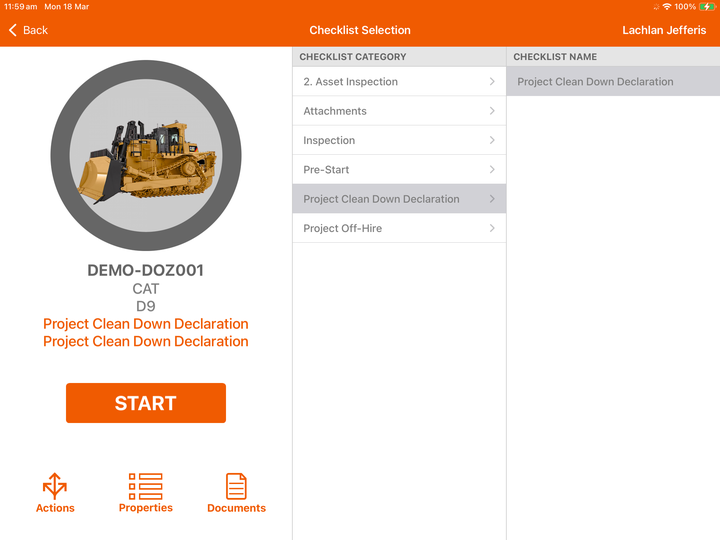
Depending on project/ client requirements you may be required to complete a Plant & Equipment Clean Down Declaration while an approved asset is working onsite (e.g. remobilising to another work zone). To aid with this there is a Clean Down Checklist available for completion for Authorised Project Users.
- Log in to the ChekRite App.
- Select New Check and navigate to the asset by searching or scanning.
- Select Checklist Category Project Clean Down Declaration.
- Select the Project Clean Down Declaration checklist.
- Follow the prompts to complete this check.
Site Authority Number Allocation
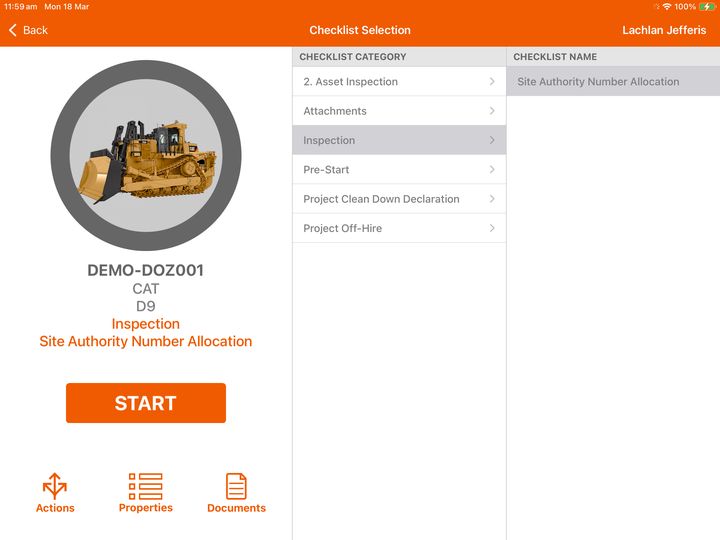
If a site authority decal goes missing/ is damaged or requires replacement you may complete this checklist to reallocate the Approval Number to the new decal.
- Log in to the ChekRite app.
- Select New Check and navigate to the asset by searching or scanning.
- Select Checklist Category Inspection.
- Select the Site Authority Number Allocation checklist.
- Follow the prompts to complete this check.
Plant Emissions Test
A plant emission test may need to be completed, and will only appear if you are working on an underground or tunnelling project.
- Log in to the ChekRite App.
- Select New Check and navigate to the asset by searching or scanning.
- Select Checklist Category Inspection & Test.
- Select the Plant Emissions Test checklist.
- Follow the prompts to complete this check.
Off-Hiring Assets
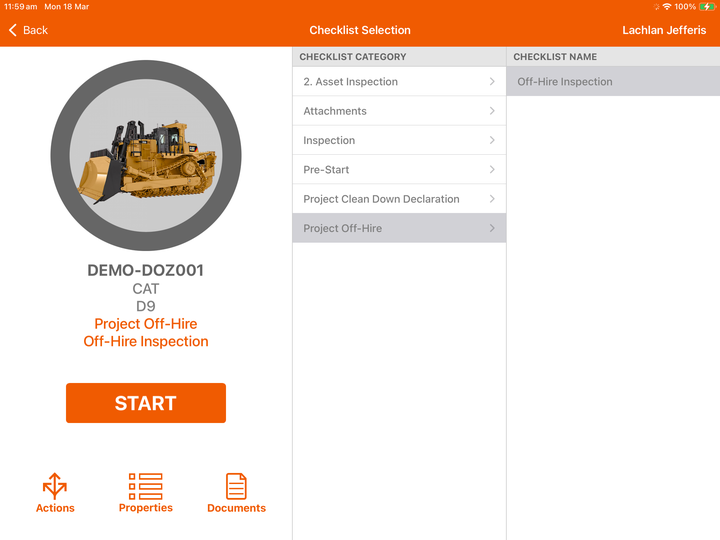
When an asset has finished on a project it should be off-hired to capture information at the time of off-hire (e.g. SMU reading / off-hire date). An asset can be off-hired by completing the Off-Hire Inspection checklist on the ChekRite App. When an asset is off-hired it's project status will change to Returned.
- Log in to the ChekRite app.
- Select New Check and navigate to the asset by searching or scanning.
- Select Checklist Category Project Off-Hire.
- Select the Off-Hire Inspection checklist.
- Follow the prompts to complete this check.
Digital Pre-Starts
If your project has elected for Digital Pre-starts using the CPB Contractors Digital Plant System powered by ChekRite, all Project Approved assets operating on the project will need to undergo a daily pre-start inspection. To get a brief overview of the Digtial Pre-Start process check out the Pre-Start Overview video below:
A pre-start inspection will need to be performed on each asset daily:
- Prior to use at the start of each shift, or
- Before commencing work, if a pre-start has not been completed for that shift already.
It is the responsibility of the operator to perform a pre-start to ensure the asset they are operating is in full working order, and to identify and report any faults or defects. It is the responsibility of the project to ensure operator's are pre-starting their machines, and that any defects identified are reported, and appropriate action undertaken to rectify.
Refer to the CPB Operator Pre-Start Guide to review the process for registering operator's on your project to perform pre-starts, and performing pre-starts using the ChekRite App.
Your project will have been issued a Pre-Start Registration Poster when electing to use digital pre-starts, if you have lost it or need another copy refer to the FAQs.
Managing Defects
A defect, or Issue is an item that has been marked as failed on a checklist that will need to be resolved. Issues allow projects and suppliers to keep a full audit history of issues that were raised for an asset and how the issues were resolved.
If when a pre-start inspection is performed and a defect is identified by the operator either failing or answering no to one of the checklist questions, that checklist item will flag as an issue.
Items are weighted and the outcome of the pre-start is classified according to how serious an issue might be considered and what immediate action needs to be taken with the asset.
Defect Classification | Operator Prompt | Action |
Critical Defects | Do Not Operate | Asset MUST NOT BE OPERATED. Arrange immediate intervention onsite. Operator must complete a new pre-start prior to operation once defect has been addressed. |
Moderate Defects | Authorisation Required to Operate | Supervisor sign-off required prior to being allowed to operate. Issues / defects identified reported to the project. To be triaged in the ChekRite Portal. |
Minor Defects | Corrective Action Required | Asset may be operated. Issues / defects identified reported to the project. To be triaged in the ChekRite Portal. |
Reviewing Issues
When a checklist is submitted that contains defect items, an email notification will be issued directly to the nominated project administrator for Critical Defects, advising that immediate action will need to be taken onsite. In addition, an email will be issued to the nominated project administrator daily with all open and outstanding issues that need to be managed.
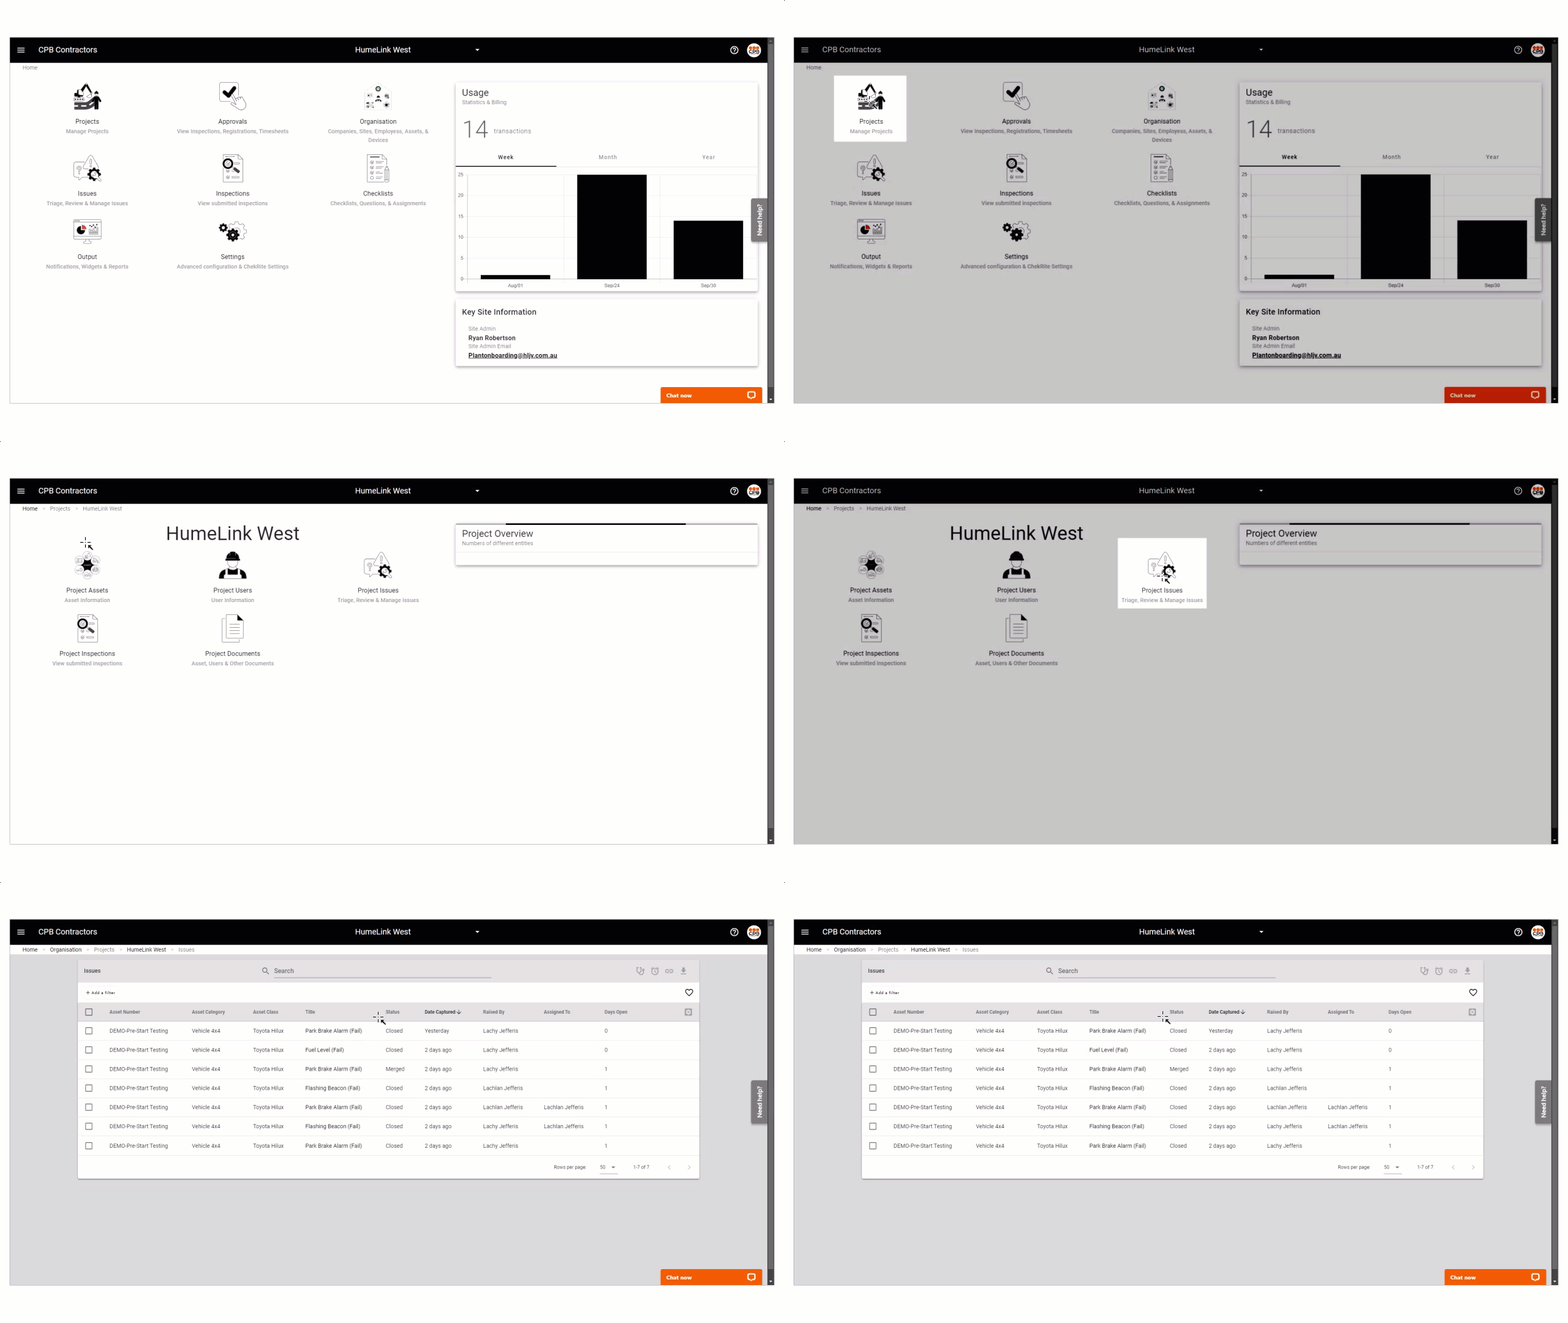
All issues are recorded directly against the asset that the pre-start was completed on. To review issues:
- Sign in to the ChekRite Portal (mychekrite.com)
- Go to Projects > Project Issues. All issues ever recorded against all assets on the project will display here.
- You may apply filters to display only the issues that you want to look at.
- There are two saved views that can be accessed to view Issues for Triage (New Issues) and Outstanding Issues, which will automatically apply the appropriate filters. Click on the heart icon to apply a saved view.
Triaging Issues
The first step in resolving new issues is to triage those issues. Triage allows you to quickly review each issue and decide on how they should be managed.:
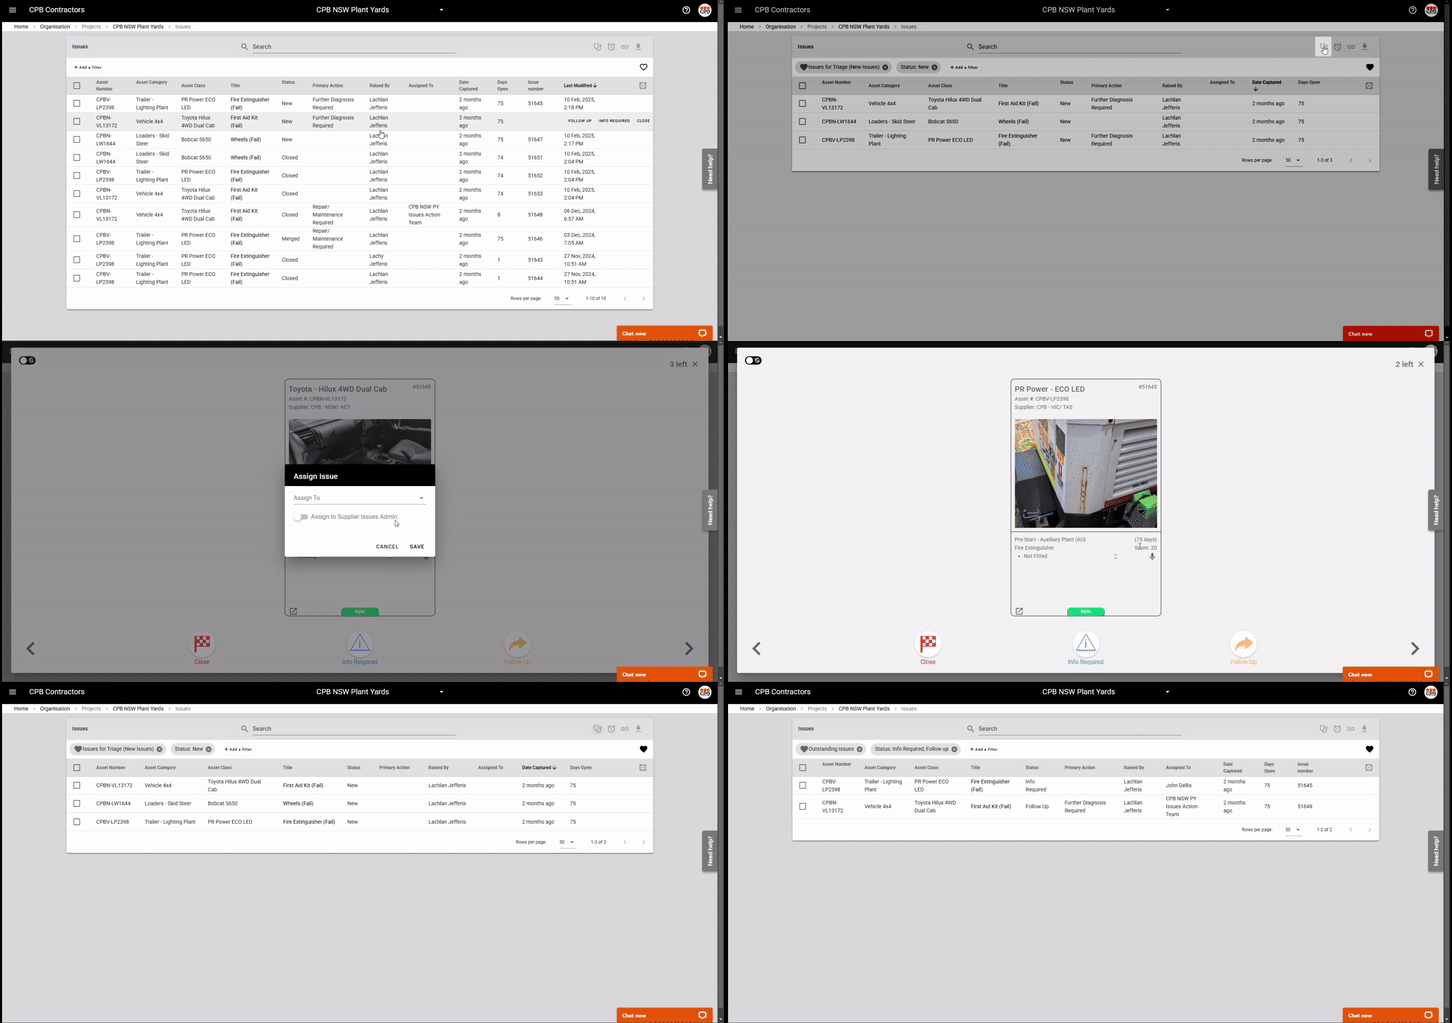
- Sign in to the ChekRite Portal (mychekrite.com)
- To start triaging issues go to the Project Issues page and click on the stethoscope symbol.Issues with a Closed status will not be triaged. If you have filters applied to Status, only those selections will be triaged.
- Select from one of the triage actions Follow Up, Info Required, Close.
Follow Up
Assigns further actions to identify how the issue should be resolved.
Info Required
Identifies that there is not enough information to take immediate action on the issue.
Close
If the issue was or has been resolved and requires no further action it can be closed. Issues can be reopened later if required.
- If you select Follow Up you will be prompted to select a Primary Action from one of the following:
Further Diagnosis Required
Contact Supervisor / Operator to gather further information to resolve issues.
Repair / Maintenance Required
Issue acknowledged, repairs to be actioned.
Stand Down Equipment
Contact Supervisor to have machine stood down so issue can be investigated ASAP.
- After you have selected a Primary Action you will need to assign the issue to a User or User Group that you want to follow up the issue. Select a user from the list. You may assign issues to yourself.
You may also assign the issue to the Supplier by enabling the Supplier Issues Admin toggle. When this is enabled the issue will be added to the daily Outstanding Issues Report that will go to the nominated Site Administrator for that supplier.
- You may also add notes and comments to the history of an asset by adding an activity.
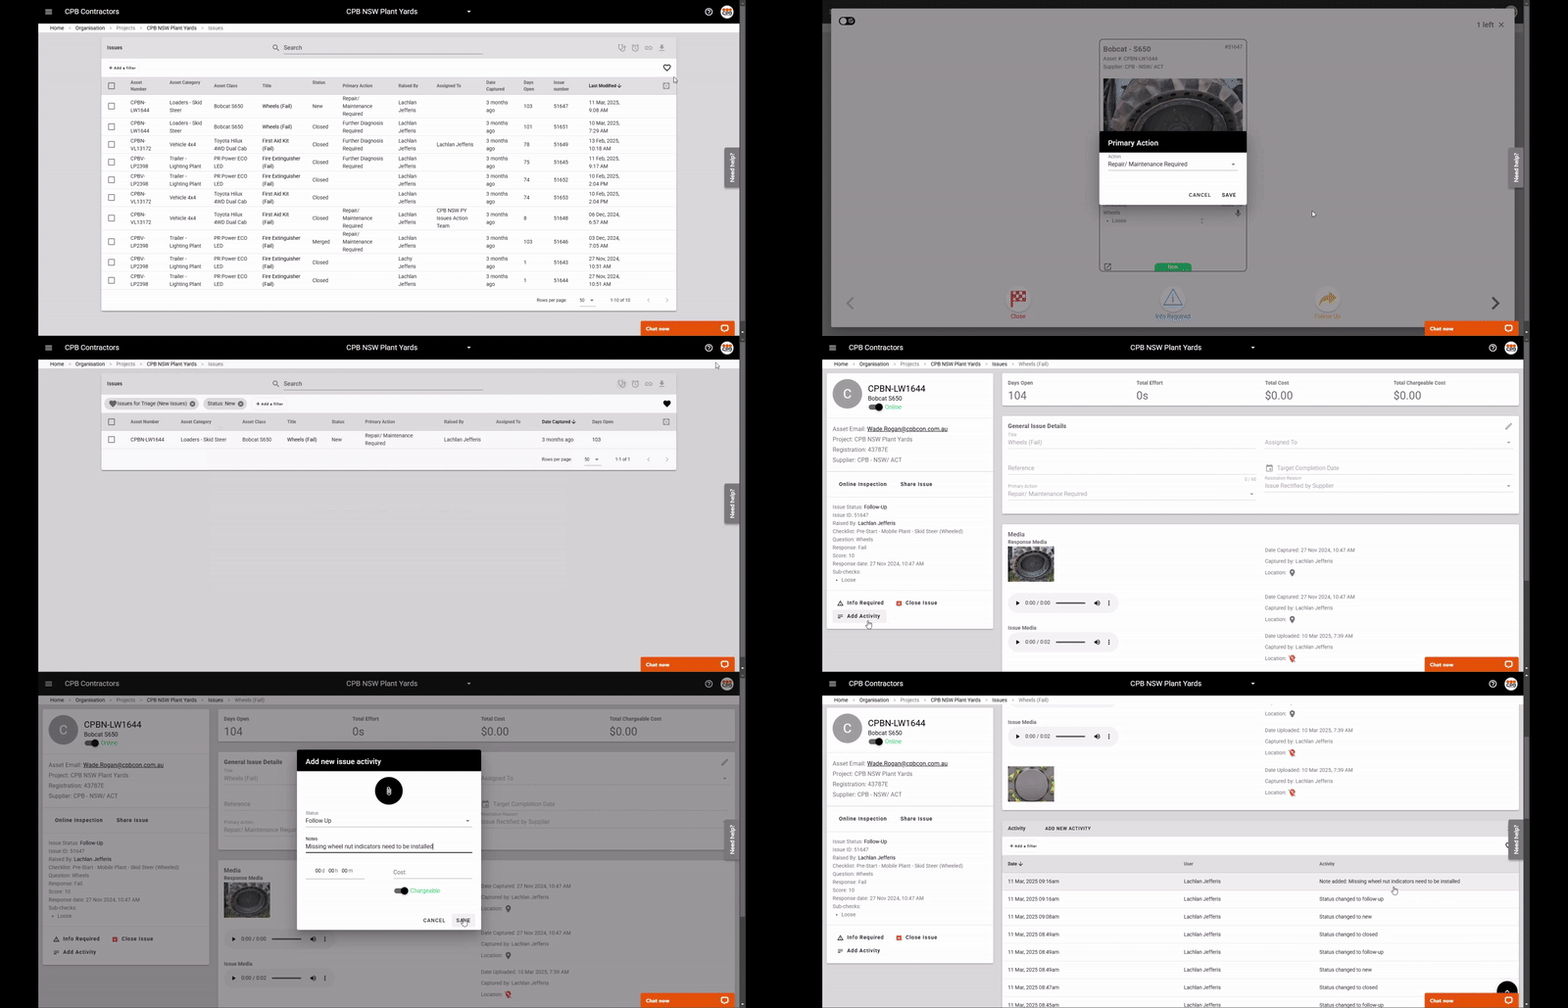
- If you select Info Required you will need to assign the issue to a User or User Group that you want to follow up the issue. Select a user from the list. You may assign issues to yourself.You may also assign the issue to the Supplier by enabling the Supplier Issues Admin toggle. When this is enabled the issue will be added to the daily Outstanding Issues Report that will go to the nominated Site Administrator for that supplier.
- If you select Close you will be prompted to select a Resolution Reason from one of the following:
Asset Off Hired - No Longer Onsite
The asset has been off-hired or is no longer approved to work on the project since the issue was recorded.
Issue Noted - Not Applicable to Asset Class
The issue is not applicable to the asset class. Issue may be closed without comment.
Issue Rectified by Supplier
Supplier of equipment has rectified the issue. Record of repair with supplier.
Issue Rectified During Daily Service
If issue was rectified during daily servicing i.e. refuelling / greasing / oil top-up etc.
Issue Rectified by Project Plant Team
Issue has been repaired by the onsite plant team.
No Issue Recorded
Non issue, OK to close without further investigation.
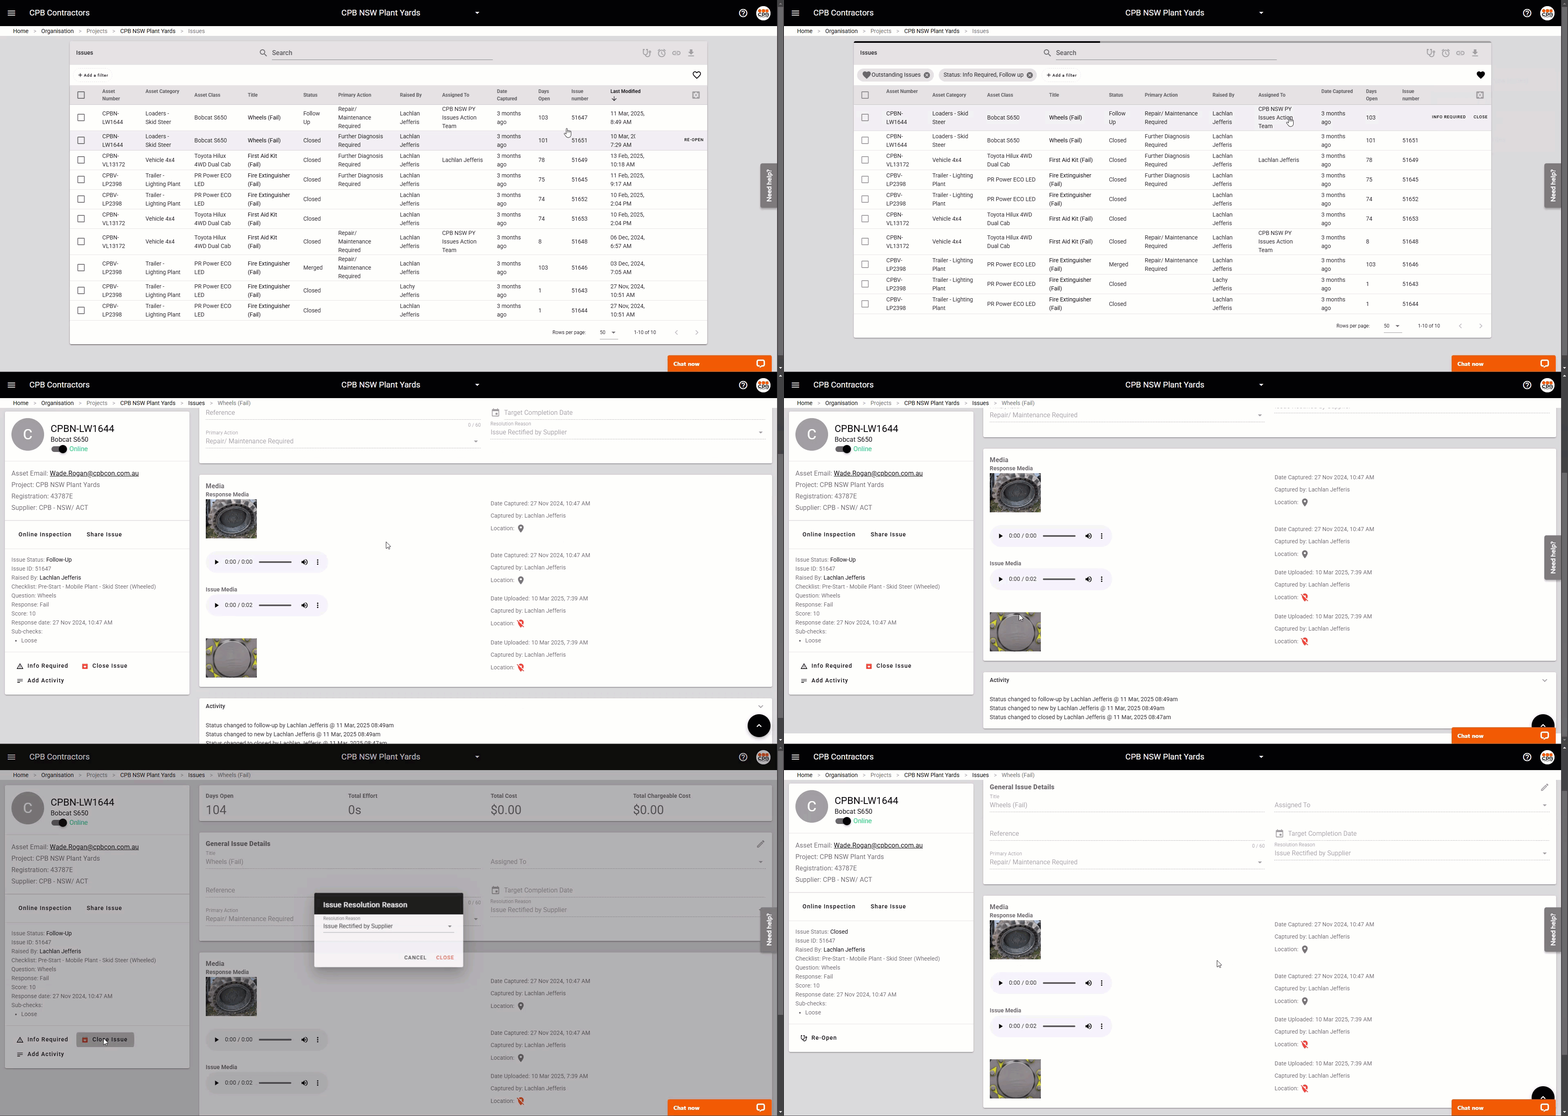
Merging Issues
If the same issue is reported on the same asset for consecutive pre-starts you can choose to merge them.

However, you can only merge New issues to Outstanding issues (either Follow-Up or Info Required). During triage if there is an outstanding issue where the asset number and issue title matches a new issue you will be given the option to merge them.
This avoids the need to assign an action where an issue may already be in the process of being rectified but the asset is still operating.
If you have a list of new issues where you know there are duplicates, once you have actioned the first issue during triage, subsequent duplicates will give you the option to merge.
Once an issue is rectified and closed, you will not be able to merge any new like issues. You will need to triage, action and rectify the new issue as if it were a different issue.
Project Issues Action Group
When you are assigning issues there is an option to assign to the Project Issues Action team or group. This group is nominated by the project when electing to use digital pre-starts and is to contain the users/personnel who you wish to be responsible for actioning any issues that are raised during pre-starts. If you wish know who is currently in the group, or want to make changes to the group please contact the relevant ChekRite Administrator noted in the FAQ.
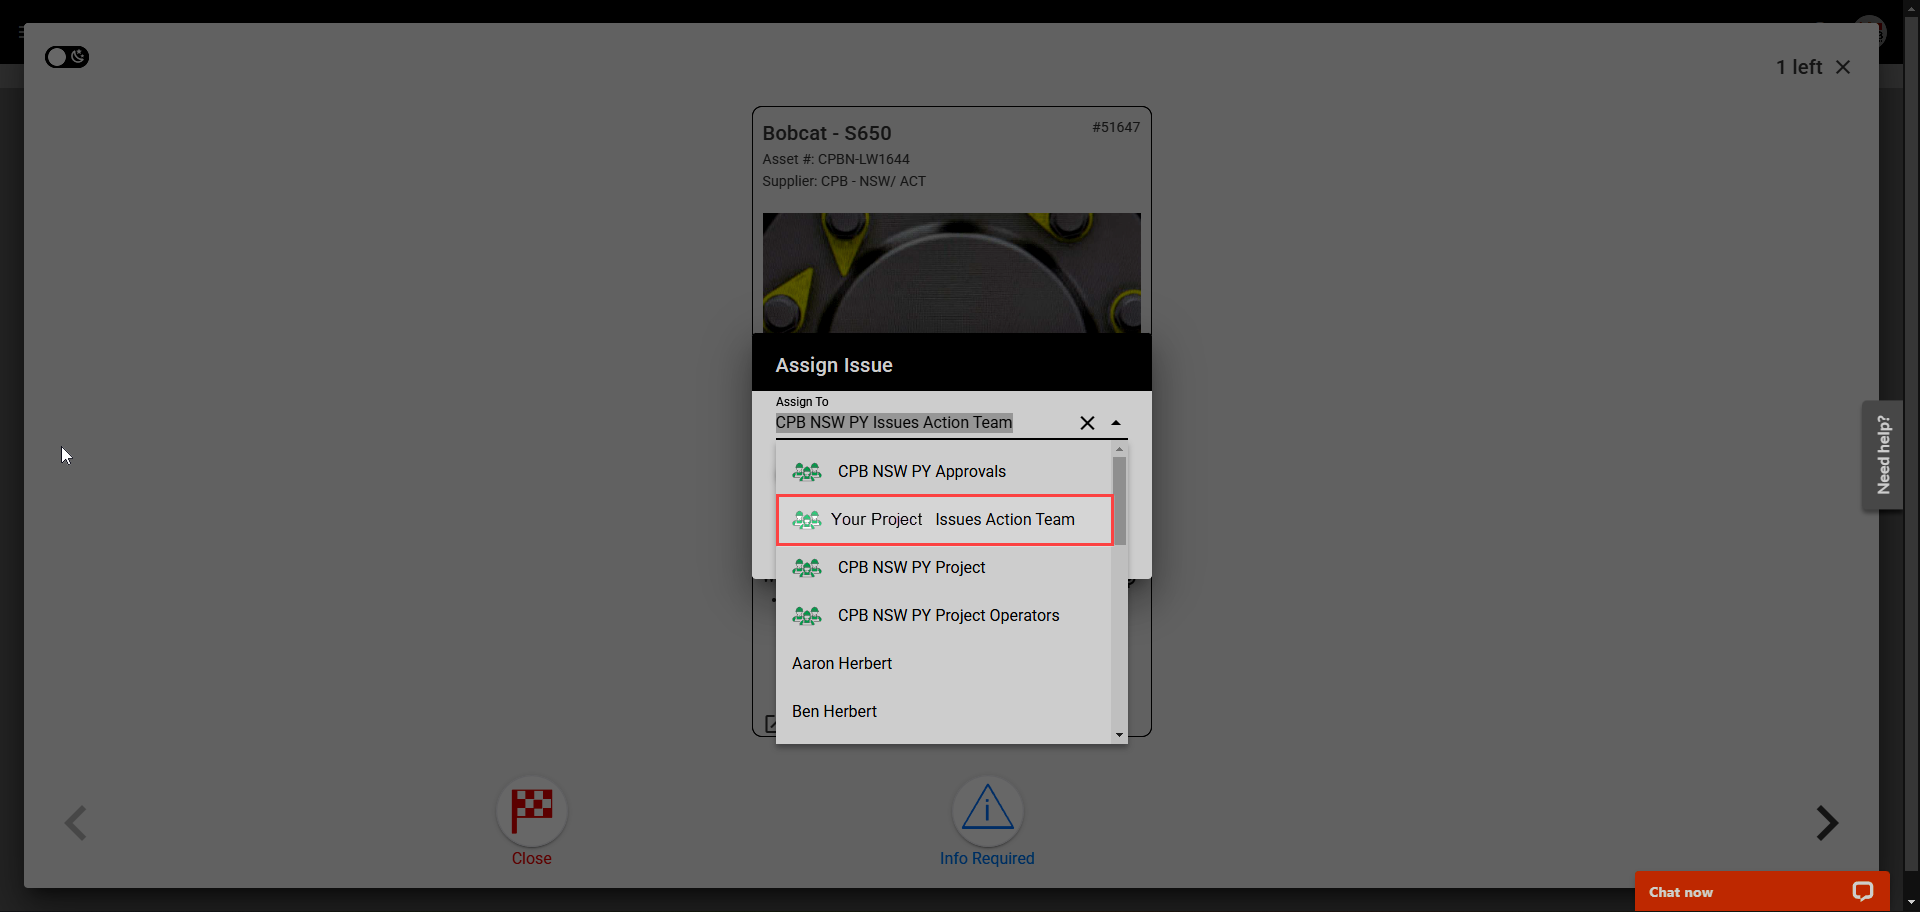
Outstanding Issues Report
The Outstanding Issues Report will be issued as an Excel sheet via email to the Project Site Administrator, and Supplier Site Administrator for any project or supplier that has assets with new or outstanding issues that were raised during pre-starts. The report will list any issues that have the status New, Follow Up, or Info Required and displays information such as the issue title, date captured, and who the issue was assigned to.
Reporting
Download Reports
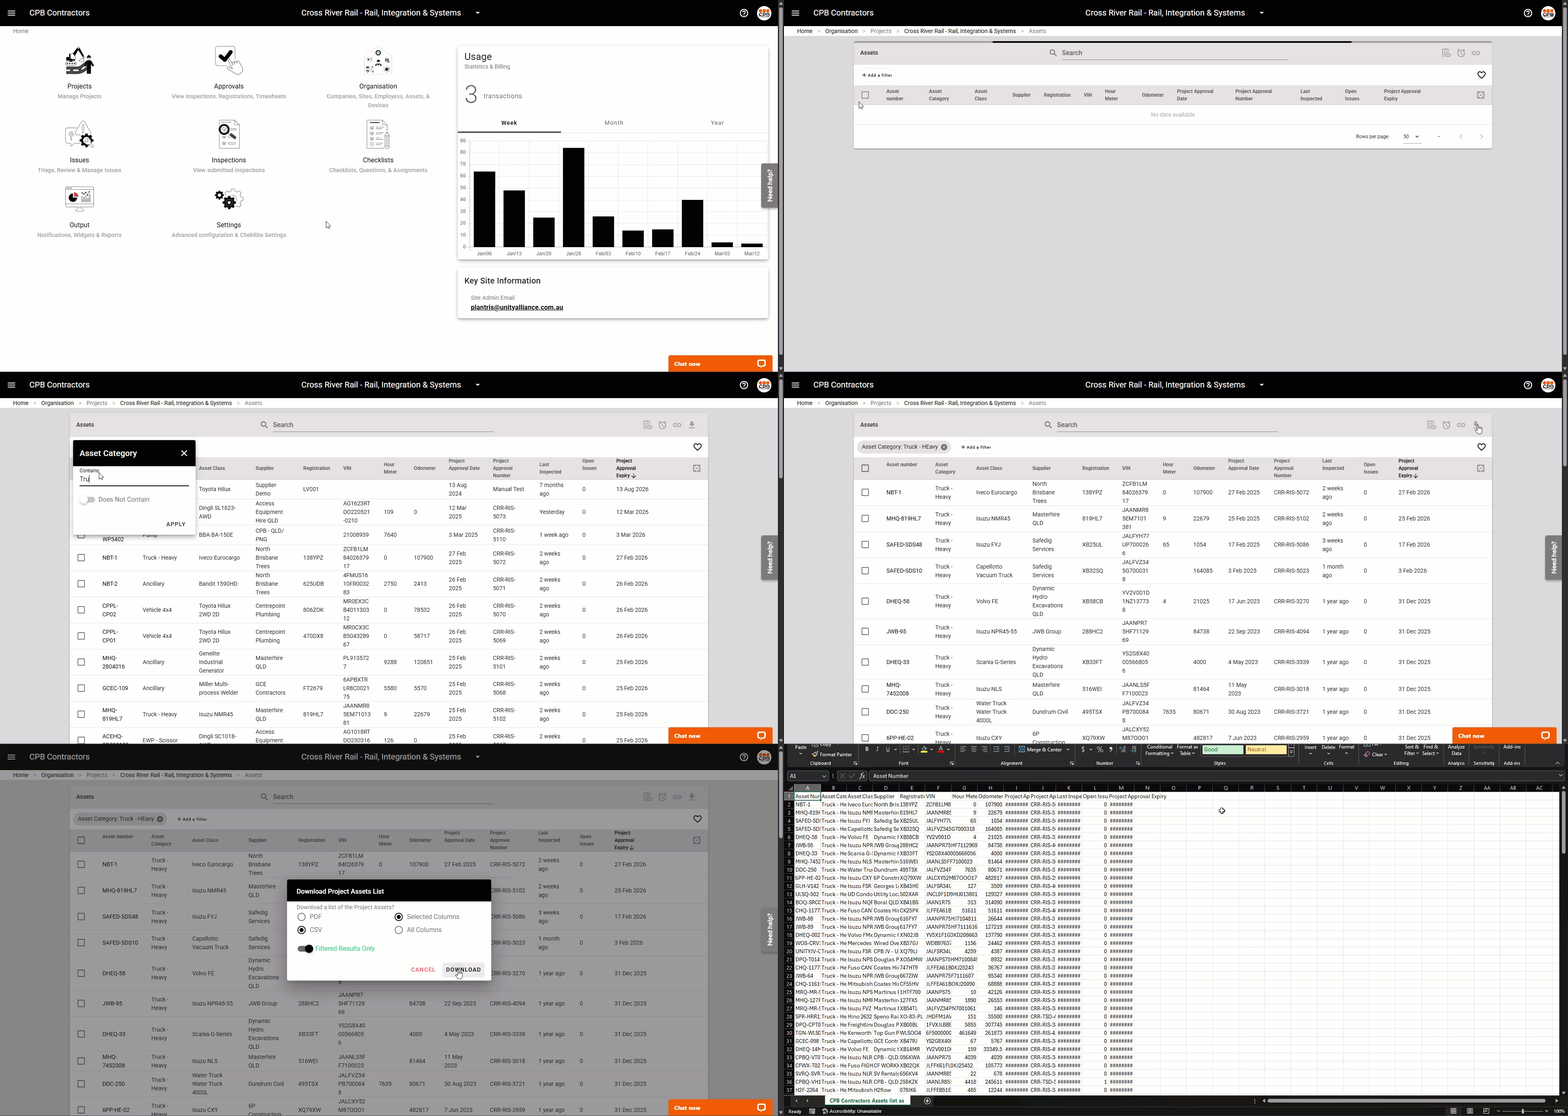
You can download reports e.g. approved asset register, filtered asset list to support auditing, directly from any page with a list in the ChekRite Portal. In this example, we will use the Project Assets page.
- Sign in to the ChekRite Portal (mychekrite.com)
- Go to the page you want to download the report from, e.g. Go to Projects > Project Assets.
- Add any filters and/or columns.
- Click on the download icon in the top right corner.
- Choose the format you want to download the report in, either PDF or CSV.
- Choose if you want to download the current display by selecting Visible Columns, or select All Columns if you would like to download all possible data.
- Enable the Filtered Results Only toggle if you want to download the report with any filters you have applied. If you don't it will download the entire list of results.
- Click Download to download the report.Some lists are too large to download. If that is the case, the Download button will say Send instead. This will send an email copy of the report to the email associated with your ChekRite user account. The report may take a few minutes to come through. Check your junk/spam folder if do not receive anything.
Scheduling Reports
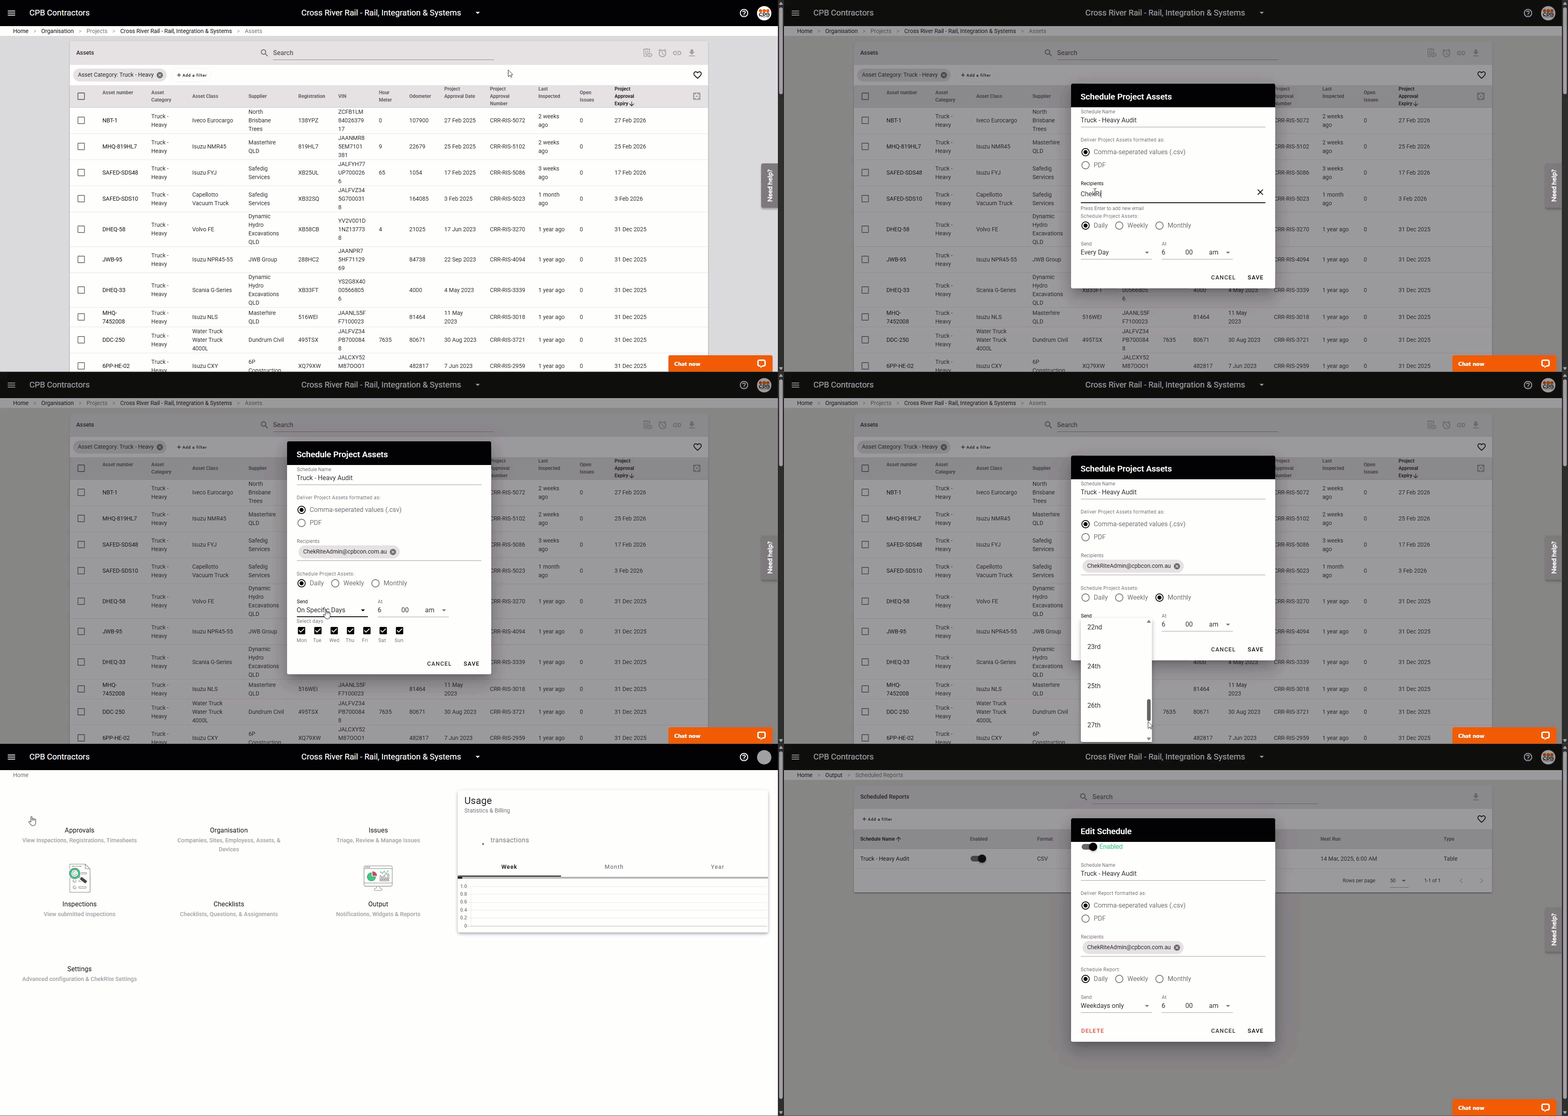
You can also schedule reports to be sent via email to recipients at defined intervals, including any filters, columns, or saved views that are currently applied.
- Sign in to the ChekRite Portal (mychekrite.com)
- Go to the page you want to download the report from, e.g. Go to Projects > Project Assets.
- Click on the clock icon in the top right corner.
- Give the report a Schedule Name, this will define what appears in the subject line when the report email is received.
- Choose the format you want to send the report in, either PDF or CSV.
- Enter the email address of any Recipients.
- Choose the Schedule then the frequency and which to Send the report. The following table details each option:
Daily
Every Day, Weekdays Only, or Specific Days (choose days from Monday to Sunday)
Weekly
Choose a day from Monday to Sunday
Monthly
Choose a date from the 1st to 31st.
- Enter the time At which the report will be sent. The timezone will be based on the state in which your company was originally registering for.Once a Scheduled Report has been created, it can only be edited, disabled, or deleted by the user that created it. To find a list of Scheduled Reports that you have created, from the home page go to Output > Sheduled Reports.
Project Locations
If your project has multiple job fronts, work sites, or locations where you might want to identify or report on assets working at a specific location, you can setup Project Locations. Project Locations can be enabled in checklists to assign a location to an asset, and later used for reporting purposes. To setup project locations:
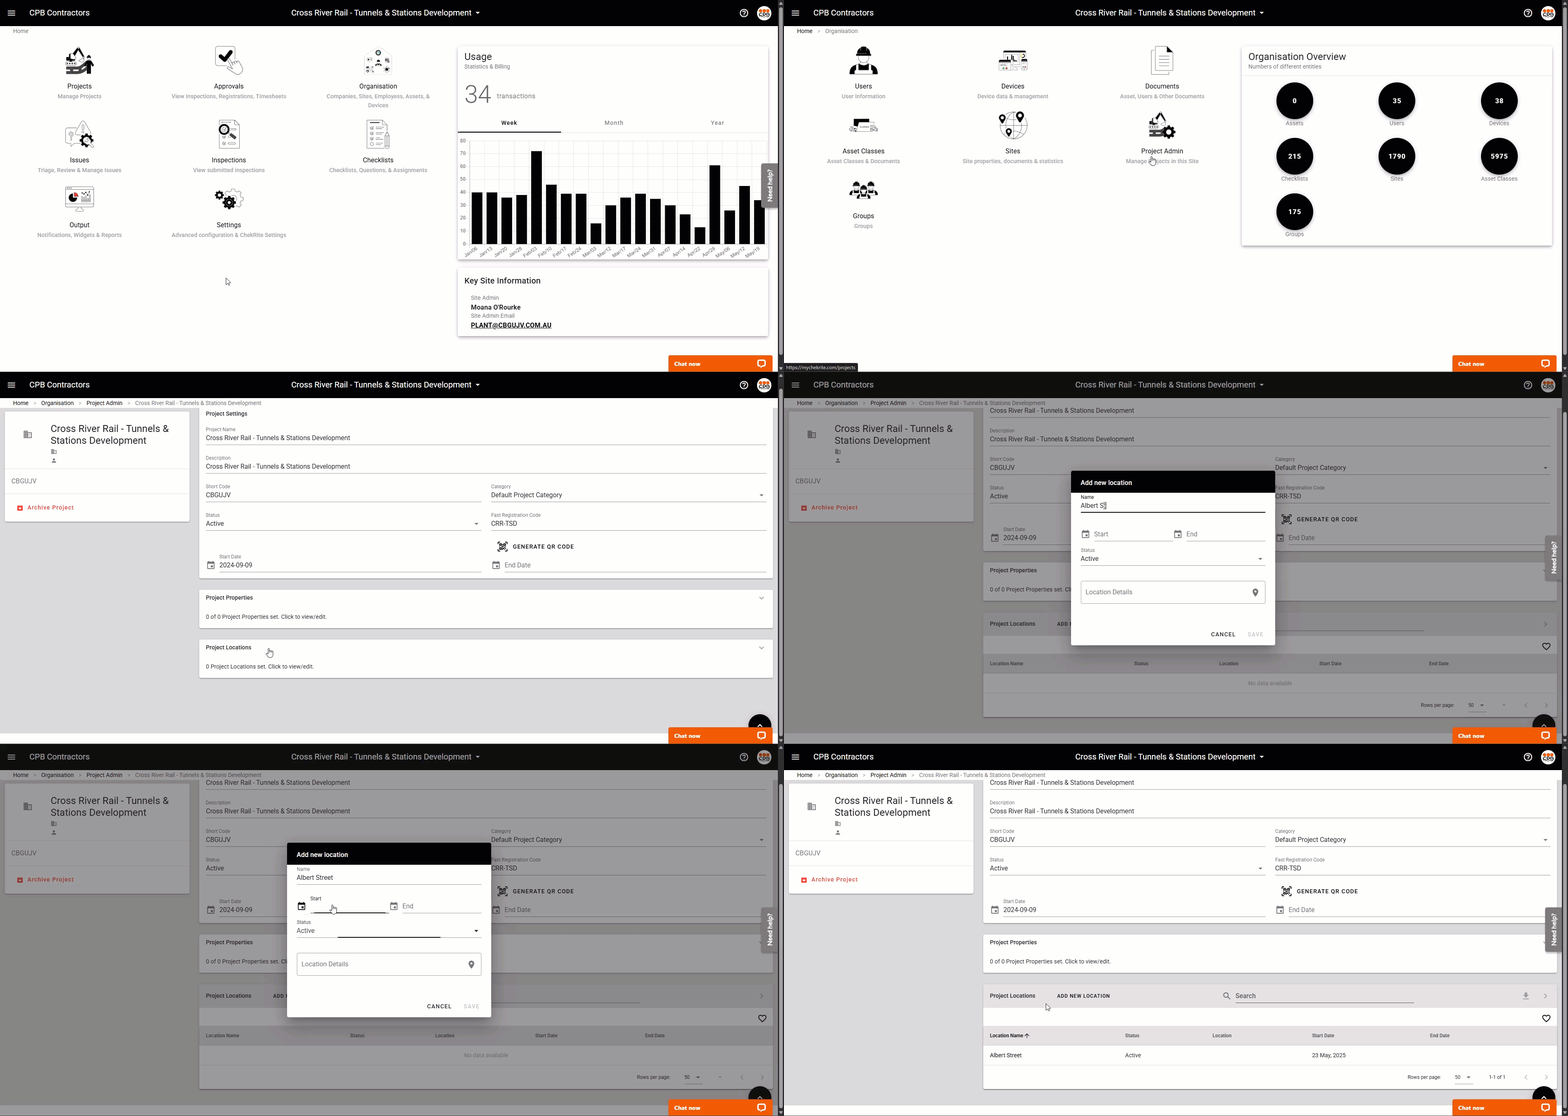
- Sign in to the ChekRite Portal (mychekrite.com)
- Go to Organisation > Project Admin
- Click on the project (there should only be one project listed)
- Scroll down and expand the Project Locations tab.
- Click on Add New Location
- Enter the location Name and Start Date. The Status will be Active by default.
If you would then like to use project locations on certain checklists contact the CPB Contractors Digital Plant team for your state of operation to discuss available options. Contacts are listed here.
Extra Support
If you need technical assistance with the CPB Contractors Digital Plant System, contact the Live Chat, use the following links, or refer to the FAQ's.
- Installing ChekRite App.
- Receiving ChekRite App Pairing Code and Employee Credentials.
- For supporting supplier's you may also reference the Supplier Guide.
FAQ's
Who do I contact if I need help?
If you need any help please contact the appropriate CPB Contractors Digital Plant team for your state of operation.
For technical issues, please contact the Live Chat in the ChekRite Portal.
State | Contact |
NSW / ACT | |
VIC / TAS | |
QLD / PNG | |
WA / SA / NT | |
NZ |
What documentation is required for the different types of assets?
You can see the documentation requirements for the different categories of asset here.
How will I know if a supplier has submitted an asset for approval?
When a supplier submits an asset for review, a notification will be sent to the nominated project plant admin email address(es). Check your email inbox or contact your nominated project plant administrator to find out if an asset has been submitted. If you are unsure contact the appropriate CPB Contractors Digital Plant team.
You can also refer to the Approvals page on the ChekRite Portal to see what assets are currently waiting to be reviewed. Recently submitted assets will appear with a Pending project status.
I mistakenly approved an asset - How do I correct it?
If you approved an asset by mistake, you will need to contact the appropriate CPB Contractors Digital Plant team or the Live Chat to have the mistake corrected. You will also need to contact the supplier to notify them of the mistake.
I received an asset submission email and I can’t see the submitted asset on the ChekRite App or ChekRite Portal - Where can I find it?
If you cannot see the asset on the ChekRite App, resync your device and confirm the sync date and time .
If you cannot see the asset on the ChekRite Portal refresh your browser.
If the asset still isn't appearing on either after performing the above, wait 5-10 minutes and try again.
If the asset still isn't appearing on either the ChekRite Portal or the ChekRite App contact the Live Chat for assistance.
I can’t see any of the assets that are pending or in review, I can only see the assets that have been approved - Where can I find the other assets?
You probably don't have sufficient access. Only authorised project approvals users may see assets that are Pending or In Review. If you believe that you should be an authorised project approvals user, please seek approval/confirmation from the Project Manager and contact the relevant CPB Contractors Digital Plant team.
How do I order new or replacement site authority decals/stickers?
If you need to make an order for a set of site authority decals/stickers please contact the relevant CPB Contractors Digital Plant team.
A supplier is asking me the status of their asset - What can I tell them?
Refer the supplier to the Project Status section of the Supplier Guide. If the asset has been submitted you may also check the status for them from the Approvals page on the ChekRite Portal.
What do the different project statuses mean for supplier assets?
Here is an explanation of the different statuses you may see against supplier assets.
Status: | Description: |
Asset does not appear | The asset has not yet been submitted. The supplier needs the complete the Supplier Asset Submission Process to submit their asset to the project. |
Pending | The asset has been submitted by the supplier and is ready for review of submitted documents and checklists. |
In Review | The asset documentation and checklists have been reviewed and accepted pending a physical project asset inspection. Please contact the supplier to arrange. OR Physical project asset inspection has been completed and asset is ready for final approval. |
Approved | Asset has been approved for use on that project. |
Rejected | The asset has been reviewed or inspected by the project plant team and has been rejected due to non-compliance or incomplete information supplied. The supplier will need to rectify the issues as per the rejection email and resubmit the asset. |
Returned | The asset is no longer required and has been demobilised / off-hired from the project. |
How do I get a copy of the Pre-Start Registration Poster if the project's lost it or needs a new one?
A copy of the pre-start registration poster for each project is saved on the ChekRite Portal. To find it:
- Go to Projects > Project Documents > Site
- Select or hover over the Pre-Start Registration Poster document.
- Select the attachment. It will open in a new tab and you will be able to print or download a copy to your device.
I can't add users - How do I get my colleagues access to the CPB Contractors Digital Plant System?
You will need to submit a ChekRite User Access request through CPB Contractors ICT Self Service on behalf of your colleague. If you do not have access to ICT Self Service please seek approval from the Project Manager and contact the relevant CPB Contractors Digital Plant team.
How do I get access to the CPB Contractors Digital Plant System?
You will need to submit a ChekRite User Access request through CPB Contractors ICT Self Service. If you do not have access to ICT Self Service please seek approval from the Project Manager and contact the relevant CPB Contractors Digital Plant team.
I have a new phone / tablet and my old pairing code is no longer valid how do get a new one?
If you are an existing user, please contact the Live Chat or the relevant CPB Contractors Digital Plant team.
What if a supplier tells me that they can’t find a suitable Asset Class when they are trying to add a new asset?
Refer the Supplier Guide topic: What if I can't find the Asset Class (Make Model) for my asset?
A supplier is trying to add a new asset, but they are saying the asset number already exists.
If ChekRite is preventing a new asset being added, the asset is likely to already exist in ChekRite. Please direct the supplier to contact the Live Chat for assistance.
Where can a supplier find their ChekRite App login Credentials?
A suppliers ChekRite App login credentials may have been issued to them via email, text or as a link in their “Welcome to ChekRite” administrator email package. Refer them to the Supplier Guide topic: Receiving ChekRite App Pairing Code and Employee Credentials, or Where can I find my ChekRite App Login Credentials? FAQ.
A suppliers’ pairing code has expired – How do they get another one?
For security reasons, the pairing code is automatically expired after 7 days. If the supplier has myChekRite Portal access, they have all the tools to re-issue a new pairing code. Refer them to Supplier Guide topic: Reissuing Device Pairing Code.
If the supplier user doesn’t have ChekRite Portal access, direct the request to the suppliers nominated administrator.
