Table of Contents
- Who do I contact if I need help?
- How do I know if my asset has been submitted?
- How long does it take for the project to approve my submission?
- What if my asset is rejected?
- What if I can't find the Asset Class (Make Model) for my asset?
- What documentation is required for the different types of assets?
- What if I don't have one of the required documents?
- What if the available Asset Inspection is not relevant to my asset?
- What do I do if my approved asset has new/additional attachments?
- I'm setting up a new user – What is the Employee ID?
- My pairing code has expired – How do I get another one?
- Where can I find my ChekRite App login Credentials?
- How can I view and download inspections that have been performed on an asset?
- How do I onboard my asset to a different project?
- How can I find out who the Site Admin for my company is?
- What do the different project approval statuses mean for my asset?
CPB Supplier Guide

- Who do I contact if I need help?
- How do I know if my asset has been submitted?
- How long does it take for the project to approve my submission?
- What if my asset is rejected?
- What if I can't find the Asset Class (Make Model) for my asset?
- What documentation is required for the different types of assets?
- What if I don't have one of the required documents?
- What if the available Asset Inspection is not relevant to my asset?
- What do I do if my approved asset has new/additional attachments?
- I'm setting up a new user – What is the Employee ID?
- My pairing code has expired – How do I get another one?
- Where can I find my ChekRite App login Credentials?
- How can I view and download inspections that have been performed on an asset?
- How do I onboard my asset to a different project?
- How can I find out who the Site Admin for my company is?
- What do the different project approval statuses mean for my asset?
Welcome to the CPB Contractors Digital Plant System Supplier Guide. This guide will take you through the steps involved in the digital asset onboarding process. Completing the Submitting an Asset to a Project section of this guide will enable you to get your assets approved for a project effortlessly. We highly recommend watching the Supplier Video Guide first, to get a comprehensive overview of the system and processes. If you’re short on time, you can watch the Quick Start Video Guide. There is also a tutorial available in the ChekRite Portal that should be completed before doing anything else.
Feel free to use the Table of Contents on the right-hand side to jump to the relevant section for you.
Video Guides
Supplier Video Guide
Quick Start Video Guide
Submitting an Asset to a Project
To begin working on a project assets must be onboarded to ensure that they have the capability to perform their intended purpose. The digital asset onboarding process will confirm, prior to acceptance and commencement of work on a project, that an asset is fit for purpose as per applicable legislation, associated standards, and manufacturer requirements.
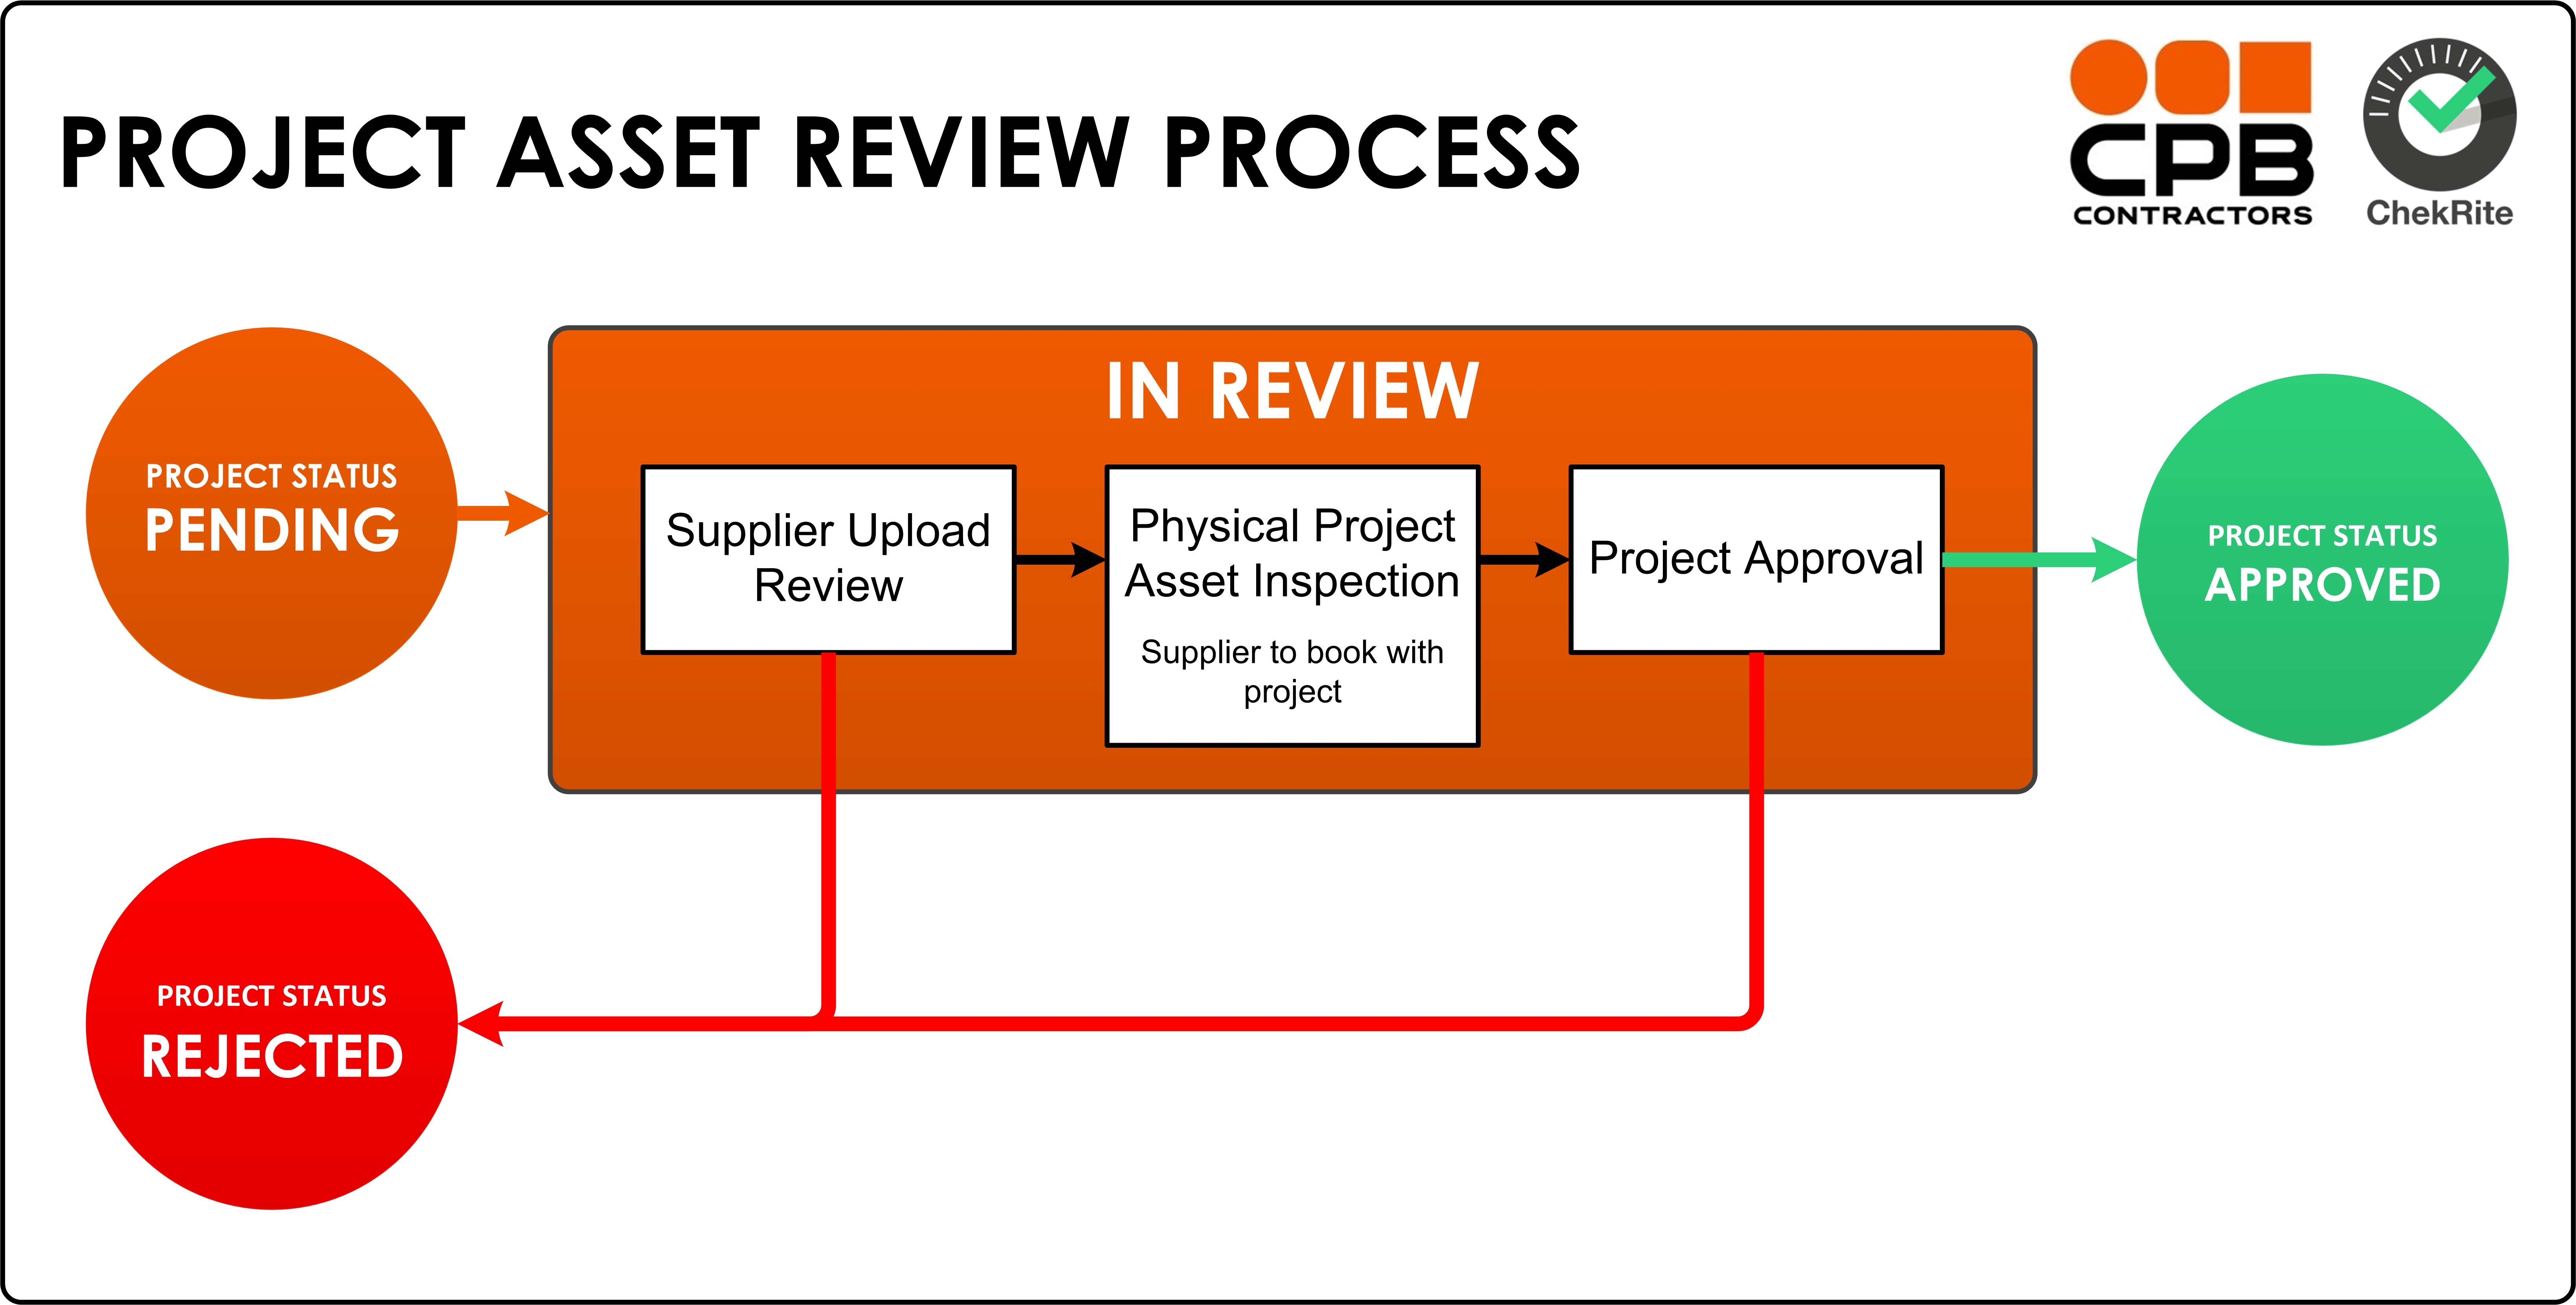
The below images outline each step in the asset submission process and is a good visual reference to return to if you get stuck. There is also a reference to the project asset review process which the project goes through with each asset, to give you a general understanding of what happens after you submit an asset.

Adding a New Asset
To begin the supplier asset submission process you will need to add assets to the ChekRite Portal. You will only have to add each of your companies owned assets to the ChekRite Portal once. Once an asset has been added it will remain listed, unless it is Archived.
- Go to Organisation > Assets.
- Click on Add New Asset.
- Enter the Asset Number.
- Select Asset Class.If you cannot find an applicable asset class you can use the Advanced Search to search for something suitable, or Request Asset Class
- Click Save.
The asset will now appear on devices that have the ChekRite App installed and paired.
Adding Asset Documents
You are required to load certain documents for assets into the ChekRite Portal so that they can be verified. A list of documents required by asset category can be found here:
Documents Required by Asset Category
To add a document to an asset:
- Go to Organisation > Assets > Find and select the asset you want to add a document to.
- Click on the Asset Documents tab.
- Click on Add New Document.
- Enter the relevant document information (name, type, and start/expiry date at minimum).Some document types may automatically set the Expiry Date, calculated from what you input as the Start Date. Similarly, some document types may automatically set the Start Date and Expiry Date, based on the date that you upload the document. In these instances you will not be able to override these automatically set or calculated dates.
- Upload the document attachment.
- Click Save.
Asset documents expire, refer to the Asset Document Expiry section for more information.
Completing Checklists
Asset onboarding checklists must be completed using the ChekRite App to record and declare that an asset is fit for purpose as per applicable legislation, associated standards, manufacturer requirements, and project specific requirements.
Plant Risk Assessment Review Form
Complete the Plant Risk Assessment Review checklist on the ChekRite App with the associated Plant Risk Assessment handy. This review is to ensure the associated risks of operating the asset have been identified in the Plant Risk Assessment uploaded to the ChekRite Portal, and identified controls have been implemented.
- Sign In to the ChekRite App.
- Select New Check and navigate to or search for the asset.You can search for an asset via it's asset number.
- Select Checklist Category 1. Mandatory Forms.
- Select the Plant Risk Assessment Review checklist.
- Follow the prompts to complete this check.

You will be required to indicate whether a hazard exists in operational activities, maintenance activities, or both, and whether the risk assessment addresses the hazard. Operation refers to the machine functions in general, and does not consider a specific task or environment. This means you should only have one Plant Risk Assessment per asset.
If a risk assessment does not meet requirements, corrective actions must be addressed before the asset can be approved for use. An authorised project plant representative will review the completed forms to ensure the risk assessment & risk review conforms to the relevant Code.
Clean Down Declaration
Prior to the asset arriving or departing from site, all vehicles, machinery and equipment shall be cleaned and visually free of plant matter, soil/mud and fire ants (in QLD). After cleaning and a thorough inspection has been performed, complete this checklist using the ChekRite App.
- Sign In to the ChekRite App.
- Select New Check and navigate to or search for the asset.
- Select Checklist Category 1. Mandatory Forms.
- Select the Plant and Equipment Clean Down Declaration checklist.
- Follow the prompts to complete this check.

Asset Inspection
An asset inspection specific to the asset type is to be completed to ensure the item is safe for operation. The relevant Asset Inspection Report will be assigned based on the asset class (Make & Model). E.g, a CAT 325 excavator will have a Mobile Plant Asset Inspection Report assigned; A Franna MAC25 will have a Mobile Crane Asset Inspection Report assigned. The inspection must be performed using the ChekRite App while physically at the machine.
- Sign In to the ChekRite App.
- Select New Check and navigate to or search for the asset.
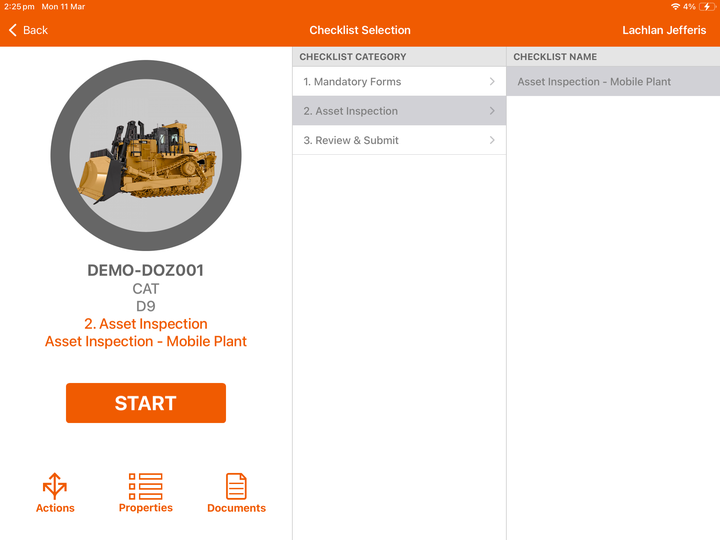
- Select Checklist Category 2. Asset Inspection.
- Select the Asset Inspection checklist.
- Follow the prompts to complete this check.
Submit Asset
To submit an asset to a project, this checklist must be completed. It shall not be attempted until all other checklists have been completed and mandatory asset documents have been uploaded. The Submit Asset checklist must be completed using the ChekRite App:
- Sign In to the ChekRite App.
- Select New Check and navigate to or search for the asset.
- Select Checklist Category 3. Review and Submit.
- Select the Submit Asset checklist.
- Follow the prompts to complete this check.

What Happens Next?
Pending: Once you have completed the Submit Asset checklist, the project approval status will change to Pending.
In Review: The project plant team will be automatically notified of the asset submission, which will be reviewed by an authorised project plant representative. The authorised project plant representative will check that the asset documents and checklists are acceptable and meet the project’s standards. Once your submission has been reviewed the project approval status will change to In Review.
If the submission is accepted, the asset will need to be physically inspected and verified by an authorised project plant representative. The Site Admin of your company will be automatically notified, via email, when the submission is accepted. Please follow the instructions in the email to make arrangements to have a physical inspection performed by an authorised project plant representative.
Approved: If the asset passes the physical inspection, the asset will need final approval to begin work on the project. If the asset passes all project standards, the asset will be approved for use on the project, your Site Admin will be notified via email, and the project approval status will change to Approved.
Rejected: If for any reason the submission is not accepted, or the asset fails to meet project standards it will be rejected, your site admin will receive an email notification, and the project approval status will change to Rejected. An exception report will be attached to the email notification identifying any issues. The issues will need to be rectified and the asset resubmitted.
Project Approval Status
You can check the project approval status of assets that have been submitted to projects at any time. The information is available via the Asset Approvals page on the ChekRite Portal home page. To check assets via tha Approvals page:
- Go to Approvals > Asset Approvals > Find the asset you want to check the project approval status of.
- Confirm the Project Name in the Project Name column, or apply a filter, and go across to Project Approval Status column to see the project approval status of the asset.

You may also find the projects an asset has been submitted to, and the status for each directly from the Assets page, to see what projects a particular asset has been submitted to:
- Go to Organisation > Assets > Find and select the asset you want to check project submissions for.
- Click on the Project Submissions tab to view projects to which the asset has been submitted to.
Assets may have any of the following Project Approval Statuses throughout the onboarding process – Pending, In Review, Approved, Rejected.
You may also check the Project Approval Status of an asset directly from the ChekRite App:
- Sign In to the ChekRite App.
- Open the hamburger menu (click on the icon in the upper left corner).
- Under Reports click on Asset Approval.
- You may sort by Project, Asset (asset number) and Status. You may also apply filters on the Project Approval Status to only show one of Pending, In Review, Approved, Rejected, or Returned, or on individual Projects, to see which assets you have assigned to which projects.
You can also check the project approval status of assets that have been submitted to projects at any time directly from the ChekRite App. The information is available via the Projects tab when you have selected an asset:
- Sign In to the ChekRite App.
- Select New Check and navigate to or search for the asset.
- Swipe across where there Actions Properties Documents icons are displayed and select Projects.
- You can filter through Approved, Pending, or Other project submissions for that particular asset.
Asset Document Expiry
Mandatory asset documents need to be reviewed regularly to ensure that information is current and up to date, and to maintain ongoing approval with a project the asset is working on. Documents need to be updated before they expire. You can see documents that are about to expire for project approved assets from the Asset Documents page of the ChekRite Portal.
The Site Admin for your company will also be sent an email notifying them when documents are close to expiring. The email will contain a direct link to the Asset Documents page.
Failure to update asset documents will revoke any project approval the asset has, and the asset will not be allowed to continue working on the project until the relevant documents are updated and the asset resubmitted to the project.
To update an asset document:
- Go to Organisation > Documents > Asset.
- Ensure you have the favourite view called Critical Documents Expiring enabled. Click on the heart symbol to select favourite views.
- Find and select the asset document that needs to be updated. You can sort the Days to Expiry column so that documents that are due to expire sooner appear at the top of the list.
- Enter the new Start Date for the updated document.Some document types may automatically set the Expiry Date, calculated from what you input as the Start Date. Similarly, some document types may automatically set the Start Date and Expiry Date, based on the date that you upload the document. In these instances you will not be able to overrided these calculated or automatically set dates.
- Delete the attachment for the old document. Click on Attachment to upload the updated document.
- Click Save.
Digital Pre-Starts
If a project you are working on is using Digital Pre-Starts on the CPB Contractors Digital Plant System powered by ChekRite, all Project Approved assets operating on the project will need to undergo a daily pre-start inspection. A pre-start inspection will need to be performed on each asset daily:
- Prior to use at the start of each shift, or
- Before commencing work, if a pre-start has not been completed for that shift already.
It is the responsibility of the operator to perform a pre-start to ensure the asset they are operating is in full working order, and to identify and report any faults or defects.
Refer to the CPB Operator Pre-Start Guide to review the process for registering to perform pre-starts, and performing pre-starts using the ChekRite App.
Managing Defects
A defect, or Issue is an item that has been marked as failed on a checklist that will need to be resolved. Issues allow projects and suppliers to keep a full audit history of issues that were raised for an asset and how the issues were resolved.
If when a pre-start inspection is performed and a defect is identified by the operator either failing or answering no to one of the checklist questions, that checklist item will flag as an issue.
Items are weighted and the outcome of the pre-start is classified according to how serious an issue might be considered and what immediate action needs to be taken with the asset.
Defect Classification | Operator Prompt | Action |
Critical Defects | Do Not Operate | Asset MUST NOT BE OPERATED. Arrange immediate intervention onsite. Operator must complete a new pre-start prior to operation once defect has been addressed. |
Moderate Defects | Authorisation Required to Operate | Supervisor sign-off required prior to being allowed to operate. Issues / defects identified reported to the project. To be triaged in the ChekRite Portal. |
Minor Defects | Corrective Action Required | Asset may be operated. Issues / defects identified reported to the project. To be triaged in the ChekRite Portal. |
Reviewing Issues
When a checklist is submitted that contains defect items, an email notification will be issued directly to the project for Critical and Moderate Defects, advising that immediate action will need to be take onsite. In addition, an email will be issued to the Site Admin for your company daily with all open and outstanding issues that need to be managed.
- Go to Issues directly from the home page. All issues ever recorded against all assets on the project will display here.
- You may apply filters to display only the issues that you want to look at. Select the Outstanding Issues favourite view, by clicking on the heart symbol, to view open issues.
Resolving Assigned Issues
When the project assigns an issue to the Supplier Issues Admin (the same person as your Site Admin), the Issues menu icon in the ChekRite App will display a count.
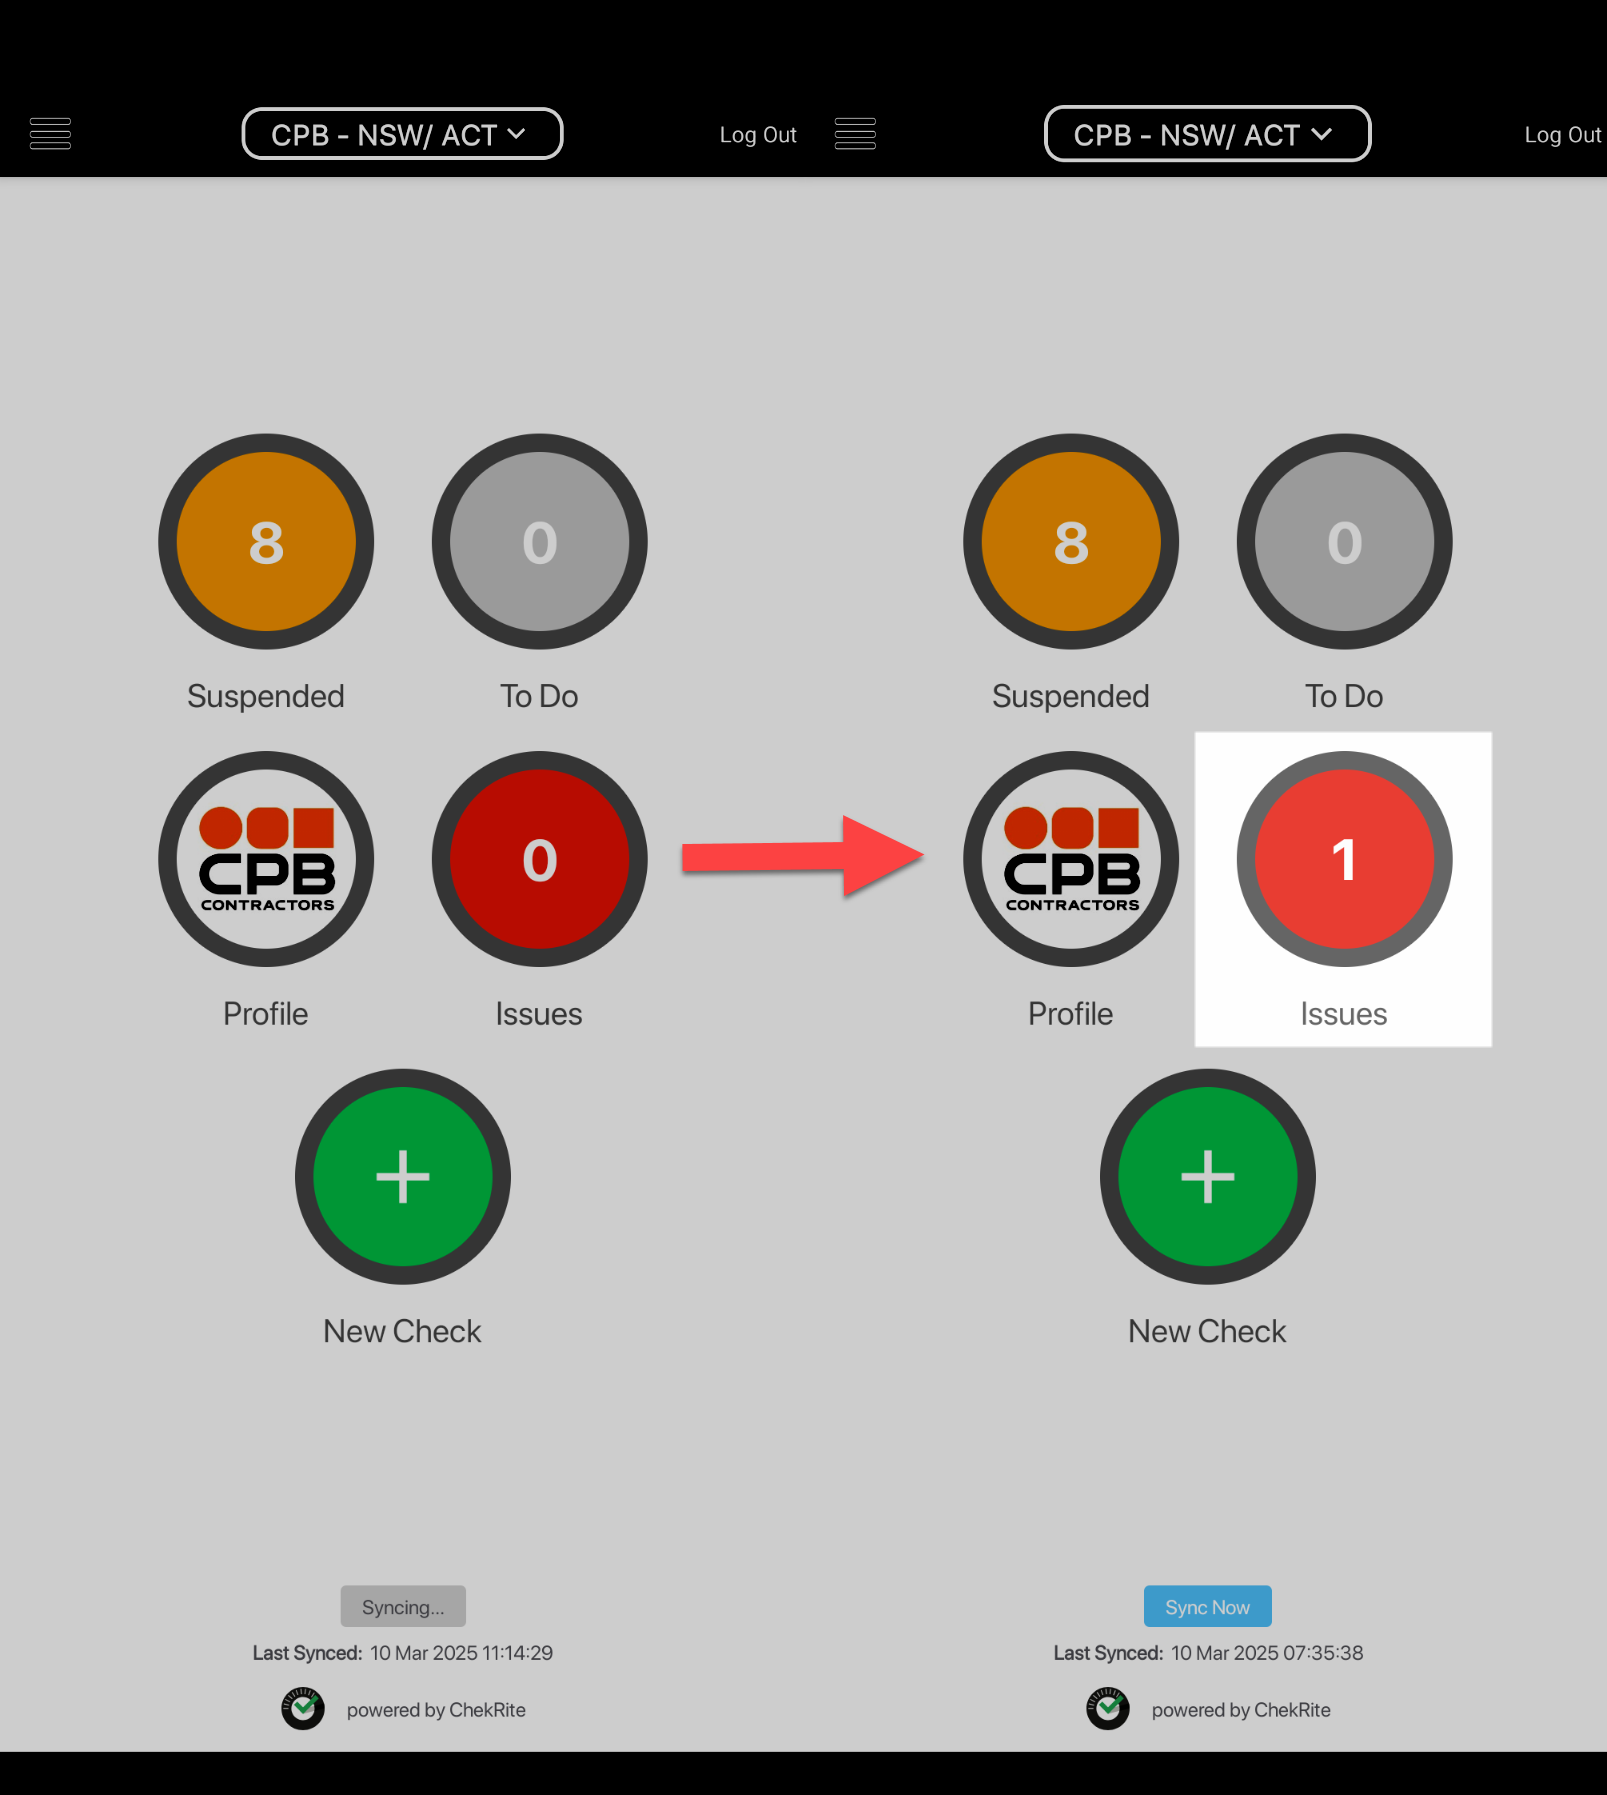
Click on the Issues button to view Issues. Open issues that have been assigned to the Supplier Issues Admin will appear under the Assigned to Me tab.
Issues will have an action assigned to them according to how the project wants the issue managed.
Action | Description |
Follow Up | The project has identified how the issue should be resolved and has assigned further actions. |
Info Required | The project has identified that there is not enough information to take immediate action on the issue. |
You can open an issue to view more information, such as photos, or voice notes from when the issue was raised, or any other history that might be associated with that particular issue.
You can also add additional comments, take photos, and record voice notes regarding the issue.
Closing Issues
If the issue has been resolved, it can be closed directly from the ChekRite App. If an issue is being closed from the app, evidence of completion should be provided in the form of photos, and a voice note or comment.

You can also close an issue from the ChekRite Portal after evidence of completion has been provided in the ChekRite App. You can confirm this by viewing the photos and voice notes or comments that have been provided in the issue activity history. When you close an issue from the ChekRite App, select the appropriate resolution reason from the list available.
Resolution Reason | Description |
Asset Off Hired - No Longer Onsite | The asset has been off-hired or is no longer approved to work on the project since the issue was recorded. |
Issue Noted - Not Applicable to Asset Class | The issue is not applicable to the asset class. Issue may be closed without comment. |
Issue Rectified by Supplier | Supplier of equipment has rectified the issue. Record of repair with supplier. |
Issue Rectified During Daily Service | If issue was rectified during daily servicing i.e. refuelling / greasing / oil top-up etc. |
Issue Rectified by Project Plant Team | Issue has been repaired by the onsite plant team. |
No Issue Recorded | Non issue, OK to close without further investigation. |
Once an issues is closed, it will no longer appear in the Issues list in the ChekRite App, and the Issues menu icon count will reduce by the number of issues that have been closed.
Adding a New User
To add a new employee you must have Site Manager access. Go to the ChekRite Portal to add and manage users.
- Go to Organisation > Users.
- Click on Add New User.
- Enter the users First Name, Last Name, Email, and Contact Number.
- Under Access Required enable the relevant access.
ChekRite App User
- Enable ChekRite App access if the user will need to complete asset onboarding checklists using the ChekRite App on their mobile device.
- Enter Employee ID and PIN.Employee ID - If the user doesn't have a unique employee ID they use regularly set it to the last 6 digits of their contact number.
PIN - Set the user’s initial pin to something like 0000 or 1111.DO NOT use personal pins such as credit card pin numbers, and DO NOT share your pin with other users. - Enable Change PIN on next sign-in to give the user the ability to change their pin when they next sign-in.
- Enable Send User App Pairing Details to automatically create the Device so you won't have to, meaning you can skip the Adding a New Device step. The user will also be sent a welcome letter which contains information on how to download the ChekRite App, login credentials, and their unique device pairing code.
Users may wish to have multiple devices setup, to set up another device please refer to the section Adding a New Device.
Once a new device is created, the user has 7 days to use the issued pairing code before it automatically expires for security purposes. If this window is missed, please refer to the Reissuing Device Pairing Code section below.
Each pairing code can only be used once. A new device will require a unique pairing code. A new user will require their own credentials and subsequent device with unique pairing code
ChekRite Portal User
- Enable ChekRite Portal access if the user will need access to add assets and upload asset documents and/or add additional users and devices.
- Enter the users email as the Username and specify their initial Password. The user can change it once they have logged in.
- Select a user Role from the drop-down list. Set it to either of the following:
Site Manager
Add assets and upload asset documents
Add users and devices
Site Asset Manager
Add assets and upload asset documents
- Enable Send User Welcome Letter if you would like to automatically send a welcome letter which contains their ChekRite Portal login credentials.
- Click Save.
Adding a New Device
Every mobile device that wants to access the CPB Contractors Digital Plant System must be uniquely registered. This includes new devices if you are upgrading or replacing an old, already registered device, or additional devices (e.g. you want to register a tablet if you already have a phone registered). To add a new device you must have Site Manager access, and the user accessing that device must already be setup. Go to the ChekRite Portal to add and manage devices.
- Go to Organisation > Devices.
- Click on Add New Device.
- Enter the Device Name (e.g. John Smith's iPad).
- Click on Generate Pairing code.
- Enable Send User Welcome Letter if you would like to send the pairing code directly to the user.
- Select the user to assign the device to and select how you want to issue the welcome letter (email or sms).The user must already be setup - follow the instructions for Adding a New User if they are not.
- Select the user to assign the device to and select how you want to issue the welcome letter (email or sms).
- Click Save
Reissuing Device Pairing Code
Once a device pairing code has been issued, you have 7 days to pair your device. If you miss this window, you can reissue a pairing code through the ChekRite Portal.
- Go to Organisation > Devices.
- Find and select the Expired device.
- Click on Pairing Code.
- Click on Share Pairing Code if you would like to automatically send the new pairing code directly to the user.
- Select the user to assign the device to and select how you want to issue the welcome letter (email or sms).
- Click Save.
If a device that is already registered is asking for a new pairing code, follow the steps above, however, when you find and select the affected device you may have to Unregister Device before Step 3.
Installing ChekRite App
Here is a video that you can share with your users to show them how to download and install the ChekRite App.
Receiving ChekRite App Pairing Code and Employee Credentials
Your pairing code and employee credentials for the ChekRite App may be issued to you via email, text or a link provided in the welcome letter. Follow the steps in the video below to find your ChekRite App credentials.
FAQ's
Who do I contact if I need help?
There are many ways to contact help.
For CPB Contractors Digital Plant System technical issues pertaining to the ChekRite system (portal or app), please contact us through the Live Chat feature in the ChekRite Portal.
If you have queries relating to asset onboarding, technical plant specifications, site requirements, booking physical inspections, off-hiring assets, or discussing rejected assets; please contact the authorised project plant representative for your project via the contact details below:
State | Project Code | Project Description | Project Plant Email |
NSW | CPB NSW Plant Yards | CPB NSW Plant Yards | |
HumeLink West | HumeLink West | ||
M6S1 | M6 Stage 1 | ||
Riverina Redevelopment JV | Riverina Redevelopment JV | ||
SCLWW | Sydney Metro City & Southwest Line-Wide Works | ||
TPCF | Tomago Precast Facility | ||
Western Sydney Airport Command Centre & Canine Facility | Western Sydney Airport Command Centre & Canine Facility | ||
WFU | Warringah Freeway Upgrade | ||
QLD | AAPoW | Army Aviation Package of Works | |
APLNG Gas Gathering | APLNG Gas Gathering | ||
BAC International Airport Security and Retail Upgrade | BAC International Airport Security and Retail Upgrade | ||
C2CD2 | Cooroy to Curra Section D - Contact 2 | ||
CopperString 2032 | CopperString 2032 | ||
CPB JV (CopperString 2023) | CPB/UGL JV CopperString 2032 | ||
CPB QLD Plant Yard (Darra) | Darra Plant Yard | ||
Cross River Rail - Rail, Integration & Systems | Cross River Rail - Rail, Integration & Systems (UNITY Alliance) | ||
Cross River Rail - Tunnels & Stations Development | Cross River Rail - Tunnels & Stations Development (CPGU JV) | ||
Logan and Gold Coast Faster Rail | Logan and Gold Coast Faster Rail | ||
Logan Enhancement Project | Maintenance/Defect Works | ||
Paradise Dam Improvement Project | Paradise Dam Improvement Project | ||
New Bundaberg Hospital | New Bundaberg Hospital | ||
NQMTR | North Queensland Mid-Term Refresh | ||
SA | Fleurieu Connections Alliance | Fleurieu Connections Alliance | |
PW2PA | Port Wakefield to Port Augusta (PW2PA) Alliance | ||
VIC | CPB VIC Plant Yards | CPB VIC Plant Yards including: - Laverton Plant Yard | |
Eastern Freeway Upgrades: Tram to Springvale | Eastern Freeway Upgrades: Tram to Springvale | ||
M80 P2W | M80 Capacity Improvements - Princes Freeway to Western Freeway | ||
Melbourne Airport | Melbourne Airport | ||
NEL | Spark - North East Link Project | ||
SRL Package C | Suburban Rail Loop Package C | ||
Vantage Data Centre | Vantage Data Centre | ||
WA | BHP Wind Fences | BHP Wind Fences | |
CPB WA Plant Yards | CPB WA Plant Yards | ||
NEWest Alliance - TCL | NEWest Alliance Thornlie to Cockburn Link | ||
NEWest Alliance - YRE | NEWest Alliance - Yanchep Rail Extension | ||
PDP1 | Port Hedland Debottlenecking Project | ||
RAAF Curtin Learmonth | RAAF Curtin Learmonth | ||
Western Ridge Crusher Project | Western Ridge Crusher Project | ||
NZ | Waikeria Prison Development Expansion | Waikeria Prison Development Expansion |
How do I know if my asset has been submitted?
If you have followed the steps in Submitting an Asset to a Project your asset should have been submitted, and will now appear on the Asset Approvals page with a Pending status. Your site admin will have also received an email confirming the submission. If the asset is not showing on the Asset Approvals page, confirm that you have done the following:
- Added the Asset in the ChekRite Portal (desktop)
- Added Asset Documents in the ChekRite Portal (desktop)
- Completed the Checklists in the ChekRite App (mobile device), including:
- Plant Risk Assessment Review checklist
- Clean Down Declaration checklist
- Asset Inspection checklist
- Submit Asset checklist
The Submit Asset checklist is the most common checklist missed. This checklist MUST be submitted after all other checklists to ensure the asset is submitted to the project.
How long does it take for the project to approve my submission?
The project plant team will aim to review your submission as soon as possible. You should be allowing at least 5 business days for the entire process - from adding the asset to approval. The submission approval process will be accelerated if all requirements are met upon asset submission. If the approval is urgent (meaning same day approval required), please contact the project plant team directly.
What if my asset is rejected?
The site admin for your company will receive an email with actions to complete, and the project approval status will change to Rejected. There will be an exception report attached to the email, which will outline failed items in RED and the 🔊 speaker symbol will link to an audio message for further information. Please correct all issues and resubmit using the Submit Asset checklist under checklist category 3. Review & Submit in the ChekRite App.
What if I can't find the Asset Class (Make Model) for my asset?
If your asset class is not listed, you can use the Advanced Search to try and narrow down to find another one suitable, sometimes it can just be the series name for that model e.g. if your asset is a Hino 500 FM 2628, you could add this under Hino 500 FM.
If you still can’t find a suitable asset class, you can request a new one using the Request Asset Class option. Select from the list of Asset Categories available and enter your full machine details (Make and Model).
The CPB - ChekRite Admin team will review the request and make available a new asset class for you to add and submit your asset to as soon as possible.
Asset Class Advanced Search
If the asset class you are trying to add is not displaying you can use the Advanced Search to narrow down your search by Asset Category, Asset Class (make), and Asset Sub-Class (model), to see if there isn’t something already available to add your asset under. If you still can’t find a suitable Asset Class, a Request Asset Class option will display.
Request Asset Class
If you still can’t find a suitable asset class for your asset using the Advanced Search, a Request Asset Class option will display. Click on this option and follow these steps to add a new one:
- Confirm your email address and mobile number (so that we can contact you about the request).
- Select the Asset Category for your asset (you must select one from the list available).
- Select from the available Asset Classes already under that category. If there isn’t one available type in the Make of the asset (e.g. Toyota).
- Type in the Asset Sub-Class field the Model of the asset (e.g. Hilux).
- Click Send.
A New Asset Class Request email will automatically be sent to the CPB Digital Plant team, and you will receive a notification with the details of the request. We will review and action the request. Requests will typically be fulfilled in the same business day when made during our support hours.
What documentation is required for the different types of assets?
You can see the documentation requirements for the different categories of assets here.
What if I don't have one of the required documents?
If you submit your asset for approval without the required documents, your submission will not be accepted, and subsequently your asset will not be approved for site operation. These are not only project requirements but federal safety requirements too. If there are circumstances where the required document is unobtainable please contact the relevant Project Plant Team to discuss.
What if the available Asset Inspection is not relevant to my asset?
If you believe the assigned checklist is not accurate, please contact the Live Chat for assistance.
What do I do if my approved asset has new/additional attachments?
If you have a new or additional equipment attachment for an already approved asset, the attachment will need to be inspected and approved. You will need to contact the authorised project plant representative for the project the asset is approved for to facilitate the addition of an attachment. You will also need to ensure the appropriate documentation is available for the attachment. You will need to ensure there is an operating manual available in the machine cab, and a separate Plant Risk Assessment or updated Plant Risk Assessment that identifies all control measures for the attachment.
I'm setting up a new user – What is the Employee ID?
An employee ID and PIN are a minimum mandatory requirement for ChekRite App users. The user will require a unique employee ID to log in to the app. We recommend something memorable: the last 6 digits of the user’s mobile number is typically unique and easy to remember.
My pairing code has expired – How do I get another one?
For security reasons, the pairing code is automatically expired after 7 days. If you have ChekRite Portal access, you have all the tools to reissue a new pairing code. See the section: Reissuing Device Pairing Code.
If you don’t have ChekRite Portal access, please request this from your site admin. If you are unsure who that is, please contact the Live Chat.
Where can I find my ChekRite App login Credentials?
Your ChekRite App login credentials may have been issued to you via email, text or as a link in your “Welcome to ChekRite” welcome letter. Please see the section: Receiving ChekRite App Pairing Code and Employee Credentials.
If you have forgotten your details and have access to the ChekRite Portal, you can retrieve them via your user page.
- Go Organisations > Users > Find and select yourself.
- Click on Modify User.
- Find the ChekRite App Credentials tab.
- From here you can retrieve your Employee ID, if you have forgotten your pin you can reset it by retyping your current pin.
- Click Save.
There is also an Forgot Employee ID and Forgot PIN reminder tools availabile in the ChekRite App for you to try to recover your credentials.
How can I view and download inspections that have been performed on an asset?
All the inspections that are completed on an asset are stored as an Inspection record on the ChekRite Portal and ChekRite App. You can view and download completed inspections as shown in the following videos:
ChekRite Portal:
- Go to Organisation > Assets > Find and select the asset.
- Click on the Inspections tab.
- Find and select the relevant inspection, you can sort by Submitted date to find the most recent.
- By default, the inspection will show failed questions or questions that have extra info recorded (e.g. photos, serial numbers etc.). To view all questions check the All Questions box.
- To view an online version of the inspection in a separate browser tab click on Online Inspection.
- To download a copy of the report click on Generate PDF from the Online Inspection window.
ChekRite App:
- Sign In to the ChekRite App.
- Select New Check and navigate to or search for the asset.
- Select the Actions icon, if you are on a phone you may need to swipe across where the asset is displayed at the top of the screen.
- Select the History tab, and select the inspection record to view.
How do I onboard my asset to a different project?
Follow the Supplier Asset Submission Process to submit to the new project (you will need to select the new project when completing the checklists). If you are onboarding an existing asset start here.
How can I find out who the Site Admin for my company is?
The details of the Site Admin are listed on the homepage of the ChekRite Portal in the lower right hand corner.
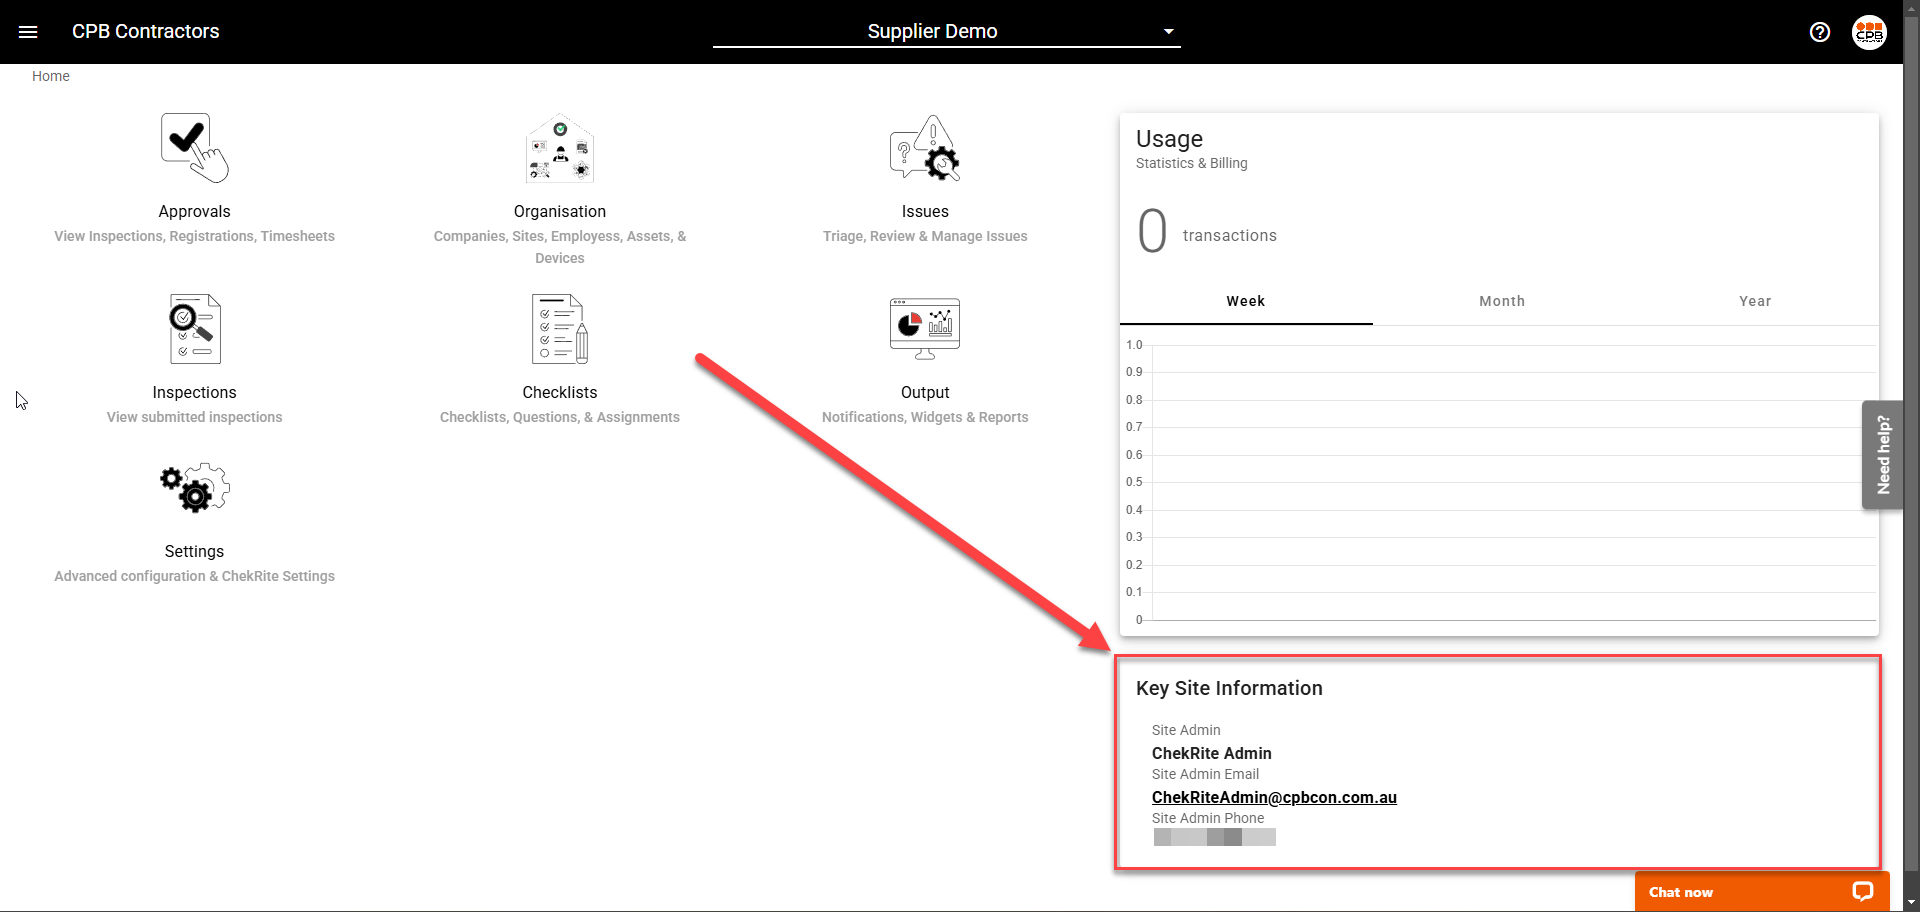
If you need to update the Site Admin details, please reach out via the LiveChat.
What do the different project approval statuses mean for my asset?
Here is an explanation of the different statuses you may see against your asset.
Status: | Description: |
Asset does not appear | The asset has not yet been submitted, you will find it on the Assets page. Complete the Supplier Asset Submission Process to submit an asset to a project. |
Pending | The asset has been submitted and the project plant team is yet to review the submitted documents and checklists. |
In Review | The asset documentation and checklists have been reviewed and accepted pending a physical project asset inspection. Please contact the project to arrange. OR Physical project asset inspection has been completed by the project plant team and asset is awaiting final approval. |
Approved | Asset has been approved for use on that project. |
Rejected | The asset has been reviewed or inspected by the project plant team and has been rejected due to non-compliance or incomplete information supplied. Please rectify the issues as per the rejection email and resubmit using the Submit Asset checklist under checklist category 3. Review & Submit in the ChekRite App. |
Returned | The asset is no longer required and has been demobilised / off-hired from the project. |