Table of Contents
Tables & Items

The Tables & Items area is where you can adjust certain configurations in your ChekRite portal such as Checklist Categories, Asset Categories, Employee Departments, Dynamic Lists and more.
Tables
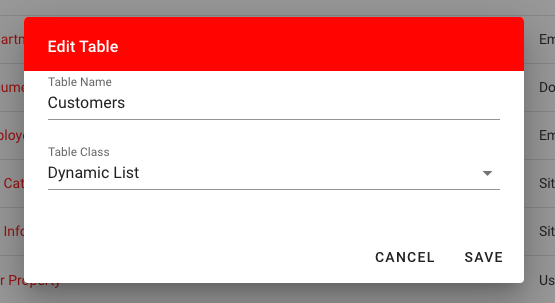
Before you can start adding items to tables you need to add the Table itself. To do that:
- Navigate to Home -> Settings -> Tables & Items
- Check to ensure the table you want doesn't already exist and if it doesn't push the Add New Table button.

- Enter the Table Name you want to call the table. You don't always need to name the table exactly the same as the Class as this might change for your business.
- Select the Table Class of the table, which determines where it is used and what options appear on the screen.
Table Classes
With the exception of a Dynamic List, each table class can only be used once. Here is a list of all the classes of table that are in ChekRite for you to add as and when you need them.
Class | Description |
Asset Category | The categories of assets that appear in the drop down list inside the Asset Classes section of Sites. Items may be added on the fly in the Asset Classes tab but you can edit them here. |
Asset Component | These are sometimes called component codes. These are a way of grouping together questions that might be related to the same component. e.g. whilst you might have 4 wheel questions on a car (front left, front right, etc.) you might want to group them all together under the component code of wheels for reporting purposes. |
Asset Property | These are the Asset Properties for your assets. Define these here and they can be used elsewhere in the system including in questions, on assets, and even in controls. |
Checklist Category | The categories of checklist that appear in the drop down list inside the Checklists section. Items may be added on the fly in the Checklists tab but you can edit them here. |
Company Property | These are the properties for your company that you can use to extend the information you store on your company. This might include things like Company Number or Website. |
Dynamic List | You can create as many of these as you need. See the Dynamic List section below. |
Question Icon | Sometimes you might want to display a custom icon beside a question in the apps. You can set those question icons on this table. |
Risk Category | Used for Risk Assessment questions to record categories of risk. |
Risk Report Group | Used for Risk Assessment questions to record the report groups that risks are separated into. |
Risk Standard | Used for Risk Assessment questions to record the industry or statutory standards that might apply to this risk. |
Site Property | These are the properties for your site that you can use to extend the information you store on your Sites. This information is available to be used in conditions of checklists and notifications. This might include things like Insurance Certificate or Landlord name. |
User Property | These are the properties for your users that you can use to extend the information you store on your Users. This information is available to be used in conditions of checklists and notifications. This might include things like Drivers Licence Number or Employee Start Date. |
Welcome Letter Text | This is user definable text that you can include at the bottom of each welcome text or email that is sent to users as part of the device registration. You can have different messages for the different apps of ChekRite. |
Dynamic Lists
Dynamic Lists are super cool. No really, they are. This is a way for you to define a list of items that pertain to your business and have users select them from a list. The really cool thing is that the end users can dynamically add to this list if you allow them to all without having to make a new version of a checklist and publish it again.
You can create as many Dynamic Lists as you need for your business. The following is an example set up for Customer Names.
Deleting a Table
Don't delete a table. Not ever. If any of the items in that table have been used in inspections you will potentially break the reporting. Most of the time this remove button is disabled.
Items
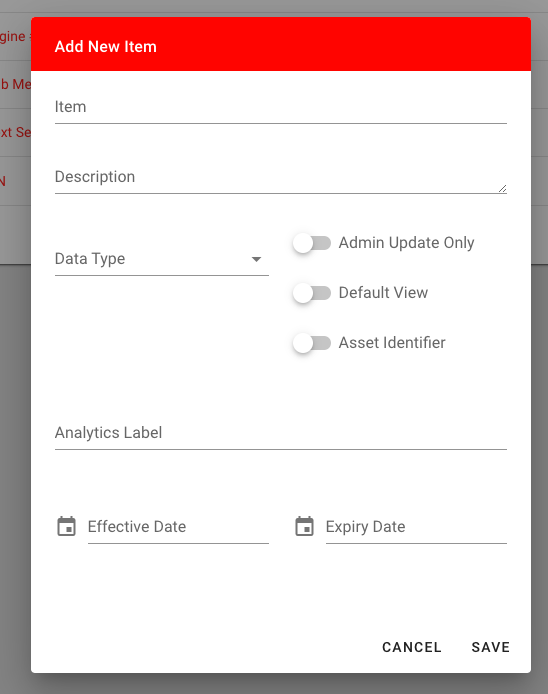
Once you have the table defined you can add items to it. To do that:
- Navigate to Home -> Settings -> Tables & Items
- Select the table you want to add items to
- Enter the name of the item in the Item field
- Optional: Enter a description of the item in the Description field. This can be used for reporting and in a Dynamic List is also displayed on the screen under the item.
- Enter any other parameters that might appear in this section based on the class of table you selected. For example, in the Asset Properties table you can also select the Data Type, Analytics Label and decide if this asset property should also be used as an alternate asset ID.
Modifying & Deleting Items
Don't modify or delete items. If there is a spelling mistake then certainly fix it but if you change it from one value to another, then all the historical records such as inspections that were entered or assets that were created will take on that new value.