ChekRite Portal
Getting Started
Organisation
Logging In & Out of the ChekRite Portal
Managing Your Sites
Managing Assets
Managing Asset Documentation
Managing Users
User Roles and Access
Managing Your Devices
Managing Groups
Asset Utilisation
Checklists
8 Steps to Building a Checklist
Creating a New Checklist
Setting Up the Structure of Your Checklist
Extra Info
Sub-Checks
Fail Weights & Scores
Reviewing Your Checklist
Testing Your Checklist
Publishing Your Checklist
Assigning a Checklist to an Asset Class
Assigning Warnings & Manuals
Modifying a Checklist
Output
Issues
Customising ChekRite
Guides
ChekRite App
Getting Started
Downloading ChekRite on your Phone or Tablet
Updating ChekRite
Synchronising
Logging In & Out
ChekRite Dashboard
Welcome to your ChekRite Demo
Starting an Inspection
Adding assets on the fly
Resetting the ChekRite App
ChekMate App
Troubleshooting
Resources
- All Categories
- ChekRite Portal
- Organisation
- Managing Groups
Managing Groups

Groups are used in the scheduling and issues system at the moment but increasingly will have a broader use throughout ChekRIte.
Rather than think of a Group as a department of people you should think of it more as a skill set. People can be members of more than one group or none at all. For example, say your company has forklifts and light vehicles. Now most people can drive a light vehicle with their normal car licence, but driving a forklift requires a special licence. In this case, you might create two Groups for Light Vehicle Licensed and Forklift Licensed. Then someone who had both licences would be able to complete tasks for both, but someone who only had a Light Vehicle licence would not see the tasks relating to Forklifts.
Creating Groups
Groups are created at a site level so ensure you are in the correct site.
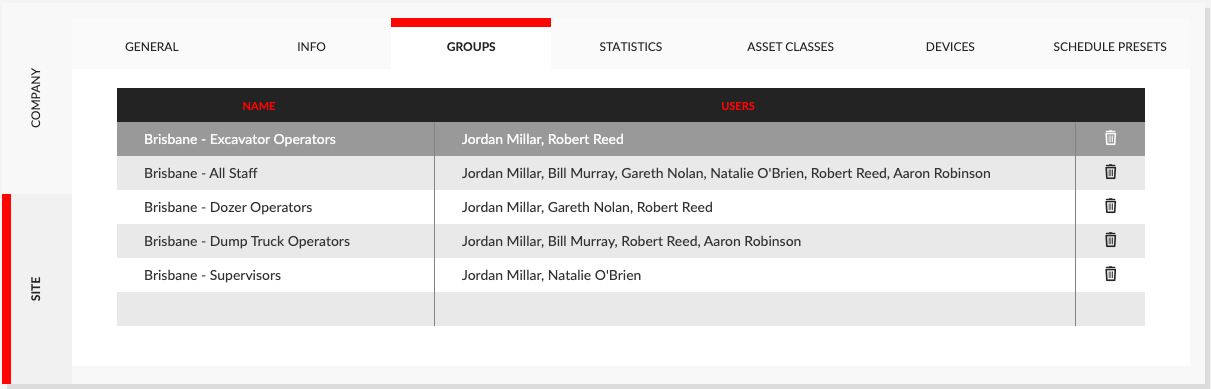
- Navigate to Companies -> Site -> Groups
- Double click in a blank line at the bottom of the table in the Name column.
- Enter the name of the group.
To rename a group, simply double-click on the name of the group and edit it. To delete a group, use the trash icon at the end of the row of the group you want to delete.
Assigning a User to a Group
Users are assigned to Groups through the Users system.
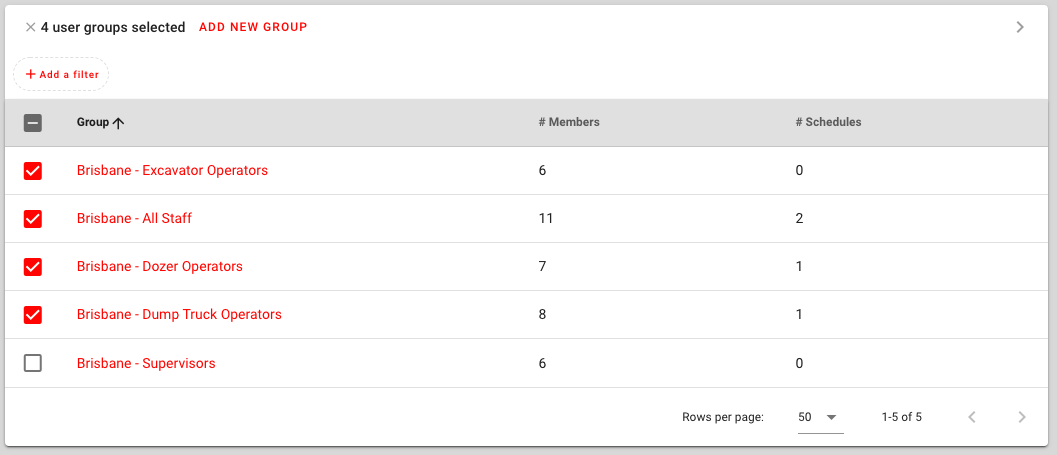
- Navigate to Organisation -> Users
- Search for and select the User
- Click on the User Groups panel to open it
- Select or unselect the Groups that you want the user to be a member of.