ChekRite Portal
Getting Started
Organisation
Logging In & Out of the ChekRite Portal
Managing Your Sites
Managing Assets
Managing Asset Documentation
Managing Users
User Roles and Access
Managing Your Devices
Managing Groups
Asset Utilisation
Checklists
8 Steps to Building a Checklist
Creating a New Checklist
Setting Up the Structure of Your Checklist
Extra Info
Sub-Checks
Fail Weights & Scores
Reviewing Your Checklist
Testing Your Checklist
Publishing Your Checklist
Assigning a Checklist to an Asset Class
Assigning Warnings & Manuals
Modifying a Checklist
Output
Issues
Customising ChekRite
Guides
ChekRite App
Getting Started
Downloading ChekRite on your Phone or Tablet
Updating ChekRite
Synchronising
Logging In & Out
ChekRite Dashboard
Welcome to your ChekRite Demo
Starting an Inspection
Adding assets on the fly
Resetting the ChekRite App
ChekMate App
Troubleshooting
Resources
- All Categories
- ChekRite Portal
- Guides
- Reading ChekRite PDFs
Reading ChekRite PDFs
When building checklists it's often useful to generate a PDF version of the full checklist for you to verify the checklist. Things you may wish to check for include that:
- there are no spelling and grammatical errors
- the order of the questions match the order the user is likely to be undertaking the inspection
- the sub-checks (options presented when a question is 'failed') are comprehensive
- you have Extra Info (e.g. photo, audio, etc.) in the right places
- the correct response type is used for the question
Those with portal access to checklists can 'print' a PDF version of both published and unpublished checklists for viewing online as well as printing.
These PDF’s are structured to display the response type, question title, task, any sub checks, and any extra info, so the layout is slightly different from the reports generated when a checklist is submitted using the ChekRite App.
As an example, here is an extract from a printed checklist:
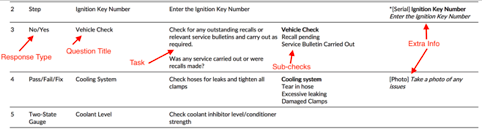
The fields explained
Response Type:
The type of response to the question. This determines what buttons or controls are displayed on the screen for the user to select. This may be: yes/no, a step, pass/fail/fix, or customised for the checklist. You can see a visual example of what these response types will look like on screen here.
Question Title:
The title of the question. This is also the heading that appears on any reports. It should be short and concise and is limited to 35 characters.
Task:
The task to be completed by the user. This should go in to as much detail as necessary for the user to complete the task.
Sub Checks:
The multiple choice options that the user is presented to drill down into more detail about the reason for the question not passing. This is presented on screen as a hierarchical tree that can be drilled into. Optionally, you can create a longer more user friendly description for the report. If you have created a longer description it will appear here, however, if none exists then you will see the “path” of the tree instead. e.g. Seat: Passenger: Ripped.
Extra Info:
Any additional information inserted into the checklist. This can include: photographs of damage, audio messages, dates, etc.