Table of Contents
Sub-Checks
After Extra Info, comes Sub-Checks. These are the options presented to the checklist user usually to describe the issues found, but may also been designed to capture further information about a certain subject. Just like Extra Info, not every check or indeed every checklist requires sub-checks. However, for those checks which do, we recommend consulting with subject matter experts who understand the range of issues that can arise and know best how to categorise them.
There are a couple of things to be aware of when designing sub-checks. Unless customised, responses with a “Pass” status will not trigger sub-checks or extra information. Also, when both Sub-Checks and Extra Info are attached to a question, when triggered in the App for the user, the sub-check selection page will always appear prior to the assigned extra info types. This makes for a better flow through the check.
What fields appear on the Sub-Check tab
Before we move on to how to set up sub-checks, let's take a moment to become familiar with the fields you will be populating on the Sub-Check tab.
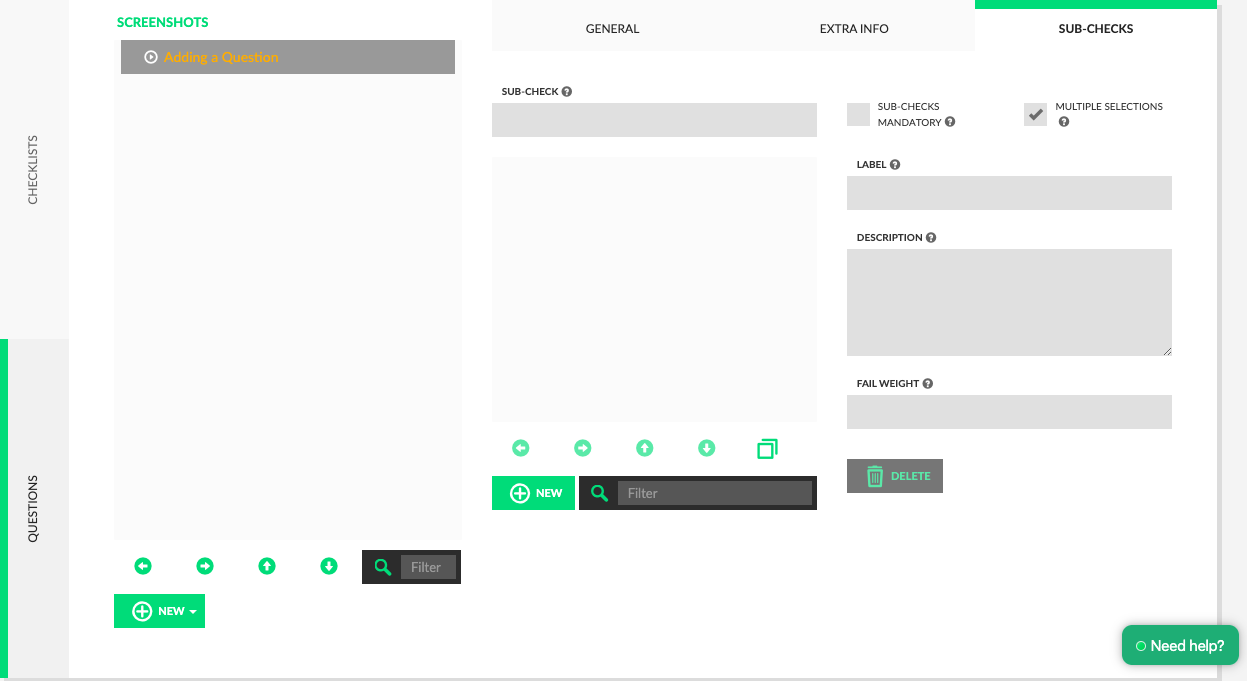
Mandatory Sub-Checks
This tick box makes sub-check selection mandatory if required. Use this feature to ensure the user provides adequate descriptive information regarding any issue flagged.
Multiple Sub-Check Selections
This enables users to select multiple sub-checks for a given issue. This allows for instances where multiple faults of a different nature are identified within the one check.
Label
This is where you enter a succinct description that specifies the nature of an issue found. For instance, should the purpose of a check be to inspect the condition of a car's bumper bar, you may design the sub-check to offer the user the choice of "scratched," "dented," and "corroded." Brevity is key for a user-friendly check and some devices do not support a lengthy label. You are limited to 35 characters in this label field.
Description
While the Label field is about brevity for the ChekRite App user, the Description field provides a longer clarification of an issue for those who are receiving, reviewing and analysing the reports. Therefore, this description only appears where appropriate in reports and is not visible to those conducting the inspection.
When reporting exceptions, the name of the failed check is followed by each layer of the sub-check hierarchy (we'll tell you more about hierarchies in a moment!). In many instances this is sufficient, for example, “Driver Seat: Buckle: Faulty”. For other times, a description provides the necessary elaboration. For example, for a failed Fire Extinguisher check a user might select this hierarchy of sub-checks: ‘Ground Level > Loose’. The long description for the ‘Loose’ sub-check would appear on the report as: “Ground-level extinguisher mounting is loose.”
How to add sub-checks
- Go to Checklists > Questions > Sub-Checks.
- Enter the Question title in the Sub-Check field or a more specific instruction for the user regarding how to select sub-checks.
- Select the Mandatory box if the selection of a sub-check is to be mandatory.
- De-select the Multiple Selections box if the user is to select only one specific sub- check.
- Enter your first sub-check into the Label field. Press Enter, Tab or click out of the field for the sub-check to appear in the list.
- To add more sub-checks at the same level, clear the “Label” field by pressing on the sub-check that you have just added in the list panel. Clicking “New” without clearing the “Label” field tiers the next sub-check below the initial sub-check. To reposition the sub-check, press the arrow buttons at the bottom of the sub-check list panel or click and drag the sub-check to the desired position.
How to delete a sub-check
- Select the sub-check to be deleted so that it is visible in the “Label” field.
- Click Delete button.
Sub-Check hierarchies
Creating a hierarchy of sub-checks enables the selection of multiple layers in order to describe an issue accurately. Often an individual check involves the inspection of a number of components which have the potential to fail in a number of different ways. A car's bumper bar, for instance, may be dented, scratched, corroded and so on. In this context, the use of a hierarchical sub-check structure would be appropriate as opposed to having the user select from a lengthy list of every component and their potential failure modes.
When building a hierarchy of sub-checks, consider what kind of naming convention will be most suitable. The first layer of sub-checks is usually the items, components, or locations within the check; the second lists descriptive options for each item in the first layer. Making the sub-check selection compulsory for the user avoids the logging of non-descriptive faults that are then difficult for others to interpret.
Let's revisit the earlier example of a faulty seat buckle. A check entitled “Seating & Seatbelts” may be a Pass/Fail question and describe a Faulty Driver Seat Buckle using the following hierarchy:
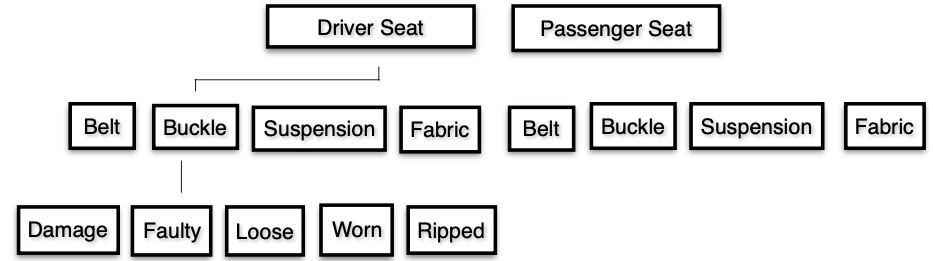
How to build a sub-check hierarchy
- Select the sub-check so that it appears in the Label field.
- Press New button.
- Enter the label for the sub-check to be added at the next tier. You can tier as many sub-checks as you wish. Think about the most appropriate hierarchical structure for your intended application. An example might be to have the first tier as the various components that could fail for a specific check and the second tier to be the various failure modes for each listed component.
- Press the triangular arrows in front of each hierarchy to expand and collapse the sub- check folders. Use the green/white arrows beneath the sub-check list panel to reposition or click and drag.