ChekRite Portal
Getting Started
Organisation
Logging In & Out of the ChekRite Portal
Managing Your Sites
Managing Assets
Managing Asset Documentation
Managing Users
User Roles and Access
Managing Your Devices
Managing Groups
Asset Utilisation
Checklists
8 Steps to Building a Checklist
Creating a New Checklist
Setting Up the Structure of Your Checklist
Extra Info
Sub-Checks
Fail Weights & Scores
Reviewing Your Checklist
Testing Your Checklist
Publishing Your Checklist
Assigning a Checklist to an Asset Class
Assigning Warnings & Manuals
Modifying a Checklist
Output
Issues
Customising ChekRite
Guides
ChekRite App
Getting Started
Downloading ChekRite on your Phone or Tablet
Updating ChekRite
Synchronising
Logging In & Out
ChekRite Dashboard
Welcome to your ChekRite Demo
Starting an Inspection
Adding assets on the fly
Resetting the ChekRite App
ChekMate App
Troubleshooting
Resources
- All Categories
- ChekRite Portal
- Checklists
- Creating a New Checklist
Creating a New Checklist
In order to start building your checklist, you firstly need to create a new checklist in the ChekRite portal. You also need to give it a name and capture some extra detail about its purpose. This is really quite simple, just:
- Go to Checklists > Checklists.
- Click New beneath the list panel.
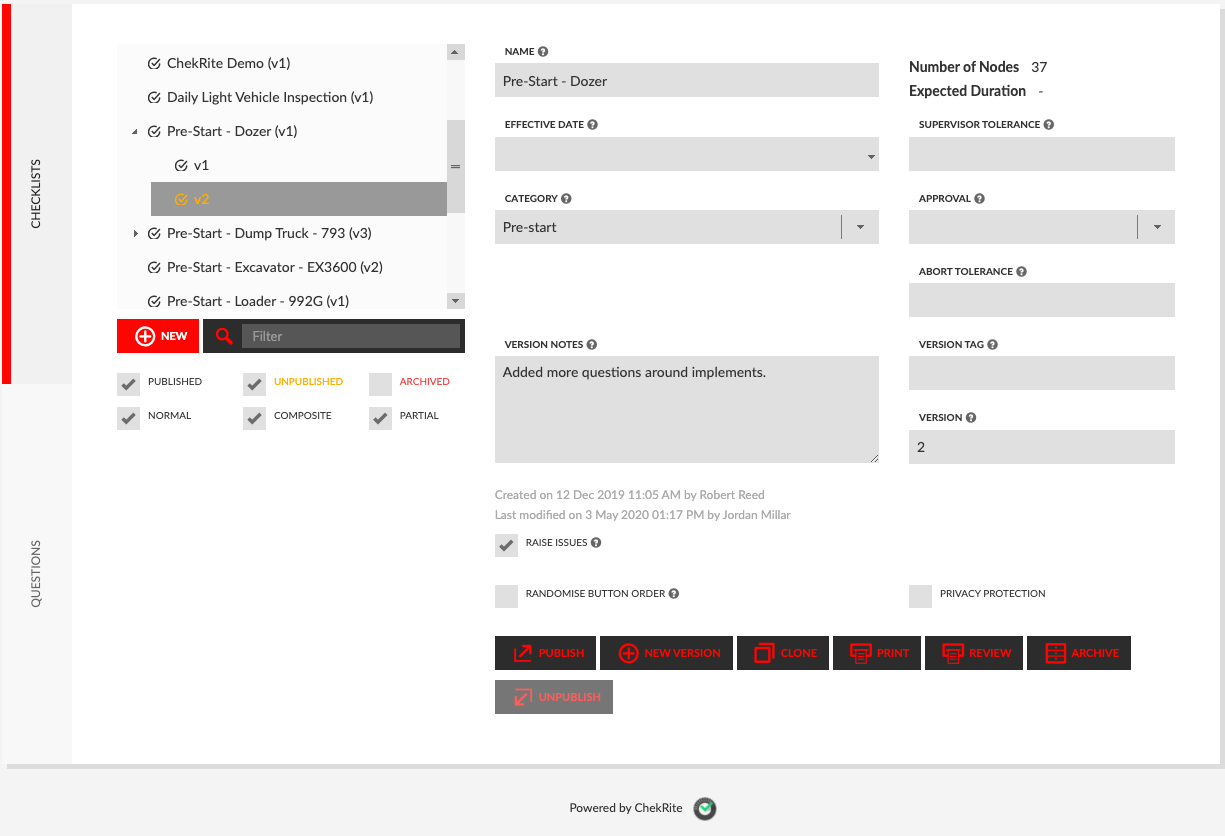
- Enter the name of the checklist into the Name field.
- Optional: Enter a date in the Effective Date field. This may be the day you begin creating the checklist or the day that you intend to publish it.
- In the Category field use the drop-down menu to select the category of checklist, such as Inspection.
- Optional: If you want to name this version enter the name in the Version Tag field. If you don't name the version of the checklist it will just be given a sequential version number. However, if your standard is to have a version name such as the date or other internal document ID then you can enter that here.
- Optional: Enter any information relating to this version of the checklist in the Version Notes field.
- Optional: The Raise Issues checkbox tells you whether or not failed items for this checklist will raise issues in the issue sub-system.
- Optional: If you check the Randomise Button Order checkbox, when the user goes through the checklist, the order that the buttons appear will be randomised to ensure they are paying attention to what they push rather than just pushing in the same place each time.
- Optional: If you check the Privacy Protection checkbox, only the person who submitted the checklist will be able to see the details of the checklist in the ChekRite app. Other users will not be able to view the details of that inspection. This only affects the ChekRite app and managers and other users with Portal access will still be able to view the details of the inspection.