Table of Contents
Setting Up the Structure of Your Checklist
Now that you've opened a new checklist, click on the Questions tab. This tab can be likened to the engine room for building your checklist. This is where you create the flow, the look and feel, and most importantly the detail of the tasks the checklist user is going to undertake.
Before you move on to setting up the structure of your checklist, it's beneficial to become familiar with the layout of this tab, the various fields and their purpose. The Questions tab is divided into three sub-tabs. These are:
- General
- Extra Info
- Sub-Checks
Questions → General
The General tab is used to create and arrange your checklist.
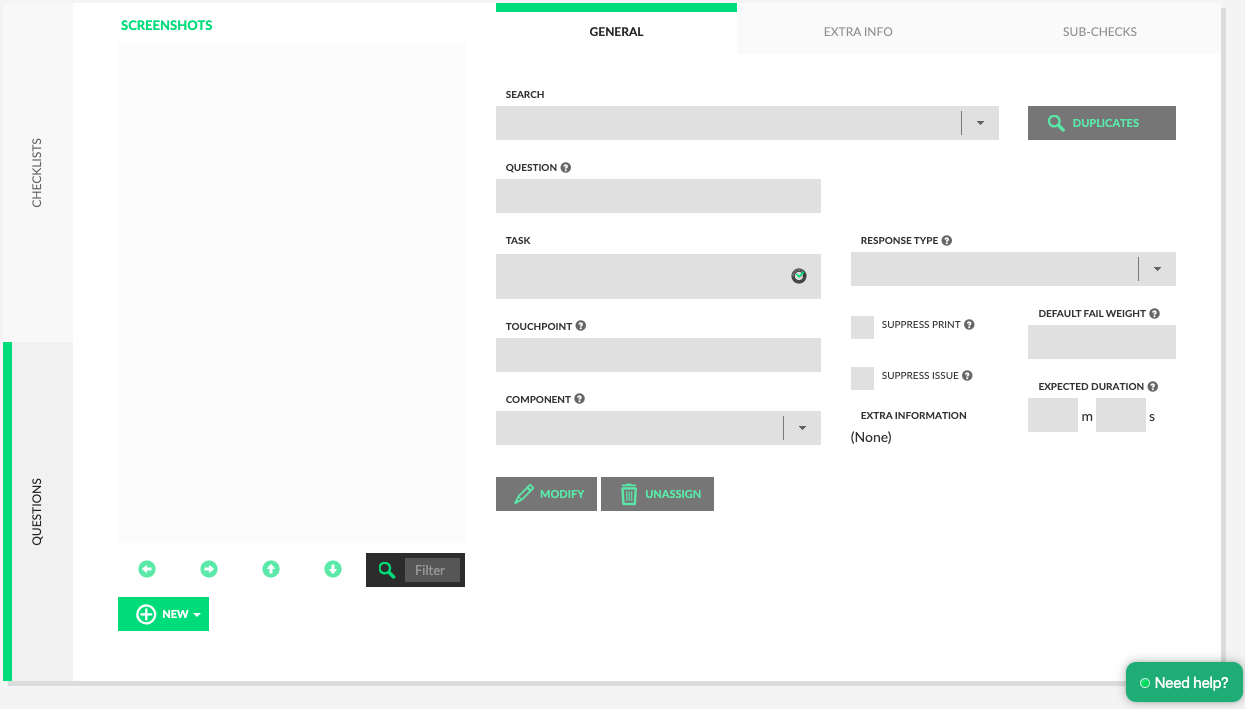
Question List Panel
This panel to the left of your screen contains the list of questions you create in the order they are to appear in your checklist. Underneath, is the New button with a drop-down menu for:
- Question
- Condition
- Repeatable Block
- Group Title
Question and Group Title are the most commonly used building blocks of checklists.
Search
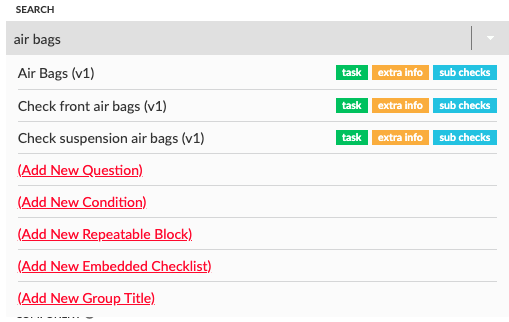
The purpose of the Search field is to determine whether the task you are proposing to create already exists in any published or unpublished checklist for your company. This avoids duplication as in many cases the exact same question can be used across multiple checklists. Move your cursor over the “Task”, “Extra Info” and “Sub-Check” boxes and a tooltip will appear showing what each of those elements contain for that question. If they are grey then it means there is nothing contained within that field.
Question
This is a mandatory title field which is limited to 35 characters. Therefore, the text entered here must necessarily be succinct. Generally the name of the item or component being checked is sufficient. Avoid any titles which describe how to undertake the check. As this is also the heading that appears on any reports, when devising titles keep in mind those who will be analysing the collected data.
Task
This field provides your checklist users with the instruction necessary for the task they are being presented with. Your choice of wording should, therefore, be clear and precise so that there is no misunderstanding about what it is they are expected to do, For an inspection, for instance, without going into excessive detail users should be informed of which components are to be checked, what they should be looking for, and how to go about looking.
Clearly worded task descriptions also enhance consistency and standardisation which in turn improves the overall output of data. We recommend consulting with subject matter experts within your organisation for detail as to the precise nature of the task.
Should you have a pre-existing, paper-based checklist that you plan converting to the ChekRite environment, take into consideration whether:
- the check wordings are clear, precise and fluid. If so, your work here has become that little bit easier. Simply copy and paste each instruction into the Task field on the Question tab.
- checks need splitting into two or more checks. This is so checks can be more clear with greater opportunity for users to pin-point precise problem areas. Whilst it may seem that this is adding more steps to the inspection, in reality, it is not lengthening the inspection duration. For example, a pre-existing check sheet for a truck might have a single check regarding “Wheels”. Separating this check into “Position 1”, “Position 2”, “Position 3”, and “Position 4” and sequencing each of these checks as the user moves around the vehicle means that the order of the inspection is streamlined as there is optimal fluency for the user, and any fault logged is more specific.
Asset Property Placeholders
In the task, you can use placeholders for Asset Properties. You can access these by clicking on the small ChekRite symbol inside the task pane. If you insert a placeholder for an asset property, when the checklist is being displayed the value of the asset property for that asset will be inserted in the text of the task.
As an example, suppose you had an asset property for the serial number for the asset. You can use the asset property placeholder to insert it into the task. So it might read "The recorded serial number for this asset is <serial_number>. Is this correct?" The system will automatically put the value of the asset property called Serial Number in this space. If no value exists it will be replaced with <serial number not set>. The user can compare this value to the value on the asset and if it is not correct can populate the correct value using Extra Info.
Component Codes
This field enables you to categorise checks if required. This feature is helpful for reporting as it allows different checks relevant to a singular component to be grouped together. To use the example of wheels again, hopefully you have taken our advice and structured your checklist to have separate checks for each wheel. This is great for the user as well as for gaining that extra level of detail about any issue found. By using the component code feature to group the wheel checks together, this flow also becomes helpful for reporting and analysing the data captured.
Component Codes are loaded through the Tables & Items section. Please feel to reach out to ChekRite if you need help with this.
Response Type
The Response Type field is another mandatory field. Its purpose is to allocate the type of response to the question, such as presenting the user with yes/no buttons or with a gauge.
Understanding which response types will trigger Extra Info and sub-checks is also important. Click on the drop-down menu and you will be presented with a choice of default ChekRite standard response types. These appear in bold text; any which are unbolded have been customised for your company.
Standard response types are listed in the following table. The Exception column lists the button for each response type that if pressed will trigger any ‘Extra Info’ options attached to the check (eg. Photo, Sub-Checks, or Numeric input) and include the details captured within the automated Inspection Exception Report.
RESPONSE TYPE | EXAMPLE | EXCEPTION |
Pass / Fail | “Inspect to ensure free from damage.” | Fail |
Pass / Fail / Fix | As above. But ‘Fix’ used in context where Fail is rectified. | Fail / Fix |
Pass / Fail / Caution | As above. But ‘Caution’ used where issue is close to a Fail. | Fail / Caution |
Yes / No | “Is the machine isolated?” | No |
No / Yes | “Is the isolator damaged?” | Yes |
On / Off | “What is the status of the isolator?” | Off |
Step | “Isolate the machine.” | NA† |
No-State Gauge | A gauge without a fail state. This is used for things like a fuel gauge or rating something out of 10. | NA† |
2-State Gauge | A gauge with 2 levels where you can either have too little or the right amount. An example is coolant level. | Bottom |
3-State Gauge | A gauge with 3 levels often used for things like fluids where you can have too much or too little. An example is oil level. | Bottom & Top |
Signature | When physical signature required. | NA† |
Hour Meter | Updates the hour meter on the asset record. There is validation to ensure a valid value is entered. | NA† |
Odometer | Updates the odometer on the asset record. There is validation to ensure a valid value is entered. | NA† |
Touchpoint | Scan a QR code based "touchpoint" to verify that you are at that specific location. Often these touchpoints are placed around buildings or vehicles. | NA† |
Prerequisite | When you need to attach evidence of another completed inspection. e.g. select the Take 5 you completed before starting this inspection. | NA† |
Quiz | Multiple choice quiz answers often used for inductions or verifications of competency. | NA† |
†Extra Info will be triggered if it exists and any Extra Info captured will be included on the Exception Report. If there is no Extra Info this will not appear on the Exception Report.
Unless customised, responses with a “Pass” status will not trigger sub-checks or extra information.
As well as these pre-set responses, you can create your own customised controls for allocation to specific checks within your checklist.
Setting Up the Structure of Your Checklist
Now it's time to set up the structure that forms the backbone of your checklist and establishes the flow.
Group Title
A Group Title is essentially a folder in which questions that fit together are filed. Depending on the complexity of your checklist, you may or may not wish to group certain questions under the one title.
To add a group title:
- Go to Checklists > Questions > General.
- Click New beneath the question list panel.
- Select Group Title from the drop-down menu.
- Enter the title into the Title field.
- Tab or click out of the field for the title to appear in the questions list panel.
Question
This sets up the General page to capture all details of the task the users of your checklist are required to undertake.
To add a question:
- Go to Checklists > Questions > General.
- Click New beneath the question list panel and select Question from the drop-down menu.
- Enter the proposed question title for the task being created in the Search field.
- If the question already exists (and is an exact match with your requirements), then select it and the question is automatically added to your checklist. Voila! No more to do here. Just move on to creating your next question.
- If the question does not already exist, select Add New Question (which appears in red font colour) from the drop-down menu.
- Enter the name of the question in the Question field.
- Enter what task the user is to perform in the Task field.
- Select the Response Type from the drop-down menu.
- Complete the Extra Info and Sub-Checks tabs as required as per the following instructions.
- To add another question, de-select the just-added question by clicking off the question in the questions list panel. This clears the fields within the General tab.
- Re-commence the “search” process for adding a new question. If you do not de-select the current question in the questions list panel and press the New button before re-commencing the search process, the next question will be tiered beneath the previously selected question. If this happens, use the green/white arrows beneath the questions list panel to correctly position/tier questions or click and drag it to the right place.
To reorganise the sequence and tiering of a checklist either drag and drop the questions into the desired order or use the arrows at the bottom of the list of questions.
Condition
This enables you to skip over certain questions depending upon the user’s responses. For instance, an additional set of questions may need to be answered if the user identifies a certain issue and not if they don't.
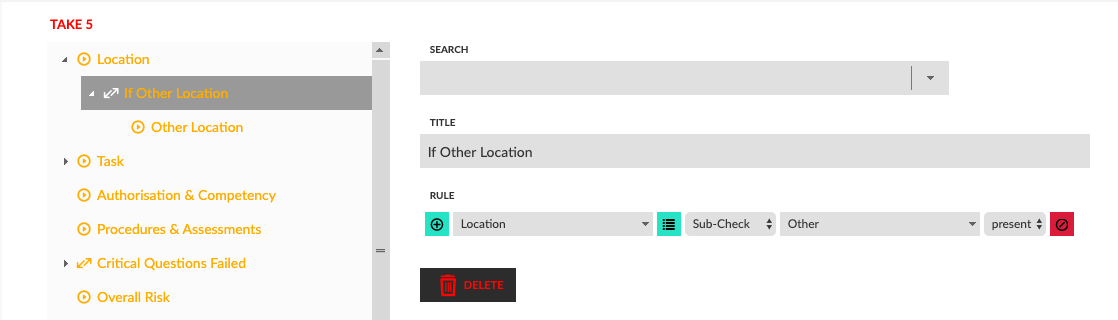
To build a condition into a checklist:
- Select Condition from the New drop-down menu.
- Enter the name of the condition in the Title field.
- Build out the rule that will decide whether or not the nested questions will be presented
- Add additional questions underneath the condition (and indented)
In the example above, we are looking at the question that says Location. The rule says to look at that question and then look to see if the user selected the sub-check called Other. If they did, the expression will evaluate to true and the question underneath (and indented) called Other Location will be shown. In this case the question asks them to leave an audio message describing the other location. If they don't select the sub-check called Other, the expression will evaluate to false and they will skip to the next question called Task.
Repeatable Block (or loops)
The Repeatable Block feature enables a set of questions within a checklist (or even an entire checklist) to be repeated multiple times as part of the one checklist submission. The number of times might be pre-known, or dependent upon the result of a check, or continuous until the user decides. Within ChekRite it is possible to build looping conditions to accommodate all these scenarios. This is a useful feature for daily logs, production tallies, or inspections on assets with many similar components such as buildings (rooms) and trains (carriages).
Fixed Repetition Loops
Fixed repetition loops mean that there will always be a pre-determined number of times that the checklist loops through the same group of questions.
To build a fixed repetition loop:
- Select Repeatable Block from the New drop-down menu.
- Enter the name of the loop in the Title field.
- Select Fixed Repetitions Count from the Loop Type drop-down menu.
- Type in the number of times to repeat or use the up and down arrows in the Repetitions Count field to select the number of repetitions.
- Add the questions to loop through indented underneath the Repeatable Block item.
Up to Entered Value Loops
Up to Entered Value means that the user is able to set a value at the start of the checklist for the number of times a loop will be cycled. This allows the length of the same checklist to be varied each time.
To build an entered value loop:
- Add the question to loop through. Select Numeric from the Type drop-down menu and tick Mandatory on the Extra Info tab to allow the user to enter the number of times this question will loop.
- Select Repeatable Block from the New drop-down menu.
- Enter the name of the loop in the Title field.
- Select Up to Entered Value from the Loop Type drop-down menu.
- Build the rules for the loop. The loop rule needs to be based on information contained in a question prior to a loop.
- Add the questions that will form the content of the loop.
Infinite Loop
An Infinite Loop must include a break condition that allows the user to decide on-the-go to continue with another loop cycle or to conclude the process. Alternatively, the loop break condition might be based on other rules within the data capture where the break is not directly determined by the user.
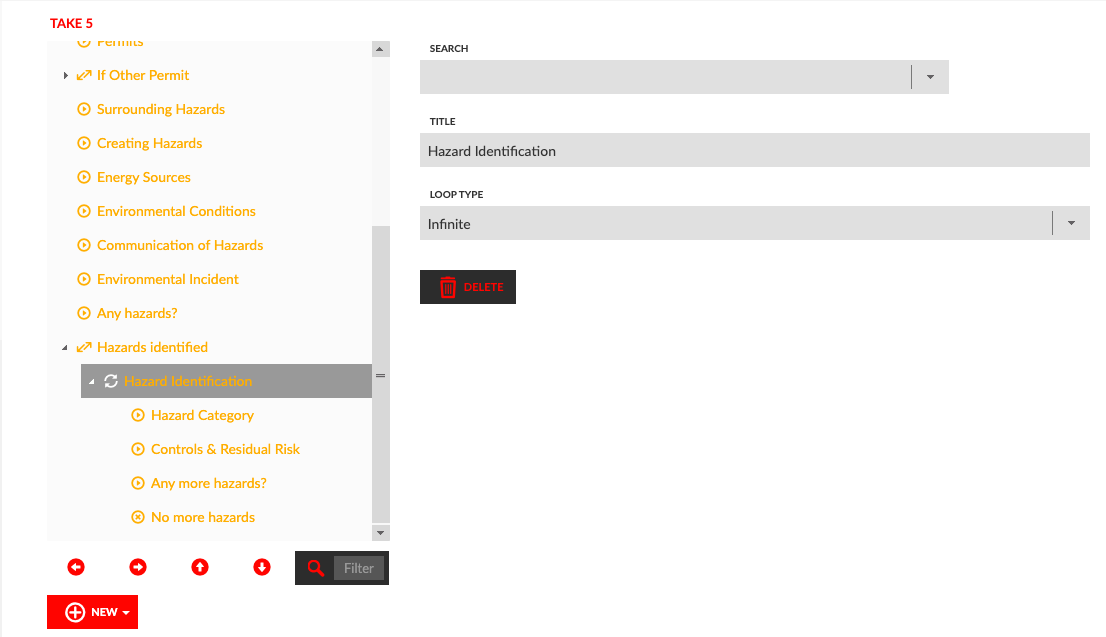
To build an infinite loop with Break condition:
- Select Repeatable Block from the New drop-down menu.
- Enter the name of the loop in the Title field
- Select Infinite from the Loop Type drop-down menu.
- Add the questions that will form the content of the loop nested in under the repeatable block.
- Create a question that the break rule will be based on. However, the break rule for an Infinite Loop can also be based on other data already captured.
- Create the Break Loop. Select Repeatable Block from the New drop-down menu. Name the title and select Break If from the Loop Type drop-down menu. Create the Break If rule.
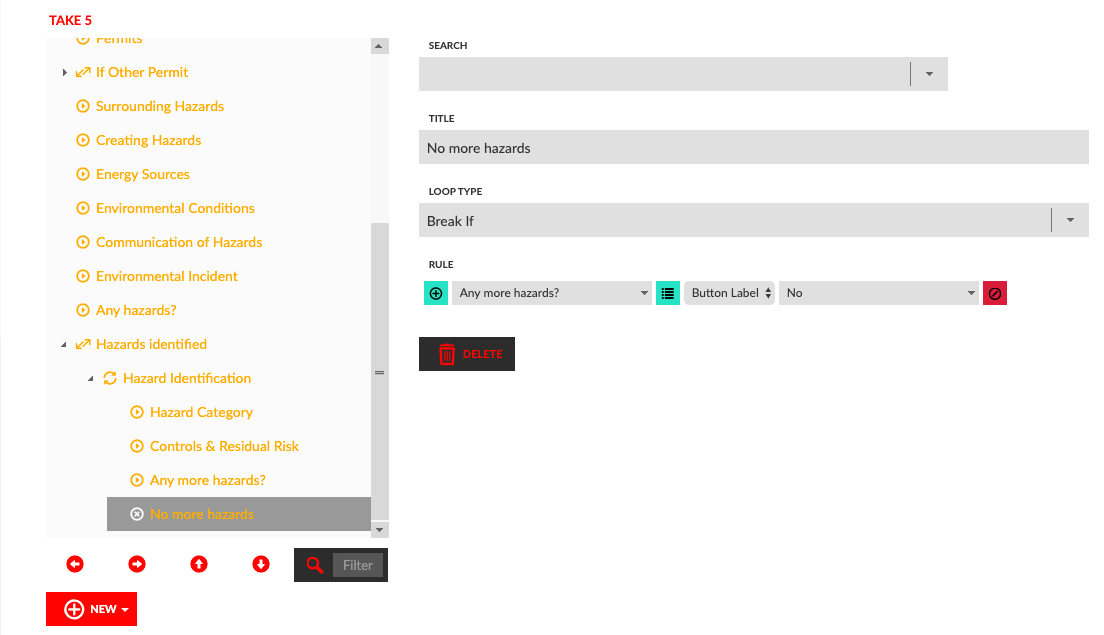
In the example above, we are trying to capture information on one or more hazards. For each hazard we have identified we will capture information until there are no more hazards. In this case, the loop is at the top called Hazard Identification. Then we have the 2 questions where we capture more information on the hazards. Then we have a question asking if there are any more hazards. Finally, we have a Break If condition that evaluates whether they push Yes or No for the question Any more hazards?.
If they push Yes, (there are more hazards) the break if condition will fail and the checklist will loop back up to the beginning of this repeatable block to gather the information on this next hazard. If they push No, (there are no more hazards), the break if condition will evaluate to true and the loop will exit.